Figured to share some progress so far. This helmet has a significant, very long story behind it. In short, the molds were acquired by Impact Props and was finally able to secure it...with the added functionality of it being in cold cast.
Cold cast for those who are unaware, is the quick and dirty alternate to real metal casting, which of course is very expensive and requires appropriate facilities and equipment. The prop builder's cold casting is still a bit pricier and a bit of a pain in the butt to work with, but the results can be amazing. How it's done is that, depending on the type of metal finish you're needing, you impregnate real metal powder into the resin during the mixing process, so that once the cast is produced, you can start to reveal the metallic sheen of the surface with a mix of high grit sandpaper and fine steel wool (0000 fine). The added bonus is that you can utilize aluminum polish to maximize the shine, as you'll see here
So to the helmet. I'm at the early stages of getting a chief suit produced (commissioning a foam suit build) but this won't be for a few months, but the helmet is a very important part of a costume. If it looks off or just not right, it can completely throw off the suit..so given the history of this helmet, it wasn't easy getting it, but I'm glad I finally did, for more reasons than one.
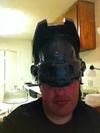
First thing. I'm a big guy, with a large head. A few years ago, I acquired one of Stony Props H4 helmets. While incredibly nice...it was not going to work out for me:

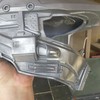
So only the full scale replicas will do. I was lucky enough to score one of the visors from Hector off of the facebook page. He had the same helmet as me and did exactly what I had planned to (using the per-existing visor as a form) and he finished it off making a very wonderfully accurate visor!
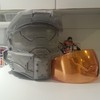
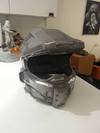
Before I began

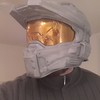
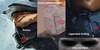
Initial test fit of the visor to check for gaps. had to remove some more on the inner nose (already done since these pics)
That's my beard FYI lol

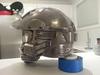
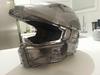
A bit of work after. I began working on the surface and this was the start of me using the aluminum polish. You can see the difference it makes

Now after a few hours of polish of getting almost every nook and cranny. It's very difficult to get it all considering the level of detail, but I'm not complaining


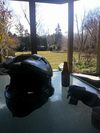
Lovely day

Next step is to start filler work and clean up of the surface details. Has quite a bit of air bubbles that formed in the cast, so gotta take care of it before I can move onto painting!
-TC
Cold cast for those who are unaware, is the quick and dirty alternate to real metal casting, which of course is very expensive and requires appropriate facilities and equipment. The prop builder's cold casting is still a bit pricier and a bit of a pain in the butt to work with, but the results can be amazing. How it's done is that, depending on the type of metal finish you're needing, you impregnate real metal powder into the resin during the mixing process, so that once the cast is produced, you can start to reveal the metallic sheen of the surface with a mix of high grit sandpaper and fine steel wool (0000 fine). The added bonus is that you can utilize aluminum polish to maximize the shine, as you'll see here
So to the helmet. I'm at the early stages of getting a chief suit produced (commissioning a foam suit build) but this won't be for a few months, but the helmet is a very important part of a costume. If it looks off or just not right, it can completely throw off the suit..so given the history of this helmet, it wasn't easy getting it, but I'm glad I finally did, for more reasons than one.
First thing. I'm a big guy, with a large head. A few years ago, I acquired one of Stony Props H4 helmets. While incredibly nice...it was not going to work out for me:
So only the full scale replicas will do. I was lucky enough to score one of the visors from Hector off of the facebook page. He had the same helmet as me and did exactly what I had planned to (using the per-existing visor as a form) and he finished it off making a very wonderfully accurate visor!
Before I began
Initial test fit of the visor to check for gaps. had to remove some more on the inner nose (already done since these pics)
That's my beard FYI lol
A bit of work after. I began working on the surface and this was the start of me using the aluminum polish. You can see the difference it makes
Now after a few hours of polish of getting almost every nook and cranny. It's very difficult to get it all considering the level of detail, but I'm not complaining
Lovely day
Next step is to start filler work and clean up of the surface details. Has quite a bit of air bubbles that formed in the cast, so gotta take care of it before I can move onto painting!
-TC