- Member DIN
- S555
Hello all! Figured it was time I got on here and posted ") My husband is Jobe Devian and has been posting his build here http://www.405th.com/f21/mkv-build-2-weeks-till-deadline-weathering-fitting-43857/
My husband is Jobe Devian and has been posting his build here http://www.405th.com/f21/mkv-build-2-weeks-till-deadline-weathering-fitting-43857/
Now it is my turn This is my first attempt at foam armour building. I have dabbled a tiny bit with making Jobe's sith boot/ shins that were customised from iron man boot and shin sections and some armour for my Jedi which has since been scrapped and remade since I know much more about what I am doing now!
Unlike Jobe, I have been building mine from foam rather than pep and resining, and I am building Reach armour with a few customised pieces. I haven't aimed to be 100% screen accurate, but to be fairly close I've hit a lot of road bumps and potholes along the way, either running into the challenges of making pieces fit (especially being female) or pep files that I just wasn't happy with. Some pieces are either half or entirely made from scratch from screenshots and gameplay.
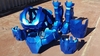
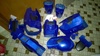
At current the pieces are done but awaiting sanding, sealing etc. To get the layering etc we have ended up using four different types and thicknesses of foams and it has worked out well most of it is built from that checkerplate patterned garage floor matting. This suit will be sprayed in a metallic blue- Vauxhall arden blue to be exact I work in an auto parts shop and can paint mix to any colour I want so I have chosen that one
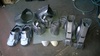
My pieces as of a few weeks ago:

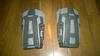
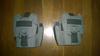
Bracers (I will eventually be adding a tactpad which holds my phone to these but that's for when I have more time!)


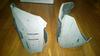
Shoulders with HAZOP add on


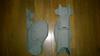
Thighs- these have been given a slight trim in places to fit better and make a little more accurate since this photo


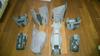
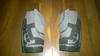
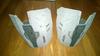
Shins with FJ/ para knees

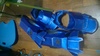
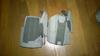
My belt/ codpiece, I am holding it as it will be velcroed shut at the front


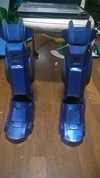
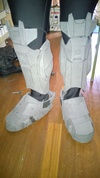
Boots- which just slot over my shoes. I have an injured ankle so I still have to be able to wear my good supportive footwear

temporary pistol and knife- we will build proper pistols and assault rifles later but for the sake of saving time we are using Nerf Megashot Magnus pistols. I sanded off all my warning labels and logos (except the nstrike badge on the grip as that was too much stuffing around). The gun still needs more layers of silver and weathering. Jobe carved the knife in sheath from two layers of interlocking foam mat glued together, then shaped with a Dremel and a piece of coat hangar wire shoved into it to hold it firmer (also was handy for the painting process!). It has since been painted all black, I'll soon be painting the small section of exposed blade silver and weathering the grip and sheath.

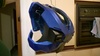
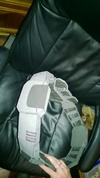
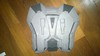
backpack

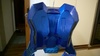
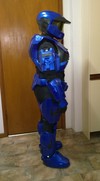
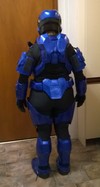
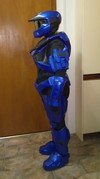
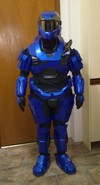
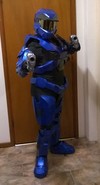
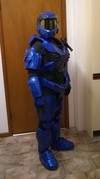
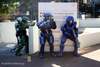
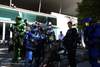
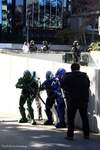
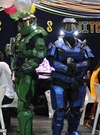
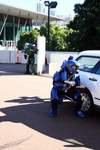
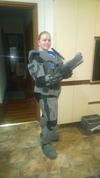
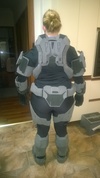
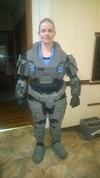
and tada! full suit minus the helmet! excuse any tape you see. The thighs will be attached with studs to the shorts I am wearing, which then go over the pants. The front and rear of the torso are attached at the top, and will buckle together plus Velcro at the bottom where the sides meet the backpack.


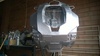
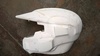
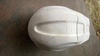
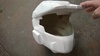
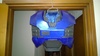
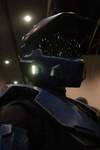
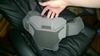
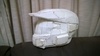
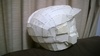
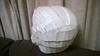
My helmet is the only thing that has been pepped, resined and slush cast in the same fashion as Jobe's as I wanted it to be a little sturdier. It is a Mk5 reach variant as I have always loved the peaked helmets over those without. I jumped into the deep end up unfolding the 3D model myself Due to deadlines it was put aside to be worked on later, this is a photo at its recent stage part way through body filling:

And just after it was pepped up


I will post updates as they happen
The plan eventually is also to add undersuit armour to the legs, torso etc but that is a build for later!
My husband is Jobe Devian and has been posting his build here http://www.405th.com/f21/mkv-build-2-weeks-till-deadline-weathering-fitting-43857/Now it is my turn
This is my first attempt at foam armour building. I have dabbled a tiny bit with making Jobe's sith boot/ shins that were customised from iron man boot and shin sections and some armour for my Jedi which has since been scrapped and remade since I know much more about what I am doing now!Unlike Jobe, I have been building mine from foam rather than pep and resining, and I am building Reach armour with a few customised pieces. I haven't aimed to be 100% screen accurate, but to be fairly close
I've hit a lot of road bumps and potholes along the way, either running into the challenges of making pieces fit (especially being female) or pep files that I just wasn't happy with. Some pieces are either half or entirely made from scratch from screenshots and gameplay.At current the pieces are done but awaiting sanding, sealing etc. To get the layering etc we have ended up using four different types and thicknesses of foams and it has worked out well
most of it is built from that checkerplate patterned garage floor matting. This suit will be sprayed in a metallic blue- Vauxhall arden blue to be exact I work in an auto parts shop and can paint mix to any colour I want so I have chosen that one My pieces as of a few weeks ago:
Bracers (I will eventually be adding a tactpad which holds my phone to these but that's for when I have more time!)
Shoulders with HAZOP add on
Thighs- these have been given a slight trim in places to fit better and make a little more accurate since this photo
Shins with FJ/ para knees
My belt/ codpiece, I am holding it as it will be velcroed shut at the front
Boots- which just slot over my shoes. I have an injured ankle so I still have to be able to wear my good supportive footwear
temporary pistol and knife- we will build proper pistols and assault rifles later but for the sake of saving time we are using Nerf Megashot Magnus pistols. I sanded off all my warning labels and logos (except the nstrike badge on the grip as that was too much stuffing around). The gun still needs more layers of silver and weathering. Jobe carved the knife in sheath from two layers of interlocking foam mat glued together, then shaped with a Dremel and a piece of coat hangar wire shoved into it to hold it firmer (also was handy for the painting process!). It has since been painted all black, I'll soon be painting the small section of exposed blade silver and weathering the grip and sheath.
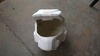
backpack
and tada! full suit minus the helmet! excuse any tape you see. The thighs will be attached with studs to the shorts I am wearing, which then go over the pants. The front and rear of the torso are attached at the top, and will buckle together plus Velcro at the bottom where the sides meet the backpack.
My helmet is the only thing that has been pepped, resined and slush cast in the same fashion as Jobe's as I wanted it to be a little sturdier. It is a Mk5 reach variant as I have always loved the peaked helmets over those without. I jumped into the deep end up unfolding the 3D model myself
Due to deadlines it was put aside to be worked on later, this is a photo at its recent stage part way through body filling:And just after it was pepped up
I will post updates as they happen
The plan eventually is also to add undersuit armour to the legs, torso etc but that is a build for later!
Attachments
-
 WP_20150309_001_zpslnypxhi3.jpg40.4 KB · Views: 151
 -
 WP_20150309_008_zpsthvt2cvk.jpg42.3 KB · Views: 162
 -
 WP_20150309_009_zps4r1wikhy.jpg37.6 KB · Views: 157
 -
 WP_20150309_004_zps9x90yt5u.jpg32.9 KB · Views: 163
 -
 WP_20150318_004_zps5eoue1is.jpg143.8 KB · Views: 163
 -
 WP_20150318_003_zpsy2gos9lq.jpg120.4 KB · Views: 151
 -
 WP_20150309_002_zpszsldbjgx.jpg29.1 KB · Views: 166
 -
 WP_20150309_007_zps7bi7tbnt.jpg37.4 KB · Views: 176
 -
 WP_20150309_006_zpss7nnwxmv.jpg39.5 KB · Views: 182
 -
 WP_20150309_005_zpsqizqcbf9.jpg36.2 KB · Views: 177
 -
 temporary_zpsan2pyg9y.jpg126.9 KB · Views: 161
 -
 temporary_zpsap8zzmsf.jpg130.9 KB · Views: 181
 -
 temporary_zpsh9oqfpo4.jpg124.4 KB · Views: 164
 -
 temporary_zpsjc6pripg.jpg128.4 KB · Views: 159
 -
 temporary_zps97be91c0.jpg89.1 KB · Views: 167
 -
 temporary_zpsbec89f16.jpg99.5 KB · Views: 164
 -
 WP_20150321_004_zpsu8veiirj.jpg154 KB · Views: 153
 -
 WP_20150318_005_zpscm2zzxx6.jpg131.2 KB · Views: 149
 -
 temporary_zpsd5a20fad.jpg106.3 KB · Views: 157
 -
 temporary_zps0ddfd984.jpg100.7 KB · Views: 159
 -
 temporary_zpsd7b86d84.jpg107.9 KB · Views: 146
 -
 temporary_zps0e1f42e3.jpg73.3 KB · Views: 150
 -
 temporary_zpsbe49b107.jpg103.4 KB · Views: 151