First Pepakura ODST Project

Status
Not open for further replies.

Enaver

New Member
Hello!

I was originally going to do a foam build, however I got a few hours in with the EVA foam and I decided it wasn't for me, rather than posting in a thread with the wrong title I thought I'd start afresh.

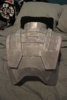
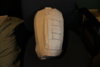
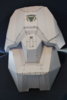
I started my Pepakura project last week, got the templates from this site for my ODST suit. I have literally been cutting and gluing every day I have had off from work, it is rather addictive and enjoyable with Netflix on the TV.

I have resined some of them already and I have realised the hard way that I should use more supports as some have slightly warped - I'd imagine that I can get past some small errors with the filler. Any suggestions on how to support it for when I use the resin? I have an abundance of EVA foam!

Overall progress:Latest update 17th May 2015

Helmet : Not started

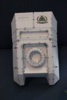
Chest core : Weathering stage
4.JPG1.jpg

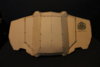
Back core : Fibre glassing stage
IMG_3573.jpgIMG_3574.jpg

Chest/belt accessories : Fibre glassing stage
IMG_3539.JPGIMG_3603.jpgIMG_3604.jpgIMG_3607.jpg

Waist plates : Bondo stage
IMG_3609.jpg

Shoulders : Bondo stage
IMG_3606.jpg

Biceps : Finished
IMG_3551.JPGIMG_3549.JPG

Gloves/Gauntlets : Pepakura stage

Thighs : Pepakura stage

Shins : Not started


Attachments

  • IMG_3525.JPG
    IMG_3525.JPG
    5.2 MB · Views: 304
  • IMG_3526.JPG
    IMG_3526.JPG
    5.9 MB · Views: 317
  • IMG_3528.JPG
    IMG_3528.JPG
    2.1 MB · Views: 311
  • IMG_3531.JPG
    IMG_3531.JPG
    2 MB · Views: 327
nice. i have downloaded some pep files too but where is the program to open them with? i guess i haven't been reading enough cuz i haven't found it.
 
Have used Bondo (well the UK equivalent) on the chest piece and the biceps. Here is what I have got so far:

IMG_3532.JPGIMG_3533.JPG

Chest piece I have gone over a few times and I think this is probably the best I am going to be able to get it for now - I am thinking of turning the remaining imperfections in to dents etc. The biceps pieces are not full done yet, need to go over them again to smooth out.

Three questions:

1. I am getting very slight cracks on the edge of the chest piece , stop this?
2. Is Bondo always going to be this fragile? It feels like all of this can easily snap and I can imagine the knees and shoulders being a problem if so.
3. Where can I get a sort of "UNMC" font?

Will be sure to update soon.
 
the thing with Bondo is that it is only as strong as what it is applied on. You said that you resined the pieces did you also fiberglass them? because that is where your strength will come from, if there is any give in the base it will crack the Bondo. For me when i was making my helmet I applied many thin coats of Bondo and nearly sanded all of it off on ever pass. you are looking to fill in all the valleys from the pep process so really once you see the edge of the paper you know you sanded far enough, then all you need is another light coat on top and it should be nice and smooth but still hold the detail because the previous layers were so thin
IMG_20141205_170231.jpg
Almost all of that Bondo will be sanded off so that only the low points are filled
IMG_20150312_184904.jpg
then repeat over and over
IMG_20150317_222049.jpg
for me the key is keep it thin and only go thick where you really need to, also make sure the pep is very strong on its own. I resined and had three layers of fiber glass on the inside and it stays nice and rigid and the Bondo never cracked.

I hope this helps a little bit and good luck on you armor you have a great start!
 
I have only resined them so far, didn't actually think to actually use the fiber glass sheets or material as well - will go out and get some tomorrow.

I am assuming some like this would do the trick?

Got a decent helmet there!
 
yup I got a large sheet of fiberglass cloth and cut it into little squares and then applied them
076308201289.jpg
this is what I used so anything similar will be fine for where you live. I probably used less than half of it for the helmet just to give you an idea of how much you will need.

and THANK YOU I am pretty happy with my helmet :)
 
Decided to have a little go with painting on the chest and here is what it looks like.

IMG_3539.JPG

Looks okay - quite a lot more indents and bumps than I thought. I have learnt a lot from the use of Bondo by doing this though, at the end I might redo it. Seems I was putting far to much on at first which was causing massive sanding problems.
 
Nice, smooth work so far! Looking extremely good.

Regarding the whole 'Bondo' issue - yep. First-time mistake for any builder is to simply slap it on like icing sugar and then complain about the effort required to sand it all off again. Small, thin layers are easier to work with, and it's far better to build something up to the level you need, rather than smack it all on at once, over-shoot when you're grinding it all off, and then need to re-apply.
 
Thanks Chernobyl!

I tried thinner layers today and its much better, nearly finished the bicep peices - just need to make them look worn. The result is much better.

IMG_3533.JPGIMG_3541.jpgIMG_3547.JPGIMG_3549.JPGIMG_3551.JPG

I am extremely happy with the results with this one.

Out of interest, do any coat the paint with a protective layer of any sort? And if so what do you use? I want to have a metallic look but not too glossy at the same time.
 
Very Nice work all the way around. The pep and Bondo skills are incredible. Double thumbs up to you
 
Thanks for the kind words ErMaC! Always nice to have compliments.

I have now added fibreglass to the back of the shoulder pieces and it has made a massive difference and this is just one layer. Its a bit messy and I used too much resin in places which resulted in pools, however I am assuming I will just sand certain over hanging bits off.

Added a picture just because! Doesn't show much but we all like pictures.

IMG_3552.JPG
 
Need some advice if possible. I have just started Hugh Holders chest core pep file, am I correct in thinking that this build is to be done in two sections? Front and back?
 
Thank you!

A little update, I have been working on the core chest piece and I so far have this - one coat of resin (coat messed up a little and went abit rubbery)

IMG_3557.JPGIMG_3560.JPG
 

Attachments

  • IMG_3558.JPG
    IMG_3558.JPG
    1.9 MB · Views: 367
Looks good! :D
Some awesome pep skills you got there, they rival my own! :D
I know all about the rubbery thing you're talking about. I typically add a tiny bit more hardener to the resin just in case. It does decrease the drying time, which also means you have to work faster, but it prevents the rubbery thing from happening.
 
I know all about the rubbery thing you're talking about. I typically add a tiny bit more hardener to the resin just in case. It does decrease the drying time, which also means you have to work faster, but it prevents the rubbery thing from happening.

Do you use the liquid or paste version?

It says to use between 1-3% of the liquid one. If your saying it happens when you don't add enough hardener then that's handy to know as I'll just add more to what I am doing by an extra %. It wasn't ideal tempature outside too which probably didn't help.
 
Do you use the liquid of paste version?

It says to use between 1-3% of the liquid one. If your saying it happens when you don't add enough hardener then that's handy to know as I'll just add more to what I am doing by an extra %. It wasn't ideal tempature outside too which probably didn't help.

I'm sorry? The paste is for the bondo, the liquid hardener is for the polyester resin... You can use both for either thing, assuming what you have over there is the same as the bondo brand stuff over here. But, personally, I wouldn't mix the polyester hardener with the body filler stuff and vice versa. The temperature is something you also need to factor in when mixing the hardener with the resin/body filler. The resin will get warm, but no to dangerous levels. You could, in theory, do glassing at zero degrees Celsius (32 degrees Fahrenheit).
 
Status
Not open for further replies.
Back
Top