You are using an out of date browser. It may not display this or other websites correctly.
You should upgrade or use an alternative browser.
You should upgrade or use an alternative browser.
Pipkin O.D.S.T Hybrid Wip
- Thread starter BPipkin
- Start date
- Status
- Not open for further replies.
Love the unique, thats the same way my mind thinks")
So apparently my rubber truck clips were not up to par so I searched a little on the inter-web and found a set of cast ones. Here's the link if anyone needs a set: https://www.etsy.com/listing/234644582/cosplay-props-cast-kit-odst-buckles

I also dug up a set of pep files for the thigh armor from the halo 4 odst. Why? Because in my opinion they look a little better than the originals. Only thing is I have to modify them slightly because they are foam files.

My jacket also came in today and i have started the process of modifying it to look more like the odst chest core. I will post some pics later.
I also dug up a set of pep files for the thigh armor from the halo 4 odst. Why? Because in my opinion they look a little better than the originals. Only thing is I have to modify them slightly because they are foam files.
My jacket also came in today and i have started the process of modifying it to look more like the odst chest core. I will post some pics later.
So it Begins again..... After the first set was destroyed I have started to remake the lower chest assets with some slight modifications to the original design.
.JPG")
I admit they are a little rough in a few spots, but bondo and spot putty tends to work miracles. Plus since I forgot to add this earlier here is the under-suit now permanently attached to the chest plate!
.JPG")
Steely eyed Spartans may also notice some details have been added as well.
I admit they are a little rough in a few spots, but bondo and spot putty tends to work miracles. Plus since I forgot to add this earlier here is the under-suit now permanently attached to the chest plate!
Steely eyed Spartans may also notice some details have been added as well.
So I admit this isn't much of an update. Lately I've been experimenting with foam. I have never really used it before so Thos is more of an experiment. I attempted to make the upper portion of the left shoulder along with some straps for the chestplate. I'm not really happy with the quality of my foam work on the shoulder so far and will probably have to try some more eperiments before I actually use a pice for the suit. The straps came out ok though.

Heres a closer look at the shoulder it's got gaps and isn't really smooth so plus the detailing is completely wrong.

Heres a closer look at the shoulder it's got gaps and isn't really smooth so plus the detailing is completely wrong.
- Member DIN
- S713
WOW. I have to say I'm VERY impressed with the work you did so far! It looks stunning and I really really hope you'll continue! O_O
Also... Well, I wish you good luck with foam. I tried foam first before I dumped it for paper... Way better to work with... but good luck!
Also... Well, I wish you good luck with foam. I tried foam first before I dumped it for paper... Way better to work with... but good luck!
Thanks! I've pretty much scrapped the foam as it is not my forte. I've been working on and off waiting to get a large amount done before my next update hopefully will be in the next few weeks. Im also waiting on some materials I ordered but hope to have them soon.WOW. I have to say I'm VERY impressed with the work you did so far! It looks stunning and I really really hope you'll continue! O_O
Also... Well, I wish you good luck with foam. I tried foam first before I dumped it for paper... Way better to work with... but good luck!
So my boomco UNSC Smg came in today and I've already ripped it apart and started the process of making it a silenced smg!

I have two giant holes to fill and the paper is just to give me an idea of how long the supressor has to be. So far I'm thinking about making it ten inches from the end of the muzzle.
I have two giant holes to fill and the paper is just to give me an idea of how long the supressor has to be. So far I'm thinking about making it ten inches from the end of the muzzle.
Attachments

Well guys after a month of waitng my truck clips finally came! I wish I had more but until the Georgia stops experiencing 4 seasons every two days all outdoor activities have been postponed. Which is driving a me bit crazy because I am ready to start some glassing and have parts I want to paint. With that being said here is the the new stuff. I also apologize in advance for accuracy lovers because if you haven't already notice that's something I'm not really concerned about. Lol anyways....

The reflective red is just to make the black clip pop from the black background.

Almost forgot about the neck ring which is a cut up plastic bowl with buckles and strapping. *Note its aright fit but I still have plent of room to breathe and turn my head.

Here is the straps from the back the gap in the collar will be filled with some black fabric later to make it look as if it is a solid vacuum suit. The straps are just hot glued to the back of the motorcycle jacket . It's a tricky to get in and I might have to rethink this later. It almost seemed like I was going to tear my nose off. However once inside my movement is not very restricted. Also most of this will never be seen as an ODST rucksack will be attached to it.
The reflective red is just to make the black clip pop from the black background.
Almost forgot about the neck ring which is a cut up plastic bowl with buckles and strapping. *Note its aright fit but I still have plent of room to breathe and turn my head.
Here is the straps from the back the gap in the collar will be filled with some black fabric later to make it look as if it is a solid vacuum suit. The straps are just hot glued to the back of the motorcycle jacket . It's a tricky to get in and I might have to rethink this later. It almost seemed like I was going to tear my nose off. However once inside my movement is not very restricted. Also most of this will never be seen as an ODST rucksack will be attached to it.
- Member DIN
- S713
I don't know what you mean isn't accurate. I love how practical it is O.O
And damn, it looks GREAT! I really can't wait to see more progress
And damn, it looks GREAT! I really can't wait to see more progress
Thanks! Practicality was the goal.I don't know what you mean isn't accurate. I love how practical it is O.O
And damn, it looks GREAT! I really can't wait to see more progress
Also sorry about the confusion on the accuracy bit. To answer your question the truck clips are the wrong style to be used with the legacy effects breastplate.


SGSRTcameron
Member
Whistle, looks sick! puts my shambled together ODST to shame! and that gun, oh how I want it.
I may be the King of Necro-Post but at least this is a good one. For the pass few months I have been consumed by..... the entire Destiny saga and of course college. However the last few weeks I've been busy contemplating what to do with the ODST build. So that being said I have searched for new inspiration, and the will to finish what I started. I no longer can say that accuracy is going to be a concern because at this point I honestly have no clue what kind of monstrosity I am creating. As all my original plans have been scrapped, as well as some of my original design aspects. So if you're looking for a good example of what is now officially being dubbed as an Outer Rim Colony ODST then you've come to the right place. If anyone ask "What did you do to my armor? My answer is fairly simple "Some minor Modifications."
So here's whats new:


Using foam templates that I got from the 405 archive I built a set of halo reach thigh attachment plates seen as standard issue for Marines and ODSTs of that era. The red lens is just leftover reflective strapping behind a piece of clear plastic. No leds here as my current and only source is too expensive. The magnum is bolted directly to the thigh plate through the screws in the grip. washers are placed in between layers to prevent the heavy resin weapon from tearing the bolts through. Strapping is used to hold the plates in place which attach directly to the chest piece. I'm actually happy these turned out the way they did since this is the first time ive been successful with foam.


Sean Bradley's ODST backpack kit was finished ant mounted to the motorcycle riding gear with bolts and wing nuts. Note that it has also been modified slightly to fit with my ODSt's design. It also was made to appear that it has extensive wear and tear along with crude repairs.

Rather than going camo I opted for a black undersuit that is a loose fit. The pants have a mesh layer then a solid boot. The shirt is mostly hidden by the motorcyle riding gear. It just hides exposed portions. No need to be fancy here as most of the odst undersuit is covered by armor.


For the gauntlets I'm currently experimenting with soft armor variants similar to what is seen on the "Bullfrogs" of Reach. These sleeves are my first attempt, and I'm currently on the fence about using them. The gloves however are going to be used.

Also made some new templates for the shoulders based off of a sketch that I saw. These will be used with foam if they work... I'm on at least my forth attempt with making the shoulders trying multiple designs. These are based from the Legacy effects style ODST which is still my personal favorite.
So here's whats new:
Using foam templates that I got from the 405 archive I built a set of halo reach thigh attachment plates seen as standard issue for Marines and ODSTs of that era. The red lens is just leftover reflective strapping behind a piece of clear plastic. No leds here as my current and only source is too expensive. The magnum is bolted directly to the thigh plate through the screws in the grip. washers are placed in between layers to prevent the heavy resin weapon from tearing the bolts through. Strapping is used to hold the plates in place which attach directly to the chest piece. I'm actually happy these turned out the way they did since this is the first time ive been successful with foam.
Sean Bradley's ODST backpack kit was finished ant mounted to the motorcycle riding gear with bolts and wing nuts. Note that it has also been modified slightly to fit with my ODSt's design. It also was made to appear that it has extensive wear and tear along with crude repairs.
Rather than going camo I opted for a black undersuit that is a loose fit. The pants have a mesh layer then a solid boot. The shirt is mostly hidden by the motorcyle riding gear. It just hides exposed portions. No need to be fancy here as most of the odst undersuit is covered by armor.
For the gauntlets I'm currently experimenting with soft armor variants similar to what is seen on the "Bullfrogs" of Reach. These sleeves are my first attempt, and I'm currently on the fence about using them. The gloves however are going to be used.
Also made some new templates for the shoulders based off of a sketch that I saw. These will be used with foam if they work... I'm on at least my forth attempt with making the shoulders trying multiple designs. These are based from the Legacy effects style ODST which is still my personal favorite.


Not sure if anyone will want these but here are scanned copies of the foam templates that I have made so far. Sorry no instructions included as they are just pencil sketches.

Stomach plate

Legacy Style Shoulder

Reach Marine/ Odst Shin
Also finished painting shoulders & shins, plus made both stomach plates this afternoon.
.JPG")
.JPG")
Note: I have removed the you're next from the back of the helmet.
Stomach plate
Legacy Style Shoulder
Reach Marine/ Odst Shin
Also finished painting shoulders & shins, plus made both stomach plates this afternoon.
Note: I have removed the you're next from the back of the helmet.
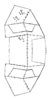
So after careful consideration the current shins and boot covers have been placed in file 13. I've spent the day re designing my templates, and hopefully these turn out better. Also since I don't mind sharing here are my new shin knee and boot templates all will work with any halo reach trooper or marine build.


The calf is slit in two between the front and back half.

The shin is much wider than the original, and fits the calf better.
boot cover currently being edited design did not account for folding gaps.

shin detail under boot cover
The calf is slit in two between the front and back half.
The shin is much wider than the original, and fits the calf better.
boot cover currently being edited design did not account for folding gaps.
shin detail under boot cover
Attachments
- Member DIN
- S757
For starters I guess I need to apologize for letting my thread die. Over the past few months I have moved and been going to college so it has taken its toll on the amount of progress I have made. Not to mention moving resulted in the destruction of a number of the torso assets which has set me back even more. The good news is I'm back in action now, progress may be slow but I hope to keep up with more frequent updates.
For the first round of new stuff is the completed belt and crotch plate along with a slight modification to the helmets main emblem. Enjoy!
View attachment 19286
As you can see I no longer have the side plates for the stomach and the hip plates were crushed as well.Below is the finished belt buckle.
View attachment 19287
Followed by the crotch plate. With holes to run the straps through.
View attachment 19288
Last but not least is the new angel of death emblem on the front of the helmet. This was achieved with a vinyl skull placed over the cut down spartan logo.
View attachment 19289
And some added detail from the WETA Odst
View attachment 19609
I'm really digging the decal on that helmet. It's stuff like that really pulls ODST armor together.
- Status
- Not open for further replies.
Similar threads
- Replies
- 16
- Views
- 1,118