Pipkin O.D.S.T Hybrid Wip

Status
Not open for further replies.

BPipkin

Jr Member
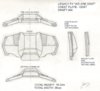
A ODST inspired armor build combining elements from different versions of Odst armor. Variants include Dutch Style helmet. Live action trailer chest and stomach plates. Weta inspired pieces, and a lot of custom touches. Armor is a hybrid of foam and fiberglass mainly because I got tired of cutting out paper and smelling like fiberglass resin.

Helmet: Dutch Variant - purchased from sean bradley
chest plate- We are Odst Trailer variant, it's been so long I don't remeber who I got the file from....

Chest Plate- Legacy Effects Style Chest Plate From We Are ODST
Stomach Plate- Modified from Kirrou Odst game accurate Pep files
Rib Plates- Deleted
Side Plates - custom
Belt- Kirrou Pep Files
Core- Armored Motorcycle Jacket
Hip Plate- Deleted
Shins- custom foam template
Boot- Reach
Gauntlet- WETA Mod
knee-Reach marine
Thigh- Reach marine
Shoulders- custom Legacy Style Foam
Backpack-Purchased From Sean Bradley
fanny pack- heavily altered pep file

Weapon Magnum Halo Reach Standard Issue Not Socom --- Why because I already have that prop

Halo 5 Boomco Smg coversin to silenced Done_but deleted from this suit

Overall Status- Done!
image.jpg image.jpg image.jpg image.jpg
 

Attachments

  • image.jpg
    image.jpg
    192.3 KB · Views: 528
  • IMG_0379.JPG
    IMG_0379.JPG
    1.2 MB · Views: 551
image.jpg
For starters I picked up one of Sean Bradley's amazing Dutch helmets to give me a good foundation to begin my build. Plus this allows me to focus my efforts on the rest of the suit without having to worry about messing up on the helmet. Which in my opinion is the most important part.
image.jpg
After a quick removal excess from the mold I cut out the visor and prepped the helmet for paint. This will be done later as it has a few air bubbles that needs to be fixed but overall I was very pleased with the overall quality.
 
image.jpg
Here are the pieces that I've already got roughed out in card stock. The truck clips that are sitting under the chest plate are made from a rubber commercial floor matt that I found in a dumpster. So yes I did some dumpster diving :D
What ever it takes to get the job done!
 
image.jpg
I got bored one day so I went ahead and started to design the paint scheme for the suit the chest plate has been fiberglassed bondoed and has black automotive high build primer sprayed on it. At this point note that I'm just catching up to the present on what I've acutally done as this was taken a few months ago. Also if you look close you can see the truck clip in the upper corner. They are actually functional as the rubber material is fairly robust.
 
View attachment 11547
Here is the current state of my build. As you can see the helmet and chest plate is fully painted the belt buckle is built and painted as well as the rib gaurds. The side plates are just kind of stuck up their for reference one is glassed the other is in primer. It is sitting on some motorcycle riding gear which is acting as a stand until I get the foam core built. Most of the straps have been cut and removed from a half dozen or so old backpacks that I had stuffed in the closet. The helmet is also lighted with some cheap LEDs I purchsed from the dollar tree. Although it looks cool it makes it impossible to see out of the visor so that will have to be used just in photo ops.
View attachment 11548
I was also suprised with a gift of a Halo Reach era magnum. No clue where it came from or who originally built it but it's a pretty rough cast will have to do some work to it to make it slightly more presentable. But for now that wil be on hold as school requires most my money and time. Oh the joys of college.
 
That is the best ODST build i've seen! (Please don't take this very seriously, i've only seen three.) OVER 9000 thumbs up! (Yes. I just did that.)
 
Since apparently my Ipad doesn't like to upload pictures I will try to post them from my pc. For starters here is a few of the completed pieces that I have. I apologize for the grainy quality, it is raining today so i will not be going outside to take pictures.
They are as follows: The Helmet.- Which as proper to credit Sean Bradley for as this is his kit. I can build stuff however since I'm trying to rapidly construct this suit in the short span between semesters I opted for a pre-fabbed helmet.
IMG_1401.JPG
IMG_1412.JPG
Note: This is actually a modified Spartan logo. I'm not really going for accuracy with this suit,but instead more of a concept style build.
IMG_1415.JPG
Hers is a shot of the Led book lights that I purchased from the dollar tree. I have found these to be a cheap and easy alternative to actually wiring in a led, battery pack, and switch. They give a neat glowing effect to the visor similar to that of what is seen in the movie Prometheus.
 
For the chest Plate I decided on the we are odst live action trailer style.
odstref.jpg
It took me some digging but I finally found a descent model to use. That model was the TarkovODSTchestV1.
Here is the picture of the finished product front and back.
IMG_1411.JPG
For those who are wondering the two black stripes are based off my emblem from the game they are not rank stripes. Also the BP01 is my first and last initial plus since this is my first attempt at a full suit I put 01.
IMG_1416.JPG
Note I don't know if my methods are considered the best way to build the things but i find it works best for me. For those that want to know the supports are in fact drinking straws and cardboard strips. I found that hot gluing these in before glassing that I virtually eliminated all my warping issues. Its not very pretty but this will never be seen, plus it allows for a light but rigid support system to attach straps too.
The stomach plate below the chest is modified from kirrou's game accurate ODST Pep file. Basically all I did was build his design first, then extended the top and sides a bit to give it that nice crown like shape. Due to being a perfectionist I couldn't stand the circular structure having chunky squared off edges so I pulled the plastic roll from an empty scotch tape dispenser and glued it in its place.
IMG_1421.JPG
 
For the rib plates,belt and I'm assuming this is called the COD piece. I used the files made by kirruo. For the COD piece or crotch plate i did however add two rectangular openings to allow for small straps to pass through. These parts are in various stages of completion from finished to just seeing its first few coats of filler.
However for those who want to know my finishing process usually goes like this:
After being glassed II typically sand off all the drips and brush strokes Then I use a combination of hot glue and small amounts of resin to fix any soft spots. Once that is done i spray with a light coat of primer and sand ti find all the areas i need to fix. then i just fill appropriately with thin layers of bondo or glazing putty until get the desired surface I want. On pieces that its hard for me to see I usually spray with a coat of primer. Once done I start by applying a high build primer followed by wet sanding then I spray it with basic matte black Walmart brand spray paint. This gives me a good base to start with. Once that is dry I pant with Krylon chrome paint which makes it look fairly horrible. Once this is dried I wet sand the part with 1000to 1500 grit with uneven pressure in one direction to give the look of weathered titanium. After that it can be painted over or in my case just left raw.
IMG_1408.JPG
For the nylon straps my poor backpack made a gracious sacrifice.
IMG_1417.JPG
I still need to fix divets and holes in the crotch plate, and i ran out of chrome paint for the belt buckle. so when college quits eating my money I shall buy more!!!!
Also Have some nice vinyls to use somewhere but that's a problem for another day.
IMG_1420.JPG
 
Interesting way of finishing your pieces... I guess you could call the piece over the crotch area a cod piece. Indeed your backpack did make a glorious sacrifice. Looks good! Can't wait to see what all this armor looks like when it's finished and on you or laid out on the floor or somethin. :D
 
Thanks! My methods are sort of derived from past learning experiences so I admit they are a bit unorthodox for costume building, but it's really the only way I have ever known how to do it. I've tried following in others footsteps before with tech forums and tutorials but that didn't really get me very far. So I decided that this time I would just doi it my way and at the current time I am fairly pleased with the results.
 
No problem always glad to help out! I understand the struggle it's killing me knowing I have stuff that I want and haven't got the funds yet to acquire, but that's just the breaks of creating awesomeness on a tight budget.
 
Status
Not open for further replies.
Back
Top