1st Build WandererTJ's Mjolnir Mk. V (Custom) - S-128 - [Hybrid Build] [Pic Heavy]

Status
Not open for further replies.
W0LF,

RE Q1: Both the 3D Models of the Ab Plate design and the Jackal Shield were done by me in SolidWorks, which I've used for about 5 years now.
I might not be able to model a perfect helmet or armor component from scratch, but when it comes to designs of mechanical things and things that have a lot of fairly easy to understand geometry, I can do those with ease. So designing a Jackal Shield isn't too hard for me.
I've been meaning to work on a functional Reach M6G, but every time I look at it I get frustrated because there is no way that the gun could actually fire based on its dimensions. At least in my opinion...
By "functional" I literally mean one that could fire bullets. If I do get around to it, I will leave the design without a firing pin (not that the slide has room for it anyways...).

For the Jackal Shield, I've been toying around with the design in my head for quite some time and I finally ended up sketching it down and starting planning it out the other day.
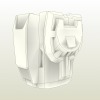
For the shape of the shield, I took the extracted model of it from Halo 4, converted it so that it would be compatible in SolidWorks and then proceeded to measure it so that I could remodel it.
Again, still not 100% sure on the size, but I definitely have the shape of the energy/plasma perfect.
Unfortunately, the extracted model lacked the central hub/shield emitter in the center, so I couldn't get any dimensions from it, but that turned out to be okay anyways, because Halo 4 uses a different design for the central hub that I'm not a super huge fan of. I definitely like the classic design from the previous games.
So in order to get the right scale for the central hub/shield emitter I took several reference images I've collected, and used them to measure out a ratio between the overall size of the shield to the width and height of the central hub, so it should be fairly proportional and accurate.
While modeling the details of the central hub/emitter, I've been referring to an art rendering done by Venerance. It hasn't turned out the same as his, but I thought his would be a good example of a good looking central hub while I work on my design.

Currently my main goal is to make this a DFA design. (Design-For-Assembly)
I would like the inner side of the hub to screw into the outer side of the hub and in doing so, hold all of the electronics together, as they will all have grooves for them to fit in so they aren't free-floating. Ideally, in the end, the parts would be 3D Printed, then cleaned up and cast into a harder and more solid plastic.

Right now I'm having issues with the fact that I'm not sure what components to use for the electronics. Without knowing their sizes, it is impossible for me to set the model up so that they all fit perfectly inside.

If you were referring to the 3D-Model of my Reach Spartan, I just extracted the model from the game. I don't know how to apply textures, so it is what it is. Never finished coloring all the polygons, so the boots and the forearms are a bit off.

RE Q2: As for my backstory, I did lots of background research into the Halo Universe and the Spartans and I sat down and marked out all of the important dates that I would need to know in order to make everything as cannon as possible. Then I just had fun with it. There are a few bits that I might change, but I sat down and worked on it until I was happy with it and I had a friend proofread it and criticize it as necessary so that I could improve it.
 
Last edited by a moderator:
Oh ok, yeah I meant the Spartan but I did learn a few things from reading all of it anyways. Yeah I was just curious cause I was gonna attempt to make/find a model of concept Jun for my build. You are quite the talented guy, thanks for responding fast. Can't wait to see what you come up with the shield! (I don't know if someone said this already but I bet you could use plexiglass for the plasma on the jackal shield, you could get the curve you want by heating it correctly, just like with the foam)
 
Oh and regarding the halo magnum, it has been proven that a real firearm of that gun would not be able to function as in the game due to the chambers size, but for a prop wise it may be able to launch a projectile by air (that's if you don't mind it shooting foam or another light projectile. If you do decide to try the airgun idea, a co2 portable bike pump makes for a great internal mech) thanks and good luck!
 
W0LF,

It may help you, it may not, but in a Model/Pepakura Request I made recently, I've added a few concept images from Reach (among other things as well), one of them in particular is an early Jun without it helmet.
I'm planning on attempting to make a Torso similar to the Mark V concepts they included for Reach, it's mostly similar, but it has some slight variations to it.
Maybe some of the images will help you out.
http://www.405th.com/showthread.php?t=13671&page=165&p=731630&viewfull=1#post731630

Also, idk if he has a thread here on the 405th, but there is a guy by the name of almightynabeshin on DeviantArt that has done a concept Mark V build.
Be sure to check out his shins in particular, you'll note that they are the same design as the concept of Jun that you have.

I'm probably going to stick to the standard shins, I will however have the above the biceps shoulder armor pieces that are on the concept but didn't make it to the final design. (They are not bicep attachments, they are shoulder attachments)


As for the Magnum, I would at least like to get the internal components moving, might do some rearranging of some of the buttons, idk.
I haven't ever designed a gun before, but I've been doing some research.
When I do get around to trying to design it, I'll probably end up making a new thread just for it.
 
Last edited by a moderator:
I'm kind of a fan of the kopis myself. Pretty close to a kukri , which we've seen in Reach.
 
Okay, in case you all haven't seen it, I've created a new thread for the props I am working on designing.
It is currently featuring the Jackal Shield, and I would love to hear some feedback about it.

You can view the thread here: WandererTJ's Halo Props & 3D Models


Vrogy,
Yeah, kopis/falcata are pretty cool!
I have a cuir bouilli (hardened leather armor) project in the works and I'm definitely hoping to learn how to forge some REAL swords in the process of the build, or at least have some custom swords based on personal designs built for me.
I'm SO happy to finally have a mannequin now. I've postponed my leather build for years now. Not having a mannequin sucked!

While I love the concept of forward curving blades, I'm unfortunately over critical of their aesthetics. It's hard to find one with just the right shape and curve to it, and when it is acceptable, the handle looks terrible lol.

Usually when I dress medieval, I use an eclectic style, so I've decided to possibly do a medieval time traveller (or something, idk) kind of theme with my blades as well.
Definitely planning on carrying a Hand-and-a-Half sword, a Jian, a Xiphos, a Kukri, and a Parrying Dagger.

I had not thought of making Emile's Kukri though, so thanks for reminding me of it.
Still leaning towards making a Sanghelli Assassination Energy Dagger though!

Long story short.... I've done a lot of sword fighting in the past, so I definitely thought that making a Hoplight-Themed Halo Spartan would be pretty cool.
It's a shame that we can't pick up the Jackal Shields in the game and maybe if I start a trend, 343 might make Halo 6 so that you can or maybe add it as a Social Playlist or something.

Sorry for the rambling/random assortment of thoughts!
 
Last edited by a moderator:
Biceps - Built and Detailed

Update Time!

Biceps - Built and Detailed
Continuing from my last Bicep images, this is my next set:

Build Photos:
From what I've noticed, most people stop around this level of detail:
attachment.php

Left Bicep, without details

But as usual, I wanted to try and capture everything as best as I could, so I took it a bit further....
attachment.php

Right Bicep, with details added

...and here's a few photos of both the Bicep and Forearm together, and how they move with one another.
attachment.php


Lastly, obviously I had to do a selfie with all my armor so far, so here it is:
attachment.php


(For full sized photos, be sure to check the thumbnails at the bottom of the post)

I still need to add the strap at the top, but that will be saved for another day, because I plan on incorporating it into the strapping of all my armor pieces as well as integrating the strap into the mounting of my shoulder attachments.


Model Used:

Reminder: I actually ended up using the templates in the file to derive new templates from which I used for my build.
Because of this, you will notice that I have eliminated certain seams from my original version of the bicep that I made, which has made this one turn out much cleaner.
I should also note, that on the underarm/armpit piece, I shortened it by 1.5'' on its upper edge and by 1.0'' on the bottom edge. Doing this has made it so that it fits extremely snugly. I actually don't necessarily need straps for these pieces as they stay where they are very well, but they tend to shift down about 0.5 - 1.0'' from where I want them to be.
I may scan all my template pieces eventually to show a little of what I ended up using.​

thumb-1036.png

http://www.405th.com/file-archive.php?do=download&downloadid=1036
Model by: ForgedReclaimer
Unfold (Foam) by: L3X BLU3R1V3R
Unfold Modified by: WandererTJ
Scaled to: WandererTJ​


Reference Images Used:
Ravarkian ShoulderReference.jpg
Credits: Ravarkian

Upper Arm - Female - Front (Forged Reclaimer).jpg Upper Arm - Female - Top 1 (Forged Reclaimer) - Copy.jpg Upper Arm  - Female - Back 1 (Forged Reclaimer).jpg Upper Arm - Female - Inside (Forged Reclaimer).jpg
Credits: Forged Reclaimer
(I had these rotated to be upright on my computer, but apparently the uploader was unhappy with that...)​

Okay, so this time around, I used A LOT more reference images, and I've decided that I will probably release .zip folders full of all the references I used once I've got them all gathered together and sorted out, so for now, please enjoy what I have above.
I have about 539 photos currently.
 

Attachments

  • Bicep v2 - Update 3.jpg
    Bicep v2 - Update 3.jpg
    2.2 MB · Views: 1,363
  • Bicep v2 - Update 4.jpg
    Bicep v2 - Update 4.jpg
    3 MB · Views: 1,404
  • Bicep v2 - Update 5.jpg
    Bicep v2 - Update 5.jpg
    2.1 MB · Views: 1,423
  • 20150611_210413.jpg
    20150611_210413.jpg
    504.9 KB · Views: 1,292
  • thumb-1036.png
    thumb-1036.png
    9 KB · Views: 293
Last edited by a moderator:
Great work, Wanderer TJ! I haven't tried using foam pep files before, but you seem to have it down to a science. Keep it up!
 
Handplates - Built and Detailed

Thanks Mstruvmgc! Thanks FlyinPhil! Love the support from you two!

Okay, got a lot of stuff to cover, will probably try to cover it across a few posts while I keep building.

First of all, I just uploaded this pack to the Archive: Halo Reach Game Assets - Base Armor (Mjolnir Mk.V)
Hopefully it will help some of you out, I've been using these models for reference for a few of my pieces. They are SUPER rough, but they kinda help.

With that said....


Update Time! :)

Handplates - Built and Detailed
So, as usual, this piece took me a practice run to make, and as usual, the first one turned out pretty bad (you can see it in the last frame of the progress pics), but the 2nd pass through turned out pretty great.
I think I might be relying a little too much on my Dremel now rather than making angled cuts with my scalpel, so these could be better, but I think they turned out pretty great. :)
I might revisit them at a later date in order to try and get clearer lines, but for now, I'm pretty pleased with myself.

Build Photos:
Completed Handplates:
attachment.php

Progress Photos (Steps):
So, this next image probably best details how I went about making these. I ended up making 3 templates derived from the pepakura unfold I made of the game model.
The 3 pieces are:
1) 5mm Piece Top (Bottom Right Template in Image)
2) 5mm Piece Bottom (Bottom Left Template in Image)
3) 12mm Piece (Top Template in Image)​
The Top and Bottom Pieces are used to indicate how I want to Dremel those edges.
attachment.php


attachment.php

(For full sized photos, be sure to check the thumbnails at the bottom of the post)

Guide to the Steps I took:
1) Due to the somewhat asymetrical model, I ended up using only 1 side of the pepakura pieces and simply mirrored one of the sides. I ended up selecting the side that would be closer to my body in regards to a Left Handplate.
2) From there, with the pieces I wanted to use, I devised/planned on how I wanted to go about shaping these oddly shaped pieces. So what I did, was I made several derived templates for how I was going to Dremel the shapes. The 1/2'' Puzzle Mat foam could have used a top and bottom template, but I had already kinda decided on how far in I wanted to angle the front edge.
3) Trace the Templates onto the Foam and Cut the Foam Shapes out using the derived templates I created.​
(Refer to: the Large Single Image Progress Photo (5mm Foam) as well as Frame #8 of the multi-image progress photo (1/2'' Foam))
4) In order to get the foam to bend to where it had a crease without a seam:
4.1) I took a Razor Blade, and I marked (using a pen) the tip I was cutting with to the depth that I wanted to cut to, for the 5mm foam, I wanted to at least consistently cut 4mm.
4.2) I marked lines on the backside of the foam for where I wanted the pieces to be creased on the front, and then I took the razor blade and I cut down those lines.
4.3) With the smooth cut complete, I folded the piece open on the cuts, and I used my rotary tool (Dremel) to add some internal angles. With the Dremel, you want to get as close to the outer edge as possible in order to get a good crease, but you also have to take care as to not cut through the outer surface with the Dremel.​
(Refer to: the multi-image Progress Photo - Frames 1, 2, 3, 4 (5mm Foam), and 7 (1/2'' Foam))
5) For the 5mm Foam, using the difference of the top and bottom templates, use the Dremel to carve an angle between the bottom edge and the lines inside the body created by the top template. For the 1/2'' Foam, draw a line halfway down the sides on the front, Dremel the angle from this line to the line that goes around the top surface.​
(Refer to: the multi-image Progress Photo - Frames 5 (5mm Foam), and 9 (1/2'' Foam))
6) Dremel the holes/indentions on the 5mm Foam​
(Refer to: the multi-image Progress Photo - Frames 6)
7) Glue/attach the top and bottom pieces
8) Cleanup inconsistencies between the bottom and top pieces using the Dremel
9) Create Detail lines matching the in-game texture on the top side of the 5mm foam
10) Done!​
(Refer to: the multi-image Progress Photo - Frames 10, and the Completed Image at the Top)


Model Used:

thumb-1038.png

http://www.405th.com/file-archive.php?do=download&downloadid=1038
Model by: Bungie
Extracted by: WandererTJ
Unfolded by: WandererTJ
Scaled to: WandererTJ​


Reference Images Used:
HandplateFront.jpg HandplateSide.jpg HandplateTop.jpg reach_10489855_FullHANDPLATE.jpg reach_10489857_FullHANDPLATE.jpg
Credits: Ruze789 (5)​
 

Attachments

  • IMG_20150619_013100.jpg
    IMG_20150619_013100.jpg
    645.1 KB · Views: 1,239
  • 20150616_185926.jpg
    20150616_185926.jpg
    2.4 MB · Views: 1,225
  • Handplate v2 - Progress Pics.jpg
    Handplate v2 - Progress Pics.jpg
    6 MB · Views: 1,242
  • thumb-1038.png
    thumb-1038.png
    9.7 KB · Views: 286
Last edited by a moderator:
Look who I found!
attachment.php
This is from a build party the other day, the guys in the back are really cool, I just met them, they've done some Assassin's Creed and Star Wars costumes.

If you look closely enough, you can see what I might be posting next ;)

Can anyone guess who Master Chief is?
Hint: He's a part of the 405th! ;)

EDIT:
Answer: It's no other than TheBradinator of Impact Props! :)
I'm in the bottom-right of the photo, ParagonProps is in the top-left, and Iknownothingcosplay is in the top-right, wearing Brad's Starlord helmet.
 

Attachments

  • Screenshot_2015-06-17-22-50-06-1.png
    Screenshot_2015-06-17-22-50-06-1.png
    720.2 KB · Views: 1,484
Last edited by a moderator:
Wasn't exactly sure how I wanted to make this next piece, so I just started modeling it in SolidWorks...
The only detail it is missing is the paint decal that goes over the curved blade.

The cuts I made into the curved blade/upper metal piece didn't turn out as well as I would have liked, but everything else is super accurate.

Model Downloadable on Grabcad:
large.png
Halo Reach Commando Shoulder - Modeled in SolidWorks by WandererTJ
 

Attachments

  • large.png
    large.png
    343.7 KB · Views: 202
Although I don't know much at all about Reach, your build is looking great so far! Also, thanks for the Under Armour link. I too was planning on the HeatGear moisture-wicking line for my kid's build - and being a smaller size knocks about $10 off the price. How breathable is the fabric?
 
Although I don't know much at all about Reach, your build is looking great so far! Also, thanks for the Under Armour link. I too was planning on the HeatGear moisture-wicking line for my kid's build - and being a smaller size knocks about $10 off the price. How breathable is the fabric?

Thanks! :D

I'd say it is pretty nice, but I also haven't tried going outside in it with a full costume on top. I've posed in the mirror with it on and moved around for an hour and I don't think I was ever hot enough to start sweating.
I wanted to make sure I got a longsleeve clothing line I knew was meant for being out in the heat and not many products offer that info besides Under Armour.
 
After 2 years I've got one full set of hand plates, forearms, and upper-arms/shoulders pepped and initial coat of resin. And you think you're slow? I envy the people who have the free time to get things built as quickly as they do. Anyway, take your time and do it right rather than fast - your costume will show the difference in the end.
 
Nooo!!! Not the dremel!! R.I.P le dremel, may it rest in the Valley of Fallen Tools.

Anywho, needless to say I'm incredibly jealous....and Robot, I think...what, about three-four years with absolutely nothing to show for it is definitely worse than only have stuff at initial resin stage.
Heck, you got that far so I'm sure you'll get it done no matter how long it takes.
 
After 2 years I've got one full set of hand plates, forearms, and upper-arms/shoulders pepped and initial coat of resin. And you think you're slow? I envy the people who have the free time to get things built as quickly as they do. Anyway, take your time and do it right rather than fast - your costume will show the difference in the end.

I actually have all the free time in the world thanks to the whole no job situation... :unsure
But it definitely have to step away at times and think about how I'm going to do the next part of something. I'm very meticulous.
I sometimes just stare at one thing for way longer than I probably should.

Anywho, needless to say I'm incredibly jealous....
Just wait... I have some really epic photos on their way ;)
I also have sad news, but I'll save that for later.

Heck, you got that far so I'm sure you'll get it done no matter how long it takes.
And I definitely will get this done, I'm actually thinking ahead as to what I'll be building next.... there is a list, a very long list.


Also, I think it's been long enough that I ought to just give away who all is in the picture above. See post above for the edit.
 
Status
Not open for further replies.
Back
Top