ODST Foam Build/First Build

Status
Not open for further replies.

Cptins8n087

Jr Member
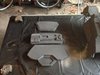
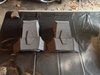
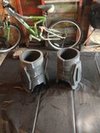
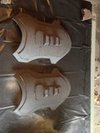
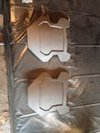
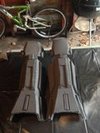
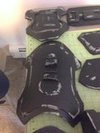
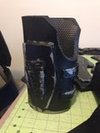
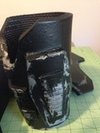
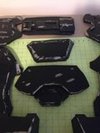
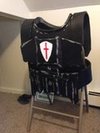
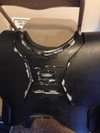
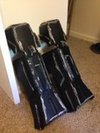
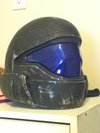
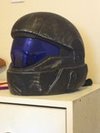
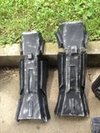
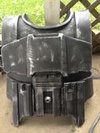
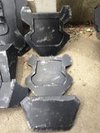
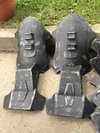
Hey all, I just finished my first build of ODST Foam Armour(pics to come). Had some general questions on how to do paint and battle damage and what everyone prefers. I have played around with the Vaseline and toothpaste method. besides dry brushing what other ways do you all prefer. any help would be great!
 
u can use a gray felt pen no washable and a Que tip to get the paint affect and some red or blue pant for blood of a covie or inne
 
thats who i followed for doing the actual build! lol i have been following him for about 2 years just finally got off my lazy butt and did it.

- - - Updated - - -

quick question as well how do you join a regiment. i live in michigan and i know we have a regiment but it will not let me post in there any special instructions?
 
here are some pics before sealant and paint

th_photos%20for%20405th%20016_zpskncrapl4.jpg

th_photos%20for%20405th%20015_zpsbqvgl8sq.jpg

th_photos%20for%20405th%20014_zpsvcfz3age.jpg

th_photos%20for%20405th%20013_zpsa905jhls.jpg

th_photos%20for%20405th%20012_zpsrvhpywpf.jpg

th_photos%20for%20405th%20011_zpswyi6pnvn.jpg

th_photos%20for%20405th%20010_zpswdsiqou6.jpg

th_photos%20for%20405th%20009_zpsnn6rc9w3.jpg
 

Attachments

  • th_photos%20for%20405th%20016_zpskncrapl4.jpg
    th_photos%20for%20405th%20016_zpskncrapl4.jpg
    6 KB · Views: 251
  • th_photos%20for%20405th%20015_zpsbqvgl8sq.jpg
    th_photos%20for%20405th%20015_zpsbqvgl8sq.jpg
    6.5 KB · Views: 265
  • th_photos%20for%20405th%20014_zpsvcfz3age.jpg
    th_photos%20for%20405th%20014_zpsvcfz3age.jpg
    5.7 KB · Views: 260
  • th_photos%20for%20405th%20013_zpsa905jhls.jpg
    th_photos%20for%20405th%20013_zpsa905jhls.jpg
    6.7 KB · Views: 264
  • th_photos%20for%20405th%20012_zpsrvhpywpf.jpg
    th_photos%20for%20405th%20012_zpsrvhpywpf.jpg
    5.6 KB · Views: 267
  • th_photos%20for%20405th%20011_zpswyi6pnvn.jpg
    th_photos%20for%20405th%20011_zpswyi6pnvn.jpg
    5.8 KB · Views: 249
  • th_photos%20for%20405th%20015_zpsbqvgl8sq.jpg
    th_photos%20for%20405th%20015_zpsbqvgl8sq.jpg
    6.5 KB · Views: 256
probably the angles, i followed DFT tutorial and what he calls the bevel or 45 degree angles. did all of those probably about 3 to 4 times each before i was actually satisfied with the way they looked
other than that just the templates
 
oh and the face that i am stocky and have huge shoulders and calf's so when it came to doing the 90 degree angles for the shins and shoulders had to alter them to make them look ok on my body. curse being 5'7" and like 220. lol
 
alright guys here it is the final paint job! the helmet i had commisioned by armory props but the dry brush is mine. the pain job on the armor is a plasti dip sealant, with a silver under coat, and a matt black over coat, then a satin clear sealant finish for the paint. I am uber happy how it turned out. still gotta add straps and buckles.

th_photos%20for%20405th%20010_zpssfim3x7x.jpg

th_photos%20for%20405th%20009_zps7tzajytl.jpg

th_photos%20for%20405th%20008_zpsccor1xcq.jpg

th_photos%20for%20405th%20007_zpsy8h9mcjn.jpg

th_photos%20for%20405th%20006_zpsfzbw9msm.jpg

th_photos%20for%20405th%20005_zpssek8h19r.jpg

th_photos%20for%20405th%20004_zpsvlypki0t.jpg

th_photos%20for%20405th%20003_zpsxldy1vxk.jpg

th_photos%20for%20405th%20002_zpsfrv6rj5q.jpg

th_photos%20for%20405th%20001_zpsxm0xj6gc.jpg

Hope you all enjoy!
 

Attachments

  • th_photos%20for%20405th%20009_zps7tzajytl.jpg
    th_photos%20for%20405th%20009_zps7tzajytl.jpg
    5.5 KB · Views: 247
  • th_photos%20for%20405th%20008_zpsccor1xcq.jpg
    th_photos%20for%20405th%20008_zpsccor1xcq.jpg
    5.3 KB · Views: 268
  • th_photos%20for%20405th%20007_zpsy8h9mcjn.jpg
    th_photos%20for%20405th%20007_zpsy8h9mcjn.jpg
    5.5 KB · Views: 263
  • th_photos%20for%20405th%20010_zpssfim3x7x.jpg
    th_photos%20for%20405th%20010_zpssfim3x7x.jpg
    5.4 KB · Views: 255
  • th_photos%20for%20405th%20004_zpsvlypki0t.jpg
    th_photos%20for%20405th%20004_zpsvlypki0t.jpg
    5.4 KB · Views: 249
  • th_photos%20for%20405th%20005_zpssek8h19r.jpg
    th_photos%20for%20405th%20005_zpssek8h19r.jpg
    5.1 KB · Views: 242
  • th_photos%20for%20405th%20003_zpsxldy1vxk.jpg
    th_photos%20for%20405th%20003_zpsxldy1vxk.jpg
    6.1 KB · Views: 254
  • th_photos%20for%20405th%20001_zpsxm0xj6gc.jpg
    th_photos%20for%20405th%20001_zpsxm0xj6gc.jpg
    4.9 KB · Views: 251
  • th_photos%20for%20405th%20002_zpsfrv6rj5q.jpg
    th_photos%20for%20405th%20002_zpsfrv6rj5q.jpg
    4.5 KB · Views: 251
  • th_photos%20for%20405th%20002_zpsfrv6rj5q.jpg
    th_photos%20for%20405th%20002_zpsfrv6rj5q.jpg
    4.5 KB · Views: 272
thank you sir. gotta add straps and buckles and still gotta get some nice comfortable lightweight tactical boots, long sleeve underarmour shirt
 
So life got in the way of my build. I was not happy with how the first paint job turned out so I scratched it up with some sand paper and repainted it and not the paint job matches the helmet much better. here are the updated photos.

th_IMG_0628_zpsw1tvnb2z.jpg
th_IMG_0627_zpsiomcuetu.jpg
th_IMG_0626_zpsnevsnyte.jpg
th_IMG_0625_zpsgyr9wvkf.jpg
th_IMG_0624_zpsz2pqtozb.jpg
th_IMG_0630_zpsixlnvogr.jpg
th_IMG_0629_zpsuuqbxnxq.jpg
 

Attachments

  • th_IMG_0628_zpsw1tvnb2z.jpg
    th_IMG_0628_zpsw1tvnb2z.jpg
    7.8 KB · Views: 242
  • th_IMG_0624_zpsz2pqtozb.jpg
    th_IMG_0624_zpsz2pqtozb.jpg
    6.7 KB · Views: 235
  • th_IMG_0626_zpsnevsnyte.jpg
    th_IMG_0626_zpsnevsnyte.jpg
    5.5 KB · Views: 267
  • th_IMG_0625_zpsgyr9wvkf.jpg
    th_IMG_0625_zpsgyr9wvkf.jpg
    6.2 KB · Views: 234
  • th_IMG_0629_zpsuuqbxnxq.jpg
    th_IMG_0629_zpsuuqbxnxq.jpg
    6.4 KB · Views: 257
  • th_IMG_0630_zpsixlnvogr.jpg
    th_IMG_0630_zpsixlnvogr.jpg
    7.1 KB · Views: 255
so update to my build, i started strapping up the ab, hip, and butt plates today. progress is looking good will have pics soon, upon trying on my torso it cracked and bent so bad it is unusable. Such a blow to the self esteem, but oh well, gonna try a different method by buying a black MOLLE plate carrier and gluing the detail pieces onto the plate carrier. gives me the ability to adjust my torso to my size so i can wear it comfortably. Pics will be up soon of the fully strapped up armour minus the chest.
 
Both Punished Props and WM armory have some great tips for weathering props, these are some of the best. but the general idea is to lightly paint any edge with silver paint (any place the prop would realistical rub or scratch against something) Then take some brownish, blackish acrylic paint mix with a tiny bit of water, rub it in all the cracks and nooks, then wipe it away, and TADA! it looks dirty and old.


http://www.wmarmory.com/?p=142

http://www.wmarmory.com/?p=3148
 
Last edited by a moderator:
Status
Not open for further replies.
Back
Top