Skyrim Ancient Nord Build!

Status
Not open for further replies.

Ryan0198

New Member
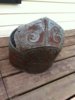
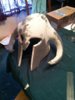
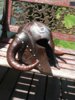
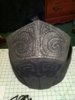
So after trying the Dwarvin armor, and taking a break from it due to no money, I landed a job and wanted to pick up where I left off. Well, by that I mean start something new and eventually go back and finish the other armor. So I decided to create my favorite armor from the game: Ancient Nord Armor. So!!!!!!!!!!!! I grabbed some pep files, created by rundown, and started work on the helmet. So at this moment pics are uploading to my email. Now I love pepakura, and the helmet went together flawlessly. Except for the first attempt which was about 10 sizes too big due to a random problem in the pep designer. So once I had it done, I tried self expanding foam to line the inside. **If you haven't tried it this way, you need to because it beats the crap out of using fiber glass resin. It cures enough to work in about 20 minutes, lightweight, flexible, easy to sand and paint, and holds its shape very well. Then I trimmed it to fit my head, added bondo, sanded until my fingers were worn down, primed it, painted it and did some weathering. For my first prop, besides a clay dragon priest mask, this helmet turned out so nice. Like, I feel like shouting FUS RO DAH every time I put it on.

Insert pics here, when ever they send to my email.....
IMG_8166.jpg

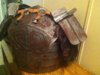
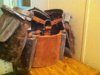
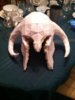
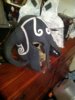
Now! Im working on an ancient nord battle axe. Got the file from ZombieGrimm and went to work. I scaled it pretty big so the blade is about 2 feet wide from each side. Looked about right to me and I feel like it needs to be massive, or why would you carry a battle axe right? So I have it pepped out. The blade and the end piece that goes at the bottom of the wood handle look great and are filled with foam. Now seriously, the foam works so well because it basically glues itself together, fills voids, and makes the prop durable. I dropped my helmet to see what would happen and it just bounced around. Of course that was without bondo. I eventually plan to mold and sell stuff, but that's in the near future after a few paychecks. So once I get some money this Wednesday, Im gonna get a wooden dowel, get everything attached, and start the bondo work. I plan on removing some of the paper to make sanding difficult areas easier because the foam is so easy to shape, which makes the bondo easier to work. Once its done I'll post pics. (still waiting for them to send -_- )
 
Here are a few pics.
image.jpg
 

Attachments

  • image.jpg
    image.jpg
    803.3 KB · Views: 221
  • image.jpg
    image.jpg
    46.2 KB · Views: 210
  • image.jpg
    image.jpg
    947.4 KB · Views: 197
  • image.jpg
    image.jpg
    1,017.9 KB · Views: 234
  • image.jpg
    image.jpg
    1.2 MB · Views: 285
It looks absolutely amazing! I was about to comment that "viking helmets didnt have horns" but. . you said nord so. . yeh. .
Awsome job mate! the final piece looks stunning! Very good paint job too!
 
UPDATE! So I managed to get a bunch of leather thanks to my sisters boyfriend. I got the armor basically done. Most of the straps and supports are done and I'm just waiting on some fake fur to tie it all together. I'm gonna get the armor painted later today. Here's a few pictures of the progress so far.
 

Attachments

  • image.jpg
    image.jpg
    936.3 KB · Views: 194
  • image.jpg
    image.jpg
    1 MB · Views: 189
Awesome! I have made some dragon priest costumes from cardboard and duct tape, but they don't look nearly as good as that helmet.. What say?
Morokei.jpgmms_picture (6).jpg
I actually also made about 5 more with props like daggers and a staff lol
but that helmet still beats them all
 
Those look good to just be cardboard and tape! I love working with the foam. But here's a few pictures of what I have done so far. I still have to add leather to the gauntlet and finish the waist area. Finding fake fur is tough. I got more leather yesterday and it's gonna make this look so sweet!
 

Attachments

  • image.jpg
    image.jpg
    932.8 KB · Views: 208
  • image.jpg
    image.jpg
    1,013.8 KB · Views: 211
  • image.jpg
    image.jpg
    799 KB · Views: 180
  • image.jpg
    image.jpg
    2 MB · Views: 190
  • image.jpg
    image.jpg
    2.1 MB · Views: 183
Howdy!
I'm really liking this build, especially that faux metal finish. On the helmet I assume you just made impressions in the curing bondo, but would you mind shedding some light on how you achieved that hammered metal effect over the foam? I don't relish the thought of dremeling out all those dimples by hand, so if you've devised a better way that'd be great haha
 
Thanks man it's been a fun build so far! And I'd be glad to shed some tips. For the helmet, there's 2 coats of bondo. The final one was just to smooth it up and build enough to make the hammered look with a dremel tool. I opted for a really grimy and rusty look. So the paint was as follows, Krylon metallic chrome, followed by Krylon aged copper, then duplicolor dark steel wheel paint. Sealed it with urethane clear, then the rust was done with French powders used in furniture shops. Unfortunately, I had to dremel the hammered look into the foam lol. It took about 3 hours for the whole suit. Thing about it is, to get a realistic hammered look you only light touch the sphere shaped grinder for the main part and only add deep ones here and there. I have a family history of auto body workers and some black smithing so I got a few tips from some family. I've got a lot of years with bondo, paint, and that sort of thing so if you need any help or ideas, shoot me a message and I'd love to help!
 
So I'm almost done with this mammajamma. Still gotta weather the leather and rough up the fur, add the front of the kilt? Basically minor stuff. I also realized that the helmet is too big so I'm gonna sell this one and make a new one. But here's a couple pics of the progress.
 

Attachments

  • image.jpg
    image.jpg
    1.1 MB · Views: 229
  • image.jpg
    image.jpg
    1.1 MB · Views: 215
While I am thinking about it, here is what I've used for the entire suit. I used pepakura for the helmet, and Eva foam for the armor. Pretty much free handed the armor using a ton of in game reference pictures. The leather is veg tanned leather, the fur is random fur I found at this cloth store. Finding the fur was the hardest part of this build and it's not even the fur I really wanted but it will do just fine. For the chest plate and rib plates, its all held together using hot glue and the back piece is a piece of foam covered in leather with one side glued down and the other attaches with Velcro. The shoulder pieces are held together with hot glue and a crap ton of leather strips. Some are glued straight to the foam while others are attached to some rings I found at walmart. The belt is a long strip of foam covered in a thicker leather than what I used for all the other parts. I couldn't find a ring sturdy or big enough for the belt so I smithed one myself lol. I took a piece of steel from an old fire poker, heated it and bent it into shape. Then did the same with a nail to make the pin that goes through the belt. All in all, its looking pretty good for a first build with foam. I have learned a lot. One big thing I learned is that wearing this bad boy burns you the heck up. I'm making this suit, and two others for me and some friends to go to DragonCon. I'm pretty sure I'll have a heat stroke in Atlanta haha. I'll try to have it all finished by this Sunday. Stay tuned and thanks for reading!!!
 
Status
Not open for further replies.
Back
Top