Mark 5 B / Noble 6 helmet build

Status
Not open for further replies.

HKurtyka

New Member
I have finally gotten around to posting my build of Halo Reach's Mark 5 b / Noble 6 helmet (and currently that's all it's gonna be, (no full suit though it wouldn't be hard to convince me to do it and go all out). This is my first foray into prop making, I plan next after finishing this helmet to make a foam something whether it be another helmet, armor or weapon. I'm sharing what I have done primarily for two reasons, a) to get tips as I am a big n00b in regards to prop making b) to help others as I have found reading build logs very very helpful to look over to gather tips and techniques. Anyway here is some pics of what I have done.

11074538_861131607294142_2066808175_n.jpg
This was attempt 1, was done in card but at this stage I figured out that it was WAY to big.

11074540_861131600627476_490782661_n.jpg
Here is a pic of all my practice attempts in varying levels of completion, I made 5 in total before I got the sizing right.

11251720_861131613960808_1275142500_n.jpg
This is a third of the way through my final card version, decided It was best to build the top and rear portion first then make the visor and chin area separate. I did it this way to make it easier to hot glue all together.

11272217_861131610627475_1570896265_n.jpg
And that's the pepakura model all done, only a good 20 + hours of work total after all my practice attempts, the final one took probably about 5-6 hours.

11303468_861131617294141_446619634_n.jpg
This after a coat of epoxy resin, one inside, one outside.

11324872_861131620627474_1153517112_n.jpg
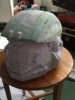
This is the beginnings of the bondo/body filler work I have been doing on it. I'm currently still getting the angles/lies perfect on top, this picture was from a couple of days ago, I since have almost finished making it perfectly symmetrical (to my eye - I'm a really OCD about perfection). Once I have done this I will go back and fill in any dents or holes with some spot putty.


Well that's all for now, I'll keep updating this as I progress.
 
Very nice build! All the lines are folded bee-ee-ay-utifuly! (thats beautifuly in case its imcoprehensible)
not to mention it appears it hasnt deformed at all! This is awesome! Definatly gonna see how this turns out.
One thing though, did you use scoch tape to attach the pieces? Glue would have been better in my opinion.
Welp. Good luck mate!
Cheers

Thanks, took forever to get all the folds perfect and put together right. I used hot glue to stick the pieces together, holds well and can be melted and re-positioned if you screw up
 
Thin coats of bondo at a time but I think you have that covered. For the dings, dents and fine scratches I use regular dry wall mud. Its cheaper and its works. :) But I think your doing a great job so far. Double thumbs up. I keep a close eye on Reach builds. So I will b watching your progress
 
Thanks, took forever to get all the folds perfect and put together right. I used hot glue to stick the pieces together, holds well and can be melted and re-positioned if you screw up

I finished cutting my pieces yesterday. I was dumb enough to go for a reach recon helmet as my first build. The multiple levels are going to be a pain in the backside. Any tips you could give me? :p
 
Thin coats of bondo at a time but I think you have that covered. For the dings, dents and fine scratches I use regular dry wall mud. Its cheaper and its works. :) But I think your doing a great job so far. Double thumbs up. I keep a close eye on Reach builds. So I will b watching your progress

Thanks! Yeah, I'm trying to do thin coats, except where I need to build up an area significantly. Its been too many coats of bondo to remember. I have just received my spot putty so I guess its too late and not worth it time wise to use dry wall mud, but I'll keep it in mind for when I run out. Anyway, gonna go throw my respirator on and keep work on it!

Oh, Sword Breaker, I'm probably not the best to be asking advice for as this is my first build, but the way I got small details was to very lightly score the fold lines (which I did with all of them not just small detail, makes it easier) and then folded them carefully, hot glue REALLY helps here as you can re-position things and it gives you about 5 seconds of play to move things into place

I just finished some first gluing and the glue i used was also very useful. I could easily move them even after attaching them but it got messy cause i had to hold them for a bit and i had to glue a few at a time xD
Im gonna post something right now. (since you are offline, by the time you read this, ill have posted it)
 
UPDATE no: 1

So I decided to bondo over the indentation on the of the helmet, it just wasn't working out. I just was struggling to get the edges nice and straight, plus the rectangle had become slightly squished and out of proportion. As well reference pictures could be taken as not having said indent, but a channel going where the edge should be, so I'm not going against the reference really. I think this stems from how the textures on the helmet are implemented, as it looks smooth but could also be meant to be indented,I believe this is so the model wouldn't be too detailed for a 360 to run, thus 'fake texture' indent. This is the 1st coat of bondo I put on it, so don't complain about the dents and stuff, I had to lay it on quite thick to fill it in and then couldn't really get a smooth surface.


11257669_862896557117647_872371873_n.jpg

Notice use of sharpie, I mark lines on where I think more bondo needs to be added, this is really helpful when your mind is full of crap from studying and your a prone to forget stuff - especially the minutia of where a little bit of bondo needs to go.

I cleaned up left and right of the brow/crown, after taking the picture I noticed I hadn't got the left half quite right, I've now fixed it. I think each are near identical, though one looks to me a very very very (can't strees how hard it is to notice) small hair off from certain angles, though I'm happy with it as it is barely recognizable. I still need to put considerable work into fixing the middle portion as I really haven't done anything with it.


11351524_862896560450980_1035276527_n.jpg

Well I'm heading outside to do some more bondo, I'll try to do another update with what I have done today either later tonight or tomorrow as it will be just a continuation of the process of filling in the indentation.

I have no idea why there's an attached thumbnail, and as of right now I'm too lazy to figure out why and remove it
 

Attachments

  • 11324872_861131620627474_1153517112_n.jpg
    11324872_861131620627474_1153517112_n.jpg
    61.3 KB · Views: 241
Sweet, looks like you're a few steps in front of me with your first build. I shall be following your progress closely sir!:)

Cheers,

Bas
 
Bad news for my build..... So I borrowed my neighbors dremel and cut the visor out and that's when I released via trying it on it was too big, I hadn't caught this sooner due to not clearly being able to see it compared to my head. Me being mainly, stubborn hadn't bothered to double check at every stage to make sure I hadn't done it wrong. Well I refuse to give up! Already started a smaller version, this time however I will learn from my mistakes and as a consequence be faster at it, along with me having the time to do it. As its stands I have two full days in which I can solely work on it, without interruption, so I expect the pepakura stage to be done at the latest Friday afternoon. Then back to resin and fiberglass stage. Anyway here is me standing with the helmet on. Please excuse the grainy image, had to zoom in so you don't see the absolute awful mess which I call my room, The quite drastic crop is not a result of me not wearing any other clothes besides my shirt.....but who knows? Maybe I'm lying! I'm not really.

image.jpg
 
Now I'm curious, what measurements did you use to scale the helmet with?

So far my helmet looks slightly too large for my daughter but seeing she's still growing I figured she could grow into it (by the time the full suit will be ready she'll probably be a year older already). For me the helmet is too small, my ears hit the side of the helmet. For her I figured I might just increase the padding on the inside but now that I look at your picture I'm worried it will look out of proportion with the rest of her. That said, with kids you expect their head and thus helmet to be bigger in relation to their body anyway so the effect may be less drastic then with an adult.

While judging from your picture I'd say you'd need to decrease the size of the helmet slightly don't forget that once you wear the harness and shoulder padding you'll look a bit wider and it may not be to bad if you'd add some padding inside for a snug fit (speaking as a noob who may be completely wrong here off course).

I changed the height in pepakura designer, but due to the model being built actually its across the visor horizontally. I build my too large helmet using the height at 265 mm, I'm now building one at 245, Its looking good so far, maybe a little too small, but I need to progress further to know for sure. From looking at reference, the helmet looks like a really tight fit, the base at the rear sitting high in the neck line kinda puts the whole thing in perspective in regards to size, that said it is a concept but its not drastically different from final model. I'll post pictures of it tomorrow when I'm done. I have completed 50% of it today so I'm making good head way. And I should apologize for my terrible attempt at humor in the post about the size.....it was late and I though it was kinda funny at the time....

Sorry about the double post but hey, it's my thread and I don't care.

halo_reach_concept.jpg
 
I'm now building one at 245, Its looking good so far, maybe a little too small, but I need to progress further to know for sure.
That's roughly the size I went for too I think, I might thus find out that I have made it too big. Alas, if so it will be on the shelf for another day as a spare and I'll start again too :)
 
Ok, I haven't built much more but I'm sure its too small now, like it would be a tight fit to squeeze on, probably would require a rubber neck seal. I have a 22 inch diameter head so I think maybe the helmet at 244 would fit your daughter right, as its too small on me but looks like it would fit a child with a little room to spare. So I went back to the drawing board and found a better model in the file archive modelled by JTM which looks better and maybe even slightly easier to build as less intricate parts, but more parts overall, but I'm working on scaling it right to get this in one shot.
 
Ok, I haven't built much more but I'm sure its too small now, like it would be a tight fit to squeeze on, probably would require a rubber neck seal. I have a 22 inch diameter head so I think maybe the helmet at 244 would fit your daughter right, as its too small on me but looks like it would fit a child with a little room to spare.

Now that I have both sides on I tried it on her head this morning. Its roomy but not overly big. With some extra padding it will be a snug fit and as she grows I could take some of the padding out so she'll be able to wear it to a couple of conventions before she outgrows it.

Time will tell if it works..
 
Update No.2

I finally am back to roughly where I has before I realised the scale. So far so good, the model is working out nicely and I have the size right, I have built the correct scale twice as I screwed up the last little bit due to building it in the wrong order, so I have a non-resined one to test sizing when I get nervous about it. I have fully resined the new helmet and mostly fiberglassed it, just a few touch up spots I have to fill. This time I have went straight to cutting out the visor as it's firstly quick to do and allows you to neatly get the visor lip bondo'd. Unfortunately there is a slight warp in my pep around the chin/cheek area and as a result of the resining on the vents, it shouldn't be too had to fix but none the less, it's more work.

11733341_892736007467035_176597130_n.jpg11655170_895849153822387_2010628773_n.jpg
 
It will be more work but in the end it will be totally worth it. Looking really good btw :thumbsup
 
Status
Not open for further replies.
Back
Top