Grif's Agent Washington MK VI

Status
Not open for further replies.

MJPvt Grif

New Member
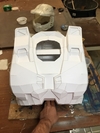
Beginning my MK VI build. My goal is to have this done for RTX this year. This will be my second armor build.

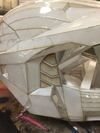
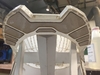
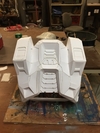
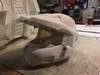
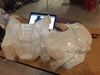
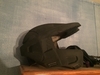
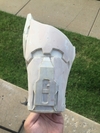
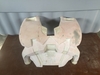
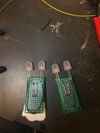
For this armor I decided to save myself hours of labor, frustration, hand cramps, and knife cuts by lazer cutting all my pepakura files. So far I've cut the helmet and torso and have been incredibly pleased by the results. The helmet took around 30 minutes to cut, the chest 45. All the fold lines are perforated, which also eliminates the need to score them and creates very crisp creases in a fraction of the time. The process also removes the chance of human error in this step. The main downside is that the joints are no longer numbered so I have to pay close attention to the model and unfold on pepakura, but that is a small price to pay.

It's going to be a busy month and a half, but right now my outlook is bright.
 
tumblr_nq9uhmJn3b1u3y9nlo1_1280.jpg
Helmet is quickly taking shape.
 
tumblr_nqdpskhGKV1u3y9nlo1_1280.jpg
Helmet finished and fits perfectly. Not going to have to cut my ears off to fit into this one!
tumblr_nqgfgq8Orw1u3y9nlo1_1280.jpg
Got all the bracing installed. Resin arrived yesterday. I plan to start fiberglassing Friday.
 
Fiberglassed the Helmet, and finished peping and began applying resin to the torso.

IMG_6427.jpg
IMG_6448.jpg
IMG_6450.jpg
IMG_6449.jpg

IMG_6426.jpg

Going to begin bondo work this weekend. Working of building the thighs and groin currently as well as working on my BR.
 

Attachments

  • IMG_6448.jpg
    IMG_6448.jpg
    129.2 KB · Views: 265
  • IMG_6427.jpg
    IMG_6427.jpg
    120.1 KB · Views: 246
  • IMG_6426.jpg
    IMG_6426.jpg
    120.3 KB · Views: 254
  • IMG_6449.jpg
    IMG_6449.jpg
    134.3 KB · Views: 257
  • IMG_6450.jpg
    IMG_6450.jpg
    137.8 KB · Views: 251
helm20bondo.jpg


chest20split.jpg


helm20primed.jpg

Bondoed and primed the Helmet, the visor should be in today to detail this weekend. Split the chest and have begun bondo work. Many more parts pepped and fiberglassed but no pics to show yet.
 

Attachments

  • helm20bondo.jpg
    helm20bondo.jpg
    123.3 KB · Views: 269
  • chest20split.jpg
    chest20split.jpg
    124.4 KB · Views: 251
  • helm20primed.jpg
    helm20primed.jpg
    124.1 KB · Views: 274
Hey, that's a really nice resin job!

Your build is extremely promising, and I, as a newbie, would really like to learn from it. So, I just wanted to ask, since I'm building a helmet from the same pep file, what is your height of the helmet? I want to get a better sense of scale. My height was 266mm (too small for me). What height is yours?

I'm looking forward to seeing your progress!
I wish I could help more, but I can't find my modified file. I measured the helmet and it's between 268 and 270mm. I'm 5'10" and wear a 7 1/2 size hat. I had to cut away some of the material around the ears to get it on and off, so try that first. I used the method in Xtreme TACTICS 101's thread to scale it. I added about an inch to the height to allow for padding in the helmet. I would also check out HaloGodess' scaling guide and the Official Pepakura Scaling Thread. Hope that helps a little.
 
Last edited by a moderator:
I wish I could help more, but I can't find my modified file. I measured the helmet and it's between 268 and 270mm. I'm 5'10" and wear a 7 1/2 size hat. I had to cut away some of the material around the ears to get it on and off, so try that first. I used the method in Xtreme TACTICS 101's thread to scale it. I added about an inch to the height to allow for padding in the helmet. I would also check out HaloGodess' scaling guide and the Official Pepakura Scaling Thread. Hope that helps a little.

Thanks for the links! I'm checking them out. HaloGoddess' guide seems to be the one that I'll try out. An inch for padding seems reasonable, I'll try that out too. It helps a lot, thank you!
 
Last edited by a moderator:
Looking good, can't wait to see more.

Thanks! Everything is pretty much at various points of partial completion.

IMG_6813.jpg
Finished Bondo on one gauntlet. The other is cut, but not yet assembled.

IMG_6882.jpg
IMG_6883.jpg
Wired the LEDs for the helmet. Pretty primitive construction, but they work, and that's what matters.

FullSizeRender.jpg
Cut the visor to fit. Just need to install the mounting hardware and detail it.

IMG_6957.jpg
Bondo finished on the breast plate. Back is nearly finished. Ordered the magnets for the attachments. Should be ready to go by the time they arrive.

Not pictured, I have both thighs assembled. Doing bondo work on one, and fiberglass on the other. Groin, and biceps are also assembled and being fiberglassed. Just got my boots in, so should have the shins and feet cut tomorrow or monday depending on how backed up the workload on the lasers is.
 

Attachments

  • IMG_6813.jpg
    IMG_6813.jpg
    131.9 KB · Views: 245
  • FullSizeRender.jpg
    FullSizeRender.jpg
    123.9 KB · Views: 240
  • IMG_6883.jpg
    IMG_6883.jpg
    132 KB · Views: 239
  • IMG_6957.jpg
    IMG_6957.jpg
    105.1 KB · Views: 273
  • IMG_6882.jpg
    IMG_6882.jpg
    132.1 KB · Views: 237
Geting ready to start painting. Haven't decided which color scheme I want to use.

Halo 3 Recollection:
Chapter_13_Reconstruction.png
Where he has the full stripe on the helmet and yellow shoulders.

or...

Project Freelancer/Halo2 Recovery One
Wash_sorry-627.jpg
Where just the front segment of the helmet is yellow and the detail is on the wrists and thighs.

Thoughs? Opinions? Observations?
 
So I actually finished this build back in August 2015, but forgo to upload the photos here. lol. So here goes!

IMG_7048.jpg
Bondo work on back of torso

IMG_7281.jpg
replaced the inside portion of the thighs with high density EVA foam to allow for more flexibility.

IMG_7529.jpg
IMG_7532.jpg
Started with a black base.

IMG_7555.jpg
Masked areas to remain black and applied the silver. (it was windy so I had to hold the pieces as I painted.)

IMG_7557.jpg
I used Rust-Oleum Metallic Accents pewter in a paint gun for the main color and then dry brushed with silver to bring out the edges.

IMG_7576.jpg
Finished with the Yellow accents. Decided to go with the Halo 2 color scheme.
 

Attachments

  • IMG_7048.jpg
    IMG_7048.jpg
    199.5 KB · Views: 283
Photos from RTX 2015

sign.jpg
shannon.jpg
Found Shannon McComick, voice of Agent Washington and got him to autograph my helmet.
Miles.jpg
Miles Luna, writer for RvB asked for a picture with some of us after a panel.
stand.jpgprofile.jpg
close.jpgpoint.jpg
group.jpg
Individual and group photos courtesy of Adam Grumbo
 
Can't help but notice that fantastic looking BR-55 you have there:D May I ask how you made it, and if it was with mdf how you achieved the proper slope effect on the front?
 
That's freaking awesome dude! I've started working on my first build for RTX2017 of Tucker and this gives me hope. Didn't even think about lights in the helmet but now I'll just have to.
 
Holy moly, this looks incredible. That pep work is seriously phenomenal, all your lines and edges look so clean and the paint job looks mind-blowingly cool. Mad props!
 
Status
Not open for further replies.
Back
Top