Ahoy all!
I'm trying out some new techniques and sharpening some skills in general, so I thought I'd share my process since the M6S I built over in my ODST thread was fairly well received. As the title suggests, this is primarily built using cereal box card and cardboard, each in varying thickness. The basic foam form was cut as a mounting surface from insulation foam, and the only other material used so far has been PVC for the cylindrical barrel components. I am very close to assembling all the parts and beginning the finishing work, which entails a great deal of plaster-work around exposed corrugation, ridges that need smoothing, & irregular bevels.
To anyone wondering about the scale, I took it down a bit to a size that I think allows both myself (suited) and the weapon to appear equally formidable. It measures 910mm on the nose, end-to-end (barrel included).
I'm also keen on including bare-bones electronics in the form of a diffused back-lit screen and frosted, edge-lit sight. These are pretty much just being added for the sake of some bad-ass photos down the line.
Enough jibber jabber, progress pics!
Started with a print of this popular schematic, but I'm always more comfortable with my own work and noticed some bits I wanted to fix anyway. So much for saving myself some time, haha


Next, I began to plan out my layers. Basically just finding a balance between my mental "ideals" and whatever I have on hand.


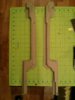
Then I really dove into this build and assembled most of the lower half in a matter of days, sleepless foodless days.


At this point, life intervened and this project was forced to the shelf for a couple weeks. I picked it back up a few days ago and have just finished most of the finicky bits on the upper half.


Oops, that's the pic limit, I have more that I will likely post along with any progress I make tonight.
Thanks for stopping by, comments/critiques/questions welcome!
I'm trying out some new techniques and sharpening some skills in general, so I thought I'd share my process since the M6S I built over in my ODST thread was fairly well received. As the title suggests, this is primarily built using cereal box card and cardboard, each in varying thickness. The basic foam form was cut as a mounting surface from insulation foam, and the only other material used so far has been PVC for the cylindrical barrel components. I am very close to assembling all the parts and beginning the finishing work, which entails a great deal of plaster-work around exposed corrugation, ridges that need smoothing, & irregular bevels.
To anyone wondering about the scale, I took it down a bit to a size that I think allows both myself (suited) and the weapon to appear equally formidable. It measures 910mm on the nose, end-to-end (barrel included).
I'm also keen on including bare-bones electronics in the form of a diffused back-lit screen and frosted, edge-lit sight. These are pretty much just being added for the sake of some bad-ass photos down the line.
Enough jibber jabber, progress pics!
Started with a print of this popular schematic, but I'm always more comfortable with my own work and noticed some bits I wanted to fix anyway. So much for saving myself some time, haha
Next, I began to plan out my layers. Basically just finding a balance between my mental "ideals" and whatever I have on hand.
Then I really dove into this build and assembled most of the lower half in a matter of days, sleepless foodless days.
At this point, life intervened and this project was forced to the shelf for a couple weeks. I picked it back up a few days ago and have just finished most of the finicky bits on the upper half.
Oops, that's the pic limit, I have more that I will likely post along with any progress I make tonight.
Thanks for stopping by, comments/critiques/questions welcome!
 The rest of it looks so accurate, it'd be a shame not to knock those walls in a few degrees at the top, even just approximately.


