Meatwad's Grenadier Build (WIP and Pic Heavy)

Status
Not open for further replies.
Talking about vents, as friend of mine just made an EOD helmet and used foam board (for anyone who doesn't know it's a bit like soft acrylic) for the vents and they turned out sweet! All it needs is a ton of hot glue and some paper templates. It's a shame he's not on forum, his builds are great!!!
Kal
 
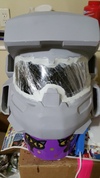
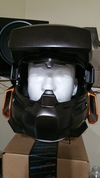
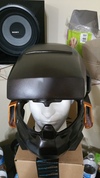
I understand your hesitation to use screen/mesh for the vents. But you may want to keep a few things in mind....what is your short term goal and what is your long term goal? I'm sure your short term is to have something ready to wear for Halloween if I remember an earlier post you made, but as you said you are hesitant due to not wanting light to bleed through and make the interior visible. For this I don't think it would be a big concern since your visor will do it's job and with as small as the vents are they won't allow too much through.

But for long term if you wish to install fans you might create more work in the long run if you put something solid there and try to remove it later. On a build of mine, I tried a particular idea and it turned out great, but as great as an idea as it was it cost me in the long run because I had to cut out and add a few hours of work that I didn't want to spare. And even if you say to yourself, "Oh I'll be careful and cut it out gently" there is always the unexpected and something may happen.

But you could also use multiple layers of screen/mesh to keep the light bleed through minimal.

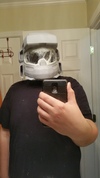
But what ever choice you do make, keep your long term goal in mind. I'd hate to see you do something permanent now only to have to tear apart your helmet later. Or worse yet damage it by accident. Cause your helmet is looking very sweet as it is, and will look even better when you get your paint scheme going on.
 
So i didn't do a whole lot this weekend, but i did install the visor and apoxie sculpted around it. I'm getting super stoked because it's actually looking like a helmet now.

Here's some pictures

Outside
20151011_222536_zpsemwekbdr.jpg

Inside
20151011_222551_zpsafja3dxy.jpg

Me modeling it
20151011_222718_zpsodhr14al.jpg

I used some of the left over apoxie sculpt to smooth out the imperfections in the vents. I think now i can just close them up with a piece of cardboard and resin. I'll add the details later.

Let me know what you guys think.
 

Attachments

  • 20151011_222536_zpsemwekbdr.jpg
    20151011_222536_zpsemwekbdr.jpg
    536 KB · Views: 181
  • 20151011_222718_zpsodhr14al.jpg
    20151011_222718_zpsodhr14al.jpg
    396.3 KB · Views: 187
  • 20151011_222551_zpsafja3dxy.jpg
    20151011_222551_zpsafja3dxy.jpg
    473.5 KB · Views: 181
In my Mando & Republic Commando helmet, I use black pantyhose to fill the vents. it's STUPID cheap, allows for ventilation, talking & hearing. I use 2 layers & just hot glue it to the inside of the helmet over the gap for the vent.
 
Hey thats amazing!!! Really coming on now.
Agree with Philthy Stache that if you layer the mesh I think the light will not make a difference.
Kal

Thanks man. I might try mesh, I'm still not sure.

In my Mando & Republic Commando helmet, I use black pantyhose to fill the vents. it's STUPID cheap, allows for ventilation, talking & hearing. I use 2 layers & just hot glue it to the inside of the helmet over the gap for the vent.

I might have to try that. Maybe my wife has a pair i can use lol.

Anyway, here's a small update. Got the apoxie sculpt around the visor trimmed. Did 1 final sanding of the whole thing and did another coat of primer. Finally took the cling wrap off. This is what it looks like:

20151013_224632_zps6jzqslb7.jpg
20151013_224636_zpsnjdbwwmw.jpg
20151013_224644_zpsgs70h85w.jpg

The good news is I'm basically 1 coat of primer and a wet sand away from painting. The bad news is... I'm out of primer lol. Luckily i get paid on Thursday.

I'll post an update as soon as i have more done. Thanks for stopping by!

20151013_224632_zps6jzqslb7.jpg


20151013_224636_zpsnjdbwwmw.jpg


20151013_224644_zpsgs70h85w.jpg
 
Last edited by a moderator:
Good news everyone! I'm no longer a new recruit! So, in light of this, i decided to just finish my helmet. I'm actually only about 90% done, but I'm taking the kids to the town "trunk or treat" tomorrow and needed something to wear. So without further ado...

20151024_042648_zpsircxgfcn.jpg
20151024_042656_zpsikckgpwz.jpg
20151024_042712_zpsjipy0opo.jpg
20151024_042722_zps9clvxp9a.jpg

I wanted to install the visor for these pictures, but the paint is still just tacky enough for me to be paranoid about leaving prints. I'll post some of those tomorrow.

Let me know what you guys think. Thanks for stopping by!
 

Attachments

  • 20151024_042656_zpsikckgpwz.jpg
    20151024_042656_zpsikckgpwz.jpg
    193.8 KB · Views: 198
  • 20151024_042648_zpsircxgfcn.jpg
    20151024_042648_zpsircxgfcn.jpg
    499.9 KB · Views: 196
  • 20151024_042712_zpsjipy0opo.jpg
    20151024_042712_zpsjipy0opo.jpg
    482.9 KB · Views: 176
  • 20151024_042722_zps9clvxp9a.jpg
    20151024_042722_zps9clvxp9a.jpg
    627.1 KB · Views: 187
I apologize if this has been answered previously in the thread, but what kind of paint did you use, and how did you apply it so smoothly? This is one issue I seem to be having with my own projects is drippy paint, and bubbles.
 
Great Job! As for Burt's question i don't know what paint Meatwad used but the trick is to apply very, VERY, light coats.
Kal
 
That's lookin' the goods!

Thanks man! I can't wait to see you cast the plates for your gloves!


Thank you man! I'm quite happy with how it turned out. Can't wait to show it off this weekend.

I apologize if this has been answered previously in the thread, but what kind of paint did you use, and how did you apply it so smoothly? This is one issue I seem to be having with my own projects is drippy paint, and bubbles.

Life SpartanCC said after your post, than layers are key. I use Krylon paint and primer. I wet sand the primer coat using 800 grit sandpaper, than tape and paint. I usually do 2-3 light coats depending on the coverage. My paint job however, is far from perfect. I was in a hurry to get it done. I painted in the dark, shortly after it rained and took it inside after each coat to dry without moisture. There are a couple areas where i over spayed. They have some minor bubbling, which i am ok with, because it's hardly noticeable. Also, the burnt copper color is actually an engine block paint. Is super runny and hard to use. If your still having issues, remember that you don't have to completely cover the entire piece in 1 go. I hope this helps you! Your paint looks good so far.

I agree with NaasadTal, that helmet is SICK!!! Well done man.

The paint job is superb and those lines are clean.

Thank you man! That is quite a flattering comment. I appreciate that you took the time to look and comment.

Great Job! As for Burt's question i don't know what paint Meatwad used but the trick is to apply very, VERY, light coats.
Kal

Yes, i agree here. I always do 2 -3 light coats. This ensures a nice even coat without being able to see thorough the paint. This will also keep it from bubbling and pooling.
 
I love the way you do the bondo in small steps on the helmet. It never occured to me to do it in small steps. I put bondo over the entire helmet on my first go and it was next to impossible to get it to look good. Thanks for the pics and great work!!
 
I love the way you do the bondo in small steps on the helmet. It never occured to me to do it in small steps. I put bondo over the entire helmet on my first go and it was next to impossible to get it to look good. Thanks for the pics and great work!!

Thanks man. I can't imagine trying to detail a helmet all at once. I didn't even get as much detail on the helmet as i would have liked due to my time frame and lack of experience. Progress the last couple weeks has been non existent. My wife recently got a night/weekend job and trying to watch 3 kids in the garage full of tools is not possible. I do hope though to start back up soon. I'll post as soon as I've made progress.
 
Status
Not open for further replies.
Back
Top