You are using an out of date browser. It may not display this or other websites correctly.
You should upgrade or use an alternative browser.
You should upgrade or use an alternative browser.
Huragok (Engineer) Costume
- Thread starter Saber
- Start date
- Status
- Not open for further replies.
- Member DIN
- S028
Looking stellar as always, Saber! Good luck in the molding, that's something I haven't ventured into yet!
Thank you! It's definitely intimidating! I've never molded anything alone, that's for sure! But look!
The mold came out almost perfect!


I'm very pleasantly surprised that all the clay came out in one piece. Now there's barely any cleanup I have left to do!
I'm getting mentally prepared to start molding the Engineer head, which I will be going a lot slower on to make sure I don't mess it up since it's the main focal-point of the costume.
Playing cards?
Yup! I will be using playing cards to split the Engineer head down the middle during molding so the mold will be in two parts. I will be lining the playing cards along the veins on the side of the neck so if there are any seams when I cast it out of polyurethane foam, the seams will be as incognito as possible.
Attachments
- Member DIN
- S028
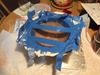
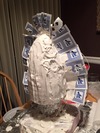
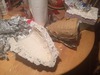
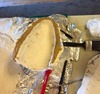
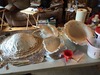
I finished the mold for the head tonight!
Here are the pics of the mold after the plaster had set.


Here is the mold as of last night when I was too tired and too nervous to try opening it.

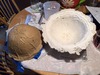
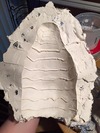
In the morning, I was able to pry off the bottom half of the mold!

The top? Welllll.... It wasn't that easy. The edges weren't thick enough for me to open it safely, so I waited till after I got off work to add more plaster to the edges and then I was able to pry it open.


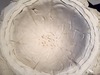
The top half came out better than I expected, but not without a few blemishes. There are a few hairline cracks that need to be repaired, but it's all in one piece!
I also found out that after reinforcing the edge of the top half of the mold, the edge warped so the halves don't perfectly align.

What I'll have to do is file down the edge until they fit back together.I had to dig all of the clay out of the mold, so remolding the whole thing again won't be possible unless I resculpt it.
Next up: Sculpt a bigger airsac and finish putting together the harness out of EVA foam.
Here are the pics of the mold after the plaster had set.


Here is the mold as of last night when I was too tired and too nervous to try opening it.

In the morning, I was able to pry off the bottom half of the mold!

The top? Welllll.... It wasn't that easy. The edges weren't thick enough for me to open it safely, so I waited till after I got off work to add more plaster to the edges and then I was able to pry it open.


The top half came out better than I expected, but not without a few blemishes. There are a few hairline cracks that need to be repaired, but it's all in one piece!
I also found out that after reinforcing the edge of the top half of the mold, the edge warped so the halves don't perfectly align.

What I'll have to do is file down the edge until they fit back together.I had to dig all of the clay out of the mold, so remolding the whole thing again won't be possible unless I resculpt it.
Next up: Sculpt a bigger airsac and finish putting together the harness out of EVA foam.
Attachments
-
 virgil%20head%20mold%203.jpg125.2 KB · Views: 164
 -
 virgil%20head%20mold%205.jpg115.2 KB · Views: 172
 -
 virgil%20head%20mold%204.jpg117.8 KB · Views: 170
 -
 virgil%20head%20mold%207.jpg73 KB · Views: 176
 -
 virgil%20head%20mold%206.jpg72.7 KB · Views: 171
 -
 virgil%20head%20mold1.jpg111.6 KB · Views: 167
 -
 virgil%20head%20mold%202.jpg100.3 KB · Views: 180
this......is......AWESOME!!!!!!!!!!
- Member DIN
- S028
this......is......AWESOME!!!!!!!!!!
View attachment 24175
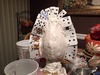
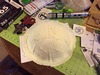
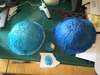
It's been about a week and I have been busy with work (as per usual), but I was able to get a second air-sac sculpted this week!


This one is bigger than the last and I am more happy with the "skirt" that went around the bottom of the dome shape. I will be molding this one out of plaster tonight.
I also decided to restart the harness that goes around the bottom of the Engineer's body. The file I had was corrupted and I lost my unfold progress after I had printed it, so I was basically trying to build the armor piece blind. I went ahead and re-unfolded the model and saved it (in multiple places!) and I've started over building it. I've also slightly adjusted the size of the file to fit the Engineer better. I hope to have that all built by the end of this weekend.
Tomorrow (Saturday), I will also be working on finishing the inner workings of the neck and maybe/possibly cast the head out of the Flex Foam-It! material I got in the mail a couple weeks ago. I still need to file down the mold so it'll fit back together snugly, but that's not much I have to do.
Big things happening, guys!
41 days until ECCC!!!!
PS. For those interested, I did a short time-lapse video of the molding process of the Engineer's head. Check it out!
Attachments

Last edited by a moderator:
- Member DIN
- S028
The first foam pull is done!
On Saturday, I went to a friend's house and we worked on a whole bunch of things.
We cleaned out and filled in air pockets in the molds for the air sacs and head.

We made a mold for the larger air sac that I had sculpted last weekend.

After plugging up the air pockets, I also filed down the edges for the Engineer head so the mold halves would fit together again.
We also lined a half of the mold with clay for when we cast the head in foam we will have the smallest amount of seams.

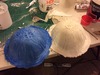
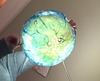
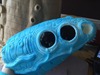
And here is the first foam pull from the smaller air sac mold!

This is cast out of Flex Foam-it! 14 with no tint or dye. It's very squishy (which is exactly what I wanted) and it translated all of the details in the mold beautifully! I am very happy with it!
It took a bit of wiggling to get it out of the mold because we didn't put enough mold release in the mold, but both came out of the ordeal with no damage!
We then wanted to try adding color to the flexfoam to see how it would look with just a tiny bit of color added.
We found out even just a tiny bit of blue made it a deep blue when it was done curing.

So I have to make a bit of a decision here...
The white foam with no tint allows for a bright light to be shown underneath the cast and you can see the air sac glow. the only problem with it being white is that it will take a lot more paint for it to be finished.
If I chose to dye all of the parts in blue, I will first have to figure out how much dye I will need to get the hue just right (which may take more tries and more material in case I mess up). The upside to dying it is I will use less paint to finish it, but the downside is the light doesn't shine though when it's dyed.
I will have to experiment with paints to see what I want to do before I case any more parts and waste more material.
What do you guys think?
Thanks for reading!
As always, any and all input/ critique is greatly appreciated.
On Saturday, I went to a friend's house and we worked on a whole bunch of things.
We cleaned out and filled in air pockets in the molds for the air sacs and head.

We made a mold for the larger air sac that I had sculpted last weekend.

After plugging up the air pockets, I also filed down the edges for the Engineer head so the mold halves would fit together again.
We also lined a half of the mold with clay for when we cast the head in foam we will have the smallest amount of seams.

And here is the first foam pull from the smaller air sac mold!

This is cast out of Flex Foam-it! 14 with no tint or dye. It's very squishy (which is exactly what I wanted) and it translated all of the details in the mold beautifully! I am very happy with it!
It took a bit of wiggling to get it out of the mold because we didn't put enough mold release in the mold, but both came out of the ordeal with no damage!
We then wanted to try adding color to the flexfoam to see how it would look with just a tiny bit of color added.
We found out even just a tiny bit of blue made it a deep blue when it was done curing.

So I have to make a bit of a decision here...
The white foam with no tint allows for a bright light to be shown underneath the cast and you can see the air sac glow. the only problem with it being white is that it will take a lot more paint for it to be finished.
If I chose to dye all of the parts in blue, I will first have to figure out how much dye I will need to get the hue just right (which may take more tries and more material in case I mess up). The upside to dying it is I will use less paint to finish it, but the downside is the light doesn't shine though when it's dyed.
I will have to experiment with paints to see what I want to do before I case any more parts and waste more material.
What do you guys think?
Thanks for reading!
As always, any and all input/ critique is greatly appreciated.
Attachments
I am really excited to see the outcome on this one! the hunter turned out fantastic. Best of luck, and as always...post progress pics!
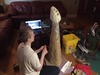
Looks great! Does light shine through the material if you use less tint? I know you said you used only a tiny bit of tint, but maybe mixing both tinted foam and a painted surface could give you the effect you're looking for.
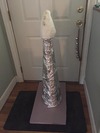
Unrelated, that is an awesome saber hilt sharing screen space with your first cast.
Unrelated, that is an awesome saber hilt sharing screen space with your first cast.
- Member DIN
- S028
I am really excited to see the outcome on this one! the hunter turned out fantastic. Best of luck, and as always...post progress pics!
Thanks! Expect progress updates to become much more common after this weekend! I'm getting laid off after this week (Boooooooo...) but that gives me more time to work on the Engineer and make it the very best it can be! I can't let the sadness of unemployment slow me down!
Looks great! Does light shine through the material if you use less tint? I know you said you used only a tiny bit of tint, but maybe mixing both tinted foam and a painted surface could give you the effect you're looking for.
Unrelated, that is an awesome saber hilt sharing screen space with your first cast.
Thanks for your input! I'm going to be tinkering around a bit with the white cast and experiment with different paints. I'm thinking of trying out some water colors on the top to give it the color it needs but keep the transparency low enough for the light to shine through. The part of the air sac that has light shining through on the character model is the very top of the dome and less around the sides and bottom edge.
I will likely use my airbrush with acrylics on the sides and edge while using watercolors on the top.
All in the name of science!
And thanks! We used that Saber hilt's light to test out the transparency of the foam.

Man I am sorry to hear about the unemployment. but im also glad in the fact that you're going to keep at the hobby to get you through this man.
but im also glad in the fact that you're going to keep at the hobby to get you through this man.VERY nice!! This is coming along great!
- Member DIN
- S028
Thanks, guys! I am very thankful for your support!
Made some progress today!
I trimmed the white foam cast of the air sac and pre-painted it with acrylic paint. I used a sponge to give it a more natural texture and avoid brush marks. I will be using an airbush to add the purples and blacks along the edges of the dome.

With the pre-paint, I wanted to see how light shows through the dome, so I held it up in front of a bright white LED lamp. The light shows through very well!

You can see where the foam is thicker in the cast by looking at the yellow spots, but I plan on trimming down those spots to make the light diffusion more even. I will also be using blue LEDs behind the domes instead of a white light to make it glow blue instead of yellow.
We also started the construction/ sculpt of the neck. A friend and I built the base out of the pink insulation foam and formed it in a sort of tee-pee shape and wrapped it in foil. Then, we started building the clay up on the base.


We ran out of clay, so I will have to go buy more in order for me to get the whole sculpt even shaped out and then I have to sculpt in the scale details.
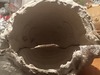
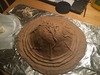
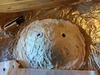
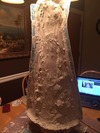
Oh yeah! Saturday, we cast the Engineer's head out of foam!
We took the two halves of the mold and tied them together with paracord and plugged any gaps with clay.

Here is an inside look at the mold.

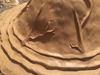
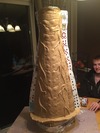
And here is the pull! It took a while to get the cast out and there are a few tears, but nothing that I can't patch!
Untrimmed.

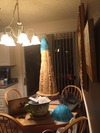
Trimmed


Selfie with the cast!

So yeah! Lots of progress!
I don't have a lot of time left before Emerald City Comic Con, but I'm determined to get this finished!
Unfortunately, I won't be able to take it on stage at the costume contest. My application was rejected.
As funny as it sounds, the rejection has actually inspired me to kick butt with this costume and make the staff jelly of my costume and regret not accepting my application!
I'll post more progress soon!
Made some progress today!
I trimmed the white foam cast of the air sac and pre-painted it with acrylic paint. I used a sponge to give it a more natural texture and avoid brush marks. I will be using an airbush to add the purples and blacks along the edges of the dome.

With the pre-paint, I wanted to see how light shows through the dome, so I held it up in front of a bright white LED lamp. The light shows through very well!

You can see where the foam is thicker in the cast by looking at the yellow spots, but I plan on trimming down those spots to make the light diffusion more even. I will also be using blue LEDs behind the domes instead of a white light to make it glow blue instead of yellow.
We also started the construction/ sculpt of the neck. A friend and I built the base out of the pink insulation foam and formed it in a sort of tee-pee shape and wrapped it in foil. Then, we started building the clay up on the base.


We ran out of clay, so I will have to go buy more in order for me to get the whole sculpt even shaped out and then I have to sculpt in the scale details.
Oh yeah! Saturday, we cast the Engineer's head out of foam!
We took the two halves of the mold and tied them together with paracord and plugged any gaps with clay.

Here is an inside look at the mold.

And here is the pull! It took a while to get the cast out and there are a few tears, but nothing that I can't patch!
Untrimmed.

Trimmed


Selfie with the cast!

So yeah! Lots of progress!
I don't have a lot of time left before Emerald City Comic Con, but I'm determined to get this finished!
Unfortunately, I won't be able to take it on stage at the costume contest. My application was rejected.
As funny as it sounds, the rejection has actually inspired me to kick butt with this costume and make the staff jelly of my costume and regret not accepting my application!
I'll post more progress soon!
Attachments
-
 10440939_10209093189190881_5300224786996520410_n.jpg66 KB · Views: 201
 -
 943800_10209093189150880_8657431455274224935_n.jpg132.1 KB · Views: 177
 -
 10173618_10209091920399162_2315557969587457100_n.jpg84.7 KB · Views: 183
 -
 10565238_10209090213276485_638405551111452933_n.jpg128.1 KB · Views: 200
 -
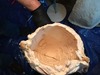 image2_2.jpg157.6 KB · Views: 169
 -
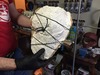 image1_2.jpg217.6 KB · Views: 167
 -
 12813895_10209093189630892_7027035917079146642_n.jpg75.2 KB · Views: 190
 -
 168234_10209093189470888_5454737068958504533_n.jpg86.9 KB · Views: 200
 -
 3762_10209072658877636_2155019325143462833_n.jpg63.3 KB · Views: 161
 -
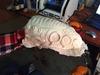 image3_2.jpg176.5 KB · Views: 173
 -
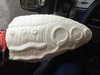 image4_1.jpg138.6 KB · Views: 160
 -
 image5_1.jpg146.9 KB · Views: 186
Well that's cruddy! You would think that being in a costume is all that would be required for a "costume contest", but what do we know? I am sure that when you walk in to that event rocking this bad boy it will make them realize their mistake. Looking seriously good, keep at it!
Awesome detail! Has me wondering what would happen if Saber and Sandbagger collaborated on a project together - it would be doom for most everybody else! Why you folks aren't working professionally in Hollywood bewilders me.
- Member DIN
- S386
Unfortunately, I won't be able to take it on stage at the costume contest. My application was rejected.
It's their loss! It looks SOOO good!
I did not apply . I suspect i would be rejected too.
It's quite clear - they dislike Covenant!! :angry
This is freaking amazing! Every day I see more cool things on here that are both inspiring and also make me feel like I've got no shot at making something good. If you need an extra set of hands (which it doesn't look like) I'm just outside PDX. Can't wait to see it finished even if I won't be at ECCC. Also thats dumb that they rejected your application.
- Member DIN
- S028
Well that's cruddy! You would think that being in a costume is all that would be required for a "costume contest", but what do we know? I am sure that when you walk in to that event rocking this bad boy it will make them realize their mistake. Looking seriously good, keep at it!
I think they are so picky about the contest this year because it's supposed to be the "world's best cosplayers" contest this year. The winner gets a trip to Chicago for another contest.
I don't care if I win or not, I just wanted to join the contest for the fun of it.
Awesome detail! Has me wondering what would happen if Saber and Sandbagger collaborated on a project together - it would be doom for most everybody else! Why you folks aren't working professionally in Hollywood bewilders me.
Awww, thank you!
I don't think I'm at the same caliber as Sandbagger. His work is amazing! His metal Iron Man is the best I've seen!
It's their loss! It looks SOOO good! .
Thank you!
Picking my jaw up off the floor here, Saber! That head looks fantastic, and the air sacks are nothing short of amazing!
Thank you so much!
This is freaking amazing! Every day I see more cool things on here that are both inspiring and also make me feel like I've got no shot at making something good. If you need an extra set of hands (which it doesn't look like) I'm just outside PDX. Can't wait to see it finished even if I won't be at ECCC. Also thats dumb that they rejected your application.
Thank you! I'm good on helping hands for now, I just need to knock this out within the next two weeks (two weeks as of this coming Thursday-- Dear lord, that is close... X_X)
ECCC is so close, I might just go insane! Gotta get this done!!!!!!
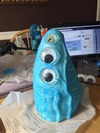
I was able to put the base paint on the head and I painted up some googly eyes to be a glossy black and they fit into the eye sockets perfectly. I probably won't have time to add a blinking eye mechanic, but they look pretty good to me! I won't glue them in until after I finish the paint job on the head.


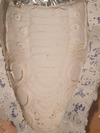
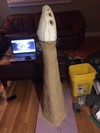
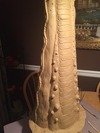
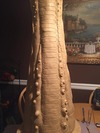
I was also able to finish sculpting the neck! It took sooooo long to finish! I think I've put 40 hours into just this sculpt alone. Not to mention, I had to buy much more clay than what I had. I think there's about 20-25 lbs of clay on this sculpt (I had to buy 9 more 2 lb at 12.50 ea to make this work).
Here are some comparison pictures of the left and right sides with polish and just-tacked-on clay.


And here is the neck with the foam head on it to see how good it looks from a distance.

And here is the underside of the neck. There aren't any good high res images of the neck that I could use as reference, so I went into game and just stared at the Engineer model and figured out what main lines were included into the design and I took my creativity and added the rest on my own imagination.

My friend Eli came over again and helped me smooth out the scales while I did the base sculpt of them. She also helped me with the starts of the molding process of the neck.
We lined the sculpt with playing cards and we started making the mold with Plaster of Paris.
I wanted to make sure that this mold was super strong, so I bought two buckets of plaster thinking I would only use one bucket per side... Nope! I've used one whole bucket and I'm not done molding the top-side of the neck yet! X_X

This project is going to financially bleed me (I've spent roughly $200 on it just in the last week) but I hope that my first unemployment check will appear in the next few days!
ONLY 17 DAYS BEFORE ECCC! AAAAAAHHHHHHHHHHHHHHHHHHHHHHHHHHHHHHHHHHHHHHHHHHHHHHHHHHHHHH!!!!!!!!!!!!!!!!!!!!!
Attachments
-
 10366301_10209129248932352_4677255098871490235_n.jpg90.1 KB · Views: 191
 -
 10371461_10209130496923551_928404494156992894_n.jpg79.5 KB · Views: 158
 -
 12801636_10209167069237836_924647785974543187_n.jpg108.2 KB · Views: 144
 -
 12512222_10209167068517818_8099328656665752464_n.jpg84 KB · Views: 160
 -
 1934056_10209155063937711_56981917345485069_n.jpg96.5 KB · Views: 152
 -
 968812_10209144473032945_5703370043069942917_n.jpg80.2 KB · Views: 168
 -
 12524340_10209144473232950_1168808242219293469_n.jpg71.3 KB · Views: 154
 -
 600383_10209144472792939_8001493511828332619_n.jpg85.4 KB · Views: 136
- Status
- Not open for further replies.
Similar threads
- Replies
- 7
- Views
- 696
- Replies
- 4
- Views
- 275