SMG Foam Build (WIP)

Status
Not open for further replies.

Xan Ives

Jr Member
So I decided, post-con, that I need a helmet and an SMG. SMG seemed pretty straightforward, so I'll see if I can do a nice one with a number of layers of foam and good beveling. I grabbed a blueprint off of google images, and looked at reference images so I could scale it properly.

attachment.jpg


It involves a lot of zooming my Preview of the blueprint in and out on my laptop, before flipping it screen up and using it as a quick tracing screen. Then I took a number of handle tracings, until I found one nicely sized to my hand that also looked about right, noted the level of zoom, then traced out the entire SMG.

attachment.jpg


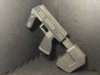
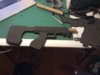
Once traced onto paper, I carefully cut it out with a spent (but still plenty sharp to cut paper) X-acto knife blade, and then traced AGAIN onto some foam, and then cut a single 3/8 thick foam tracing out.

attachment.jpg


Looks proper sized, so now I'm going to cut out a reverse duplicate so I can double it up to thicken the base, and hide the textured side of the foam. Updated when more progress happens.
 
Hmmmm, a foam weapon build. I've only seen a hand full of these that actually seemed to work out well. I'll be following this. Keep up the good work!
 
Cut out the second side, and then cut the foam base into three sections, the butt, stock, and the rest. Once that was done, I could individually trim and cut each section, instead of trying to make one giant piece perfect. Got the bottom two layers glued and trimmed, so I moved on the the layering. I targeted the main body first, so I looked at some reference images to get a sense of depth of the piece I was going for, then traced the template out and bevel cut it while it was still in the foam sheet, to get a perfect bevel.

It came out pretty well, so now I'm going to duplicate it on the other side, and then move onto the butt. The main body still need a lot of detailing, but the main structure is there.


Edit: click to open the image in a new tab, for some reason the uploader keeps flipping that one image.
 

Attachments

  • IMG_0104.JPG
    IMG_0104.JPG
    539.6 KB · Views: 218
Glad to see another member using this method as well! Looking forward to seeing how these turn out.
 
I finished the core layering on both sides, trimmed it to fit, and added the upper curved top thing. Also cut the stock into a few pieces, and trimmed the middle one smaller to make a valley on either side of the stock.

IMG_0115.JPG

Now to work on the core layering of the butt, and then some 2 mm foam layer for the rest of the gun for that nice level of detail.

- - - Updated - - -

Glad to see another member using this method as well! Looking forward to seeing how these turn out.

Thanks! I actually discovered your smg build about two hours ago, kinda reassuring to see that someone had the exact same idea I had. Looks like we both went about it in the same way as well. :)
 
Looking slick! how are you bonding the parts?

Insanely good application of hot glue. Yeah, ik I should use Barge or something else ideally, but at this point I've gotten good enough at hot glue that I rarely have any exposed glue stains, and my seams are pretty darn good to boot. I like hot glue for repositioning something slightly when I press two pieces together, since the hot glue is still malleable for a min or so for moving.
 
Not going to lie, I've wasted a lot of time by waving this around, blowing away various imaginary enemies. The layering on the receiver and handgrip looks pretty sweet, this thing is nearing completion.

IMG_0125.JPG

All that's left is to slap some sights and a fore grip on, then the barrel, and this thing is pretty much done. Might do some more detailing on the butt, but that's a low-priority task.
 
nicely done!!! I just started reading the thread and at first I didn't think such detail to be brought out of foam. I stand very much corrected.....Superb job. I want one now. Put it on my Christmas list
 
So I finally was able to jump back into work on this project, and I tackled the front handgrip and a lot of covering seams with 2mm foam and sanding.

so the handgrip turned out to be simple, but not easy. I traced out the base of the handle into two symmetrical foam pieces and glee them back to back for the base. After that, I traced out the detailing on thehandgrip onto 2mm foam, and cut it to shape before gluing the pieces into the base, which gave it much needed depth and complexity. Then I cut out a 7/8 in wide strip out of the 2mm foam, and glued it all around the edge of the handgrip to hide the seam. Then I sanded it down until the handgrip looked as seamless as I could get it, and glee it in position.

After that, I took another few 7/8 in wide 2mm foam and edged the rest of the gun that had visible seams, and then sanded all the edges down for more seamless edges.
 

Attachments

  • image.jpeg
    image.jpeg
    3 MB · Views: 194
After a very long hiatus, I've finally gotten back to foam cutting, and pretty fast too. I finished up the silencer, plus the magazine and magwell, and strengthened the floppy buttstock with half-length barbecue skewers piercing it lengthwise.

For the silencer, a sturdy paper towel roll was the exact width I needed, within about 1-2 millimeters. I needed some sort of way to make the silencer both structurally strong, and also transition to about half diameter where it meets the SMG body. Both of these requirements were solved by taking a smaller tube of cardboard, super heavy duty that I swiped from a tin foil roll, and cut out some foam strips to wrap around the outside of the smaller tube until it fit snugly into the larger tube. I didn't wrap the entire smaller tube, just enough in two places to make it even. Once that was done, I eyeballed some shallow cone circles to go on the two ends of the silencer, and sanded them down.

I realized that the cardboard grain on the main body of the silencer would be super obvious after painting, so I decided to go super duper advanced hardcore mode and wrapped a piece of paper around the silencer, before gluing it on securely. I like using thin or thick paper to smooth out or cover up accidents on bits of armor, like a slipped knife or something, so I knew it would look and paint fine.
IMG_0057.JPG IMG_0056.JPG IMG_0058.JPG
Then I had to carefully measure the angle at which the inner tube intersected the body of the gun, as it comes in at a weird non-45 degree curving slope. Accidentally got it perfect the first time attaching it, and dumped 4 gallons of hot glue on it to make sure it stayed put.

The magazine and magwell were pretty straightforward, i just traced out some templates from reference pictures, and layered a lot of craft foam to get the depth and detail I liked. I really like the magwell, since I didn't measure a single part of it, it was all eyeballed off of a single flat template. I don't know if the pictures show it, but the magwell actually is covered by several carefully beveled and sanded layers of craft foam on every side.
Magwell Nice.JPG SMG Mag.JPG

PS almost forgot, I also made the holo sight on top, which is just one core chunk of 3/8 foam with a templated foamie wrapped around top.

FullSizeRender.jpg

At this point, the major parts of the SMG are finished, all that's left is smoothing out some of the edges, whip up a laser/flashlight for the side of the silencer, and carve a trigger, and this baby will be ready for painting. At its widest point, the SMG has eight different layers of foam, which is way more detail than I expected going into this build. My only regret is that I didn't have this bad boy for the last con I went to, since I now have to wait about 9 months for the next one to roll around :p
 
VERY nice job. Looks already good unpainted.
Painted, this thing will look awesome.
 
Looks awesome dude! This is making me want to dust off my smg's and finish them off haha.
 
Looks awesome dude! This is making me want to dust off my smg's and finish them off haha.
Thanks for the support! It looks like we both went around making our SMGs in the same way, so if you have any specific questions about how I went about making mine, feel free to ask and I'll do my best to answer them, along with providing any videos or photos if you want.
 
Status
Not open for further replies.
Back
Top