The Force Awakens Stormtrooper Armor Build [WIP]

Status
Not open for further replies.
It turned out that my scaling was correct to within a millimeter even though I hadn't used the `measure distance` feature in Pepakura, so I kept moving ahead. That was an incredible discovery though, and a big thanks to PerniciousDuke for letting me in on that trick!

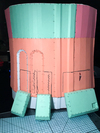
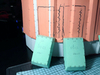
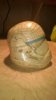
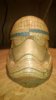
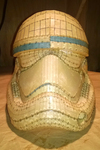
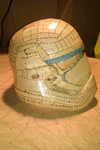
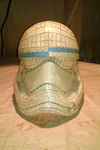
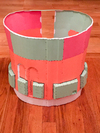
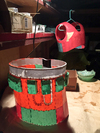
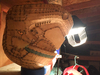
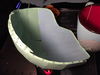
Since starting earlier this evening, one of the shoulders is now complete. At the moment though, I couldn't tell you which one (left or right). The folds are tighter and the pieces are smaller, and the piece came together quite a bit faster/better than the ab plate. I did still run into a little but of bunching here or there, which you can see from the picture. The gap won't be an issue to fix in resin/bondo so overall I'm happy with how this one turned out.

5KD65cH.jpg


There is, however, a mysterious missing piece that's numbered and tabbed on the printed pieces, but doesn't exist in the pep. Sometimes these pieces can be found outside the borders of the grid of 2D pep pieces, but in this case the piece is just nowhere to be found. Apparently it would have gone on the inside of the top of the shoulder, but at the last second it was removed from the file.

52NgDI9.jpg


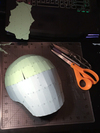
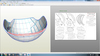
The folded version in Pepakura Designer shows the piece as it exists in real life, sans missing piece. I'm not really sure what the deal is here, but whatever. Moving on to the next shoulder!

K49e2G0.jpg
 

Attachments

  • 5KD65cH.jpg
    5KD65cH.jpg
    267.4 KB · Views: 243
  • 52NgDI9.jpg
    52NgDI9.jpg
    219.8 KB · Views: 207
  • K49e2G0.jpg
    K49e2G0.jpg
    192.3 KB · Views: 235
Last edited by a moderator:
I find the measure tool crucial. First I scale it for proportions and then I check the distance of all the openings to make sure I'm going to be able to fit in it. I haven't had to re-pep a single thing since I've learned about it! :D
 
Sweet build so far. Love how its coming out and the detail really shows.
 
There is, however, a mysterious missing piece that's numbered and tabbed on the printed pieces, but doesn't exist in the pep. Sometimes these pieces can be found outside the borders of the grid of 2D pep pieces, but in this case the piece is just nowhere to be found.

Oh, I just remembered, sometimes they can be hidden underneath other, larger, pieces. There is another tool... In the 2d Menu, try running the option "Check Overlapping Parts" it will flag them in red. I've found tiny pieces under big ones before. Keep it up, your progress is looking great!
 
Ok thanks for that tip as well. I'm looking forward to using pep soon and I'll keep this one in mind.
 
Hey ! it looks really good! I also work on a helmet project but on a clone Phase II helmet. But I need some explanation and some tips :( ... Can you contact me on Skype :)? And sorry for my english ^^
 
Last edited by a moderator:
I have to say, daviduffy, I am pretty smitten that I've been able to help you in some way on this. Considering that your first Halo build you made a few years ago was how I first got into and learned so much about building peps in the first place!

Following that train of thought, Skypheo, almost all of the help you need is already on this site. Read through some tutorial threads, or check out the all-in-one manual in the New Recruit sticky and then find someone who is doing something similar to you and follow along with them on their thread. You're lucky in that you've found daviduffy's thread, he is very thorough and clear in his explanations and is to the point about areas of concern on his builds.
 
Last edited by a moderator:
wow! i really want to try pep. i tried it once but didnt have the right paper :/ and i also do not know how to scale :/ ill do more research... Good luck man!
 
I would love and try to make this helmet for myself and for my son, but I was wondering what you did with the pieces that are placed outside of the helmet layout in the pepakura (the 4 little airvents that are on the side and top of the helmet), I don't see them on your model and also the folding of them in the Pepakura seem near to impossible. Did you leave them out in your pep (and do you have another way maybe to create them aterwards?).
Any advice welcome before I begin on this project of a lifetime :)
Thx in advance!

Good eye, and great question! I decided to omit these from the pep. Like you said, the size and scale of them made it seem absurd to even try. I will need to find a different medium with which to make them -- perhaps foam, or perhaps I will try my hand at resin-casting. Honestly, I have no idea how I'm going to solve that one. I will eventually post about it once I do though, so stay tuned!
 
Well, I have a small update. I'll start by saying that things have been moving slower recently, which is kind of a bummer. I need to start hardening these pieces to keep my motivation high. All of this pepping is getting boring.

Anyways, I have been trying to figure out how to add the utility belt "things" to the ab plate. To clarify -- I'm not talking about the parts that attach to the rubber belt, I'm talking about the circle of 7 boxes above the belt. These pieces are represented in the files as separate from the ab plate, even though every completed version of this armor I have seen has them actually attached. This is just going to be a freehand situation, which usually makes for slow going.

I've made up the first three boxes that will be attached, and roughed-in where they will go. One thing is certain: these need to be built into the actual ab plate, not hardened separately and attached to the outside (some details on the Master Chief suit taught me that). As usual, I'm deferring the majority of the cleanup work to the bondo stage, but here's my strategy:

I've made up the pieces using the same scale factor as the ab plate, which has worked pretty well so far. I'm in the process of placing and drawing super rough outlines of where the pieces will go, and then I'll use a few tiny amounts of glue to tack the pieces into place. After that, I'll remove the inner paneling from the ab plate so that I can incorporate the utility belt things into the actual ab plate instead of keeping them as separate pieces. And finally, I guess I'll just keep my fingers crossed that the whole thing will still be flexible enough to bend and allow a human into it! I'm sure some weirdo maneuvering and/or part modification will be required to accommodate that.

Whatever, all in good time.

Js0fcJC.jpg

(I know the sharpie lines aren't straight, don't worry. They aren't attached yet.)

jbt4Qb1.jpg
 

Attachments

  • Js0fcJC.jpg
    Js0fcJC.jpg
    306.7 KB · Views: 195
  • jbt4Qb1.jpg
    jbt4Qb1.jpg
    303.7 KB · Views: 196
It looks like you're on a good track thinking about it and working through it. For some reason it lost the post I made, so I'll try to recap here. Question: Why don't you want to harden separately and attach to the outside and what happened with your MC build in that regard?

I think you're right to be concerned about mobility and ease of adorning the ab plate if those pouches are hardened into it. From images I've seen of the FO trooper, those pouches are attached separately. I can see a gap and a shadow, most likely secured by a single point which would offer the most mobility. My thought would be to use something like these belt clips. Buy them before you harden the ab plate and work the clips into the hardening process instead of trying to attach them later. Or if you can't, put extra reinforcement there so that at the end you can just drill a hole through to nut and bolt the clip down. Plus how cool would it be to make those pouches semi function?! :)

Nice work though, despite slowing down. Sizing looks spot on.
 
Hey PerniciousDuke

Those clips look like a good idea -- I will probably use something like those, or some heavy duty snaps for fastening some of the pieces together. However, any kind of fastening device is a potential failure point for the suit, which is why I generally try to avoid attaching hardened pieces to one another. I'm sure your idea would work, especially if the clip was worked into the structure of the piece. I just prefer less pieces.

According to this video, it looks like the Anovos pre-made stuff comes with the utility pockets at least partially cast. I also noticed that their ab plate is split down both sides, which doesn't seem ideal. If I can eliminate even one of those two seams as well as work some of the pockets into the ab plate piece, I'll be satisfied.

AGHyNzf.png
 

Attachments

  • AGHyNzf.png
    AGHyNzf.png
    330.3 KB · Views: 300
Last edited by a moderator:
ANOVOS Knows what they are doing. I would follow them. But also they deal with fiberglass and molders instead of origami super edition (lol that's what it felt like to me tho). They split it for easy access to take on and off.
 
Quick post, I have the inner and outer resin coat completed on the helmet. Here they are!

9PkI1lJ.jpg


pmTLSkN.jpg


JE3Z2cJ.jpg


Going to put in some more time this week finishing the pep on the back closure piece/thermal detonator. The ab plate itself is finished at this point, and all of the little utility pieces are attached, just waiting for resin!
 

Attachments

  • I8TEpRO.jpg
    I8TEpRO.jpg
    43.7 KB · Views: 221
  • z61fszk.jpg
    z61fszk.jpg
    45.5 KB · Views: 218
  • Xb9Ec8O.jpg
    Xb9Ec8O.jpg
    261.8 KB · Views: 229
  • JE3Z2cJ.jpg
    JE3Z2cJ.jpg
    289.8 KB · Views: 189
  • pmTLSkN.jpg
    pmTLSkN.jpg
    253.9 KB · Views: 197
  • 9PkI1lJ.jpg
    9PkI1lJ.jpg
    238.2 KB · Views: 217
I am finally fully into the resin stage with several of the pieces!

In the world of pepping, I finished attaching the little cargo compartments to the ab plate, and have moved on to pepping the thermos (thermal detonator) that goes on the back plate. I admit that I am getting a bit tired of the pep work, but it is probably because of the slow freehand work that I had to do on the ab plate cargo areas.

I realize it kind of looks like crap, but once it gets fully into the hardening phase it's all going to come together. Before putting any resin onto the piece, I made sure to measure around my torso where I think the top and bottom of the ab plate will hit, and adjusted the piece accordingly. With the little paper brace in place, it fits into the bottom of the inner chest/back piece, and still (according to my measurements) is big enough for me to fit inside of it. I'll figure out how that's going to happen eventually; for now, I'm just happy to be finished pepping the damn thing.

G7vGSsW.jpg

I had a bad feeling about it, but it worked out.

As for resin work, I had some trouble sourcing the typical cheap-o paintbrushes from local dollar stores, so I was not able to move into this phase with many of the pieces until just recently. A week or so ago, I ordered a huge mass of crap brushes from Dollar Tree, and they have just arrived! With progress unblocked, I can officially continue with resin.

gbvVe4h.jpg

This is what $34 of paintbrushes looks like.

My progress is as follows:

Outer Resin Complete
Inner Chest/Back
Ab Plate
Back Plate

Outer and Inner Resin Complete
L and R Shoulders

Fiberglass in Process
Helmet

ZY015G9.jpg


I am obviously most excited to be moving forward with fiberglass for the helmet. I have it about one quarter of the way done, and should hopefully be over 2/3rds of the way complete by the end of this weekend!
 

Attachments

  • G7vGSsW.jpg
    G7vGSsW.jpg
    377 KB · Views: 196
  • ZY015G9.jpg
    ZY015G9.jpg
    379.7 KB · Views: 179
  • gbvVe4h.jpg
    gbvVe4h.jpg
    358.8 KB · Views: 195
I realize it kind of looks like crap,

Are you kidding?!?! This is looking so good!

Looking at the helmet gives me chills. The good kind. You'll definitely be able to keep the order in that thing. :)

Best of luck in the coming stages!
 
Fiberglass progress update!

I finished the preliminary glass on the helmet. I'll only have to circle back to fiberglass for the helm if there are weak spots/areas that were missed, or if I need deeper resin coverage to accommodate heavy sanding in the bondo phase. I AM SO EXITE.

tumblr_lojsg8bhRP1qjazks.gif


I will have to update with some images of how I handled the internal vented areas, and the mic/vocoder housing. It wasn't that difficult though, and all of that is wrapped up. Here she is, drying

FUXOkIf.jpg


The sports bra is now fully resin'd inside and out, and the ab plate is close -- fully done on the outside, and almost fully complete on the inside. The resin hasn't totally closed the gaps where I free-handed the utility pockets in, but I didn't expect that to happen until fiberglass anyways. Everything in that regard is progressing pretty much as I thought it would.

VwOkn6L.jpg


I also got one of the shoulders fully fiberglassed. One side of that piece was a little bit crooked (bent in), so I built out a little bailing wire brace to keep it positioned at the correct width while it cures. I could potentially heat the piece (before bondo) and re-shape it, but I figure this is an easier way to take care of the problem. We'll see if any further work is needed there.

UzcGn62.jpg

Here's the whole family so far.

No progress on the back plate (needs inner resin) or the thermos (still pepping). I'm realizing I will probably need to rondo the thermos once it's finished, since it will be an enclosed piece. That will be interesting!

For pep work, after the thermos is finished and attached to the back plate, I will probably go biceps > forearms > hand plates. All of these little pieces are mind-numbingly boring to cut out and fold, I tell ya.

Last thing for tonight is a realization I have come to. I need help figuring out what to make the eye pieces out of. I have no idea. I have looked around/left comments on previous builds, but haven't really gotten responses. Since it's the helmet, I need it to be as screen-accurate as possible! Anyone have ideas?

I have also just realized that I need to figure out a solution for the black grill thing in the front as well. These problems are creeping up!

Pep In Progress
Thermal Detonator (Thermos)

Outer Resin Complete
Back Plate

Outer and Inner Resin Complete
R Shoulder
Inner Chest/Back
Ab Plate

Fiberglass Complete
Helmet
L Shoulder
 

Attachments

  • UzcGn62.jpg
    UzcGn62.jpg
    364.6 KB · Views: 184
  • VwOkn6L.jpg
    VwOkn6L.jpg
    354.3 KB · Views: 192
  • FUXOkIf.jpg
    FUXOkIf.jpg
    362.6 KB · Views: 191
  • tumblr_lojsg8bhRP1qjazks.gif
    tumblr_lojsg8bhRP1qjazks.gif
    305.1 KB · Views: 231
I need help figuring out what to make the eye pieces out of.

Find someone with a vacu-form table? At least they don't look like an unusual shape or color. You'll be able to just use whatever dark window tint you can find. Maybe find some kind of ski goggles that are already tinted? Your pep shows them bulge more than they look from the pics I've found on google (below).


I have also just realized that I need to figure out a solution for the black grill thing in the front as well. These problems are creeping up!

I amazon searched "honeycomb silicone" and these pot holders came up. Lots of other options too, but many are very small. This one might actually be too thick. I don't know, it's something.


TFAStd01-1536x864-533318783063.png


I don't know if you have them over there, but in Washington we have community fab labs. It's like a membership thing, you pay for a month and you get access to fabrication machinery. Usually like table saws, bandsaws, but many have 3d printers now. You might need to go that route for the silicone looking part and the black "frames" around the lenses.


What weapon are you going to do??!?? (besides the thermal detonator)

TFAStd01-1536x864-533318783063.png
 
Last edited by a moderator:
Status
Not open for further replies.
Back
Top