- Member DIN
- S128
Re: Duke's Halo 4 Venator Pep Build *WIP (1st suit Step-by-Step) +photos!
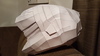
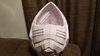
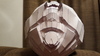
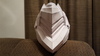
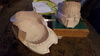
And voila!

This turned out to be a pretty tricky helmet. It is so angular that symmetry is crucial. All the little mistakes I made get noticed really easy when you look at it at the wrong angle. One that I really hope I can correct with bondo is the lopsided muffin top of the helmet when looking at it dead on. It is leaning to the left just slightly.


I forgot to close the hole at the top, not intentional and it is closed now.

Happy New Year everyone!!!
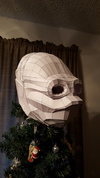
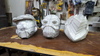
And voila!
This turned out to be a pretty tricky helmet. It is so angular that symmetry is crucial. All the little mistakes I made get noticed really easy when you look at it at the wrong angle. One that I really hope I can correct with bondo is the lopsided muffin top of the helmet when looking at it dead on. It is leaning to the left just slightly.


I forgot to close the hole at the top, not intentional and it is closed now.

Happy New Year everyone!!!