ZP's First Full Suit Build - ODST WIP

Status
Not open for further replies.

Fallen

Well-Known Member
Community Staff
Member DIN
S922
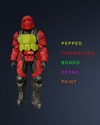
So this will be my WIP thread for my first real build. I'm aiming for an ODST made out of a combination of pepakura and foam.

I'm starting with Hugh Holder's ODST model found in the file archive, but there are some files I've seen that I'm mulling over using instead such as Kirrou's HD Forearms.


ProgressPic.png

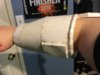
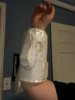
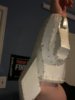
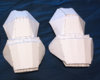
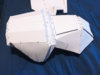
As of yet I have pepped out both shoulder plates, hip plates, and biceps all from Hugh's model. I'm likely to re-do the biceps as I think they're a little too small and want to try slightly larger. Thankfully they print on one page so I'm not wasting a bunch of paper re-doing them. I also pepped and did the first coat of resin on the forearms before the weather here took a nosedive. However, as I said in my example, I'm leaning towards the HD forearms instead, but I'm going to wait until I've finished pepping the rest of my pep pieces before I move forward on that idea.


Each weekend I intend to post what I intend to finish in the coming week.
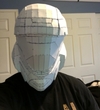
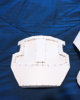
This week: HELMET PEPPED
 

Attachments

  • 2016-01-19 07.51.38.jpg
    2016-01-19 07.51.38.jpg
    162.8 KB · Views: 197
  • 2016-01-19 07.51.49.jpg
    2016-01-19 07.51.49.jpg
    148.8 KB · Views: 201
  • 2016-01-19 07.51.57.jpg
    2016-01-19 07.51.57.jpg
    177.1 KB · Views: 186
  • ProgressPic.png
    ProgressPic.png
    734.1 KB · Views: 219
Re: ZP's ODST WIP

Credits and Thanks

  • Hugh Holder for his amazing models
  • mkshane81for the hip plate unfold
  • cayoke for adding the files to the archive
  • RobotChicken for the Silhouette Cameo tutorial (immensely helpful)
  • Cereal Killl3r for his tutorials on fiberglassing
  • Xtreme TACTICS 10 for his scaling tutorial - using method 1 for most, method 2 for helmet
  • All the members of the 405th for their advice, project, and answering my dumb questions.

I imagine this list will grow as this project continues.
 
Last edited by a moderator:
Re: ZP's ODST WIP

A little weekend update. I didn't have a lot of time to work on my build this weekend. Spent a lot of time looking for houses. I'm finally ready to make that jump into adulthood by buying my first house. Visited a couple of great properties over the weekend and scheduling to look at another one sometime this week. Enough about home searching. Here's what I did manage to do:

I built the front plate that hangs under the belt.
2016-01-23 14.04.48.jpg
One of the techniques that I've gone to using when waiting for pieces to dry is to take bull clips of varying sizes (the ones I used on the front are the smallest I have. If I'm going to do multiple tabs clipped at once like the picture below, I put glue on two tabs, clip the first, then stay ahead of my clips with the glue.
2016-01-23 13.33.57.jpg
I also managed to rebuild and try out one of the biceps at a larger size. My previous ones were way too small on me, so I think after hardening these ones will work.
2016-01-24 18.50.12.jpg 2016-01-24 18.50.24.jpg

I've decided to post pics of my forearm pieces that I built and resined in December. They were the first pieces that I did before working on some boot covers. Those never came out the way I wanted, so I trashed them and am considering if I'll even do the boot covers or use my combat boots instead.

I'll finish this post by adding some links to pieces I"m thinking about for my undersuit and gloves:
Undersuit I'm thinking Subdued Urban Camo from amazon. Shirt, pants
Gloves probably some airsoft gloves found here with fingers or here without
And last instead of building the neck pieces out of foam I might just buy this although it might just be easier to build the neck piece.
 

Attachments

  • 2016-01-22 17.01.57.jpg
    2016-01-22 17.01.57.jpg
    1.6 MB · Views: 196
  • 2016-01-22 17.02.20.jpg
    2016-01-22 17.02.20.jpg
    401.3 KB · Views: 213
  • 2016-01-22 17.02.26.jpg
    2016-01-22 17.02.26.jpg
    368.4 KB · Views: 193
Re: ZP's ODST WIP

Great idea with the clips. What kind of glue are you using that takes so long to dry?
 
Re: ZP's ODST WIP

Great idea with the clips. What kind of glue are you using that takes so long to dry?
I'm using normal Elmer's Glue, and it doesn't take long to dry. Although I will say my bottle of Elmer's does seem more watery than I remember from elementary school. The clips just allow me to keep moving on with other things without having to worry about my tabs slipping at all. I might put together small pieces, or right now I've spent time preparing my Silhouette Studio files for printing, scoring, and cutting.

After looking at the forecast for this weekend, I decided to switch gears. We're going to get a break from the winter weather, so I'm hoping to get out and do some fiberglassing. With that in mind I want to get as many pieces ready for that as possible, so the shins are going on hold until the weekend. Didn't think I'd have enough time this week to get them done by Saturday what with looking at a house tonight, mentoring tomorrow night, and a work meeting Thursday evening.

So last night I worked on the belt buckle. This one was rough with all the little pieces. Some of my tabs were too big, so I had to cut them off before glueing. Netflix became my best friend for awhile. It's definitely not perfect, and I may redo it (possibly with foam?), but works for now.

2016-01-25 21.38.56.jpg2016-01-25 21.59.51.jpg

As I said, I have quite a bit going on the rest of the week, so I may not get much more done. Hoping to get the butt pack done. Cameo files are prepped, pages printed, just need to be cut and scored. So glad I have that Cameo to do all the tedious scoring and cutting work.
 
Re: ZP's ODST WIP

Yeah, the Cameo sounds sweet. Just a note that a lot of tabs end up being too big. They are usually set to 5mm, but you can change that. I use 3mm. Just enough to easily fold, but not too big to glue into tight spaces. As for the glue, my little brothers use this stuff called Tacky Glue. I don't think it's expensive and you should be able to find it at any crafts store. I think I recently saw that RobotChicken uses it too. Dries just as fast as you'd want it to.

Great work you're doing especially with such a big event going on. Good luck with the build and the new house!
 
Last edited by a moderator:
Re: ZP's ODST WIP

Glad to hear the Silhouette tutorial has helped out another costumer!

Yes, I'm now using Tacky Glue instead of Elmer's, which enables faster pepping without flaps coming undone or shifting. It stays wet long enough to get the edges aligned but sets up fast. I'm actually using a Quick Dry variety which sets up very fast (too fast sometimes).

The flaps in my Cameo unfolds are (mostly) adjusted for the faces they attach to (narrower faces get smaller flaps). That's why I like to get a model pepped before uploading so I can verify flap sizes and assembly before it goes public. (I changed the Mk VI helmet unfold at least 3 times before reaching its current version.) You can change the size and shape of individual flaps or groups of flaps before exporting, and you can also use Silhouette Studio's editing tools to modify flaps too. A new technique I'm using now removes flaps from both sides of a "smooth" seam so the cardstock sets level on both sides of the seam. The parts are so much smoother this way and means less sanding and filling later on. It takes only slightly more time modifying the parts before cutting, but that work isn't as hard as sanding hardened resin and Bondo. You can see it described with pictures here if interested: http://www.405th.com/showthread.php?t=39850&p=750086&viewfull=1#post750086.
 
Re: ZP's ODST WIP

You have an idea of what you are going to do for your visor? Good work.
I've been thinking about it for some time but have not come to a conclusion yet. I know vacuforming is out of the question in my current situation. Read a lot of other ODST threads to see what they're doing. Might look more into what Marawuff did for her scout helmet because that looked amazing.

Yeah, the Cameo sounds sweet. Just a note that a lot of tabs end up being too big. They are usually set to 5mm, but you can change that. I use 3mm. Just enough to easily fold, but not too big to glue into tight spaces.

Glad to hear the Silhouette tutorial has helped out another costumer!

You can change the size and shape of individual flaps or groups of flaps before exporting, and you can also use Silhouette Studio's editing tools to modify flaps too. A new technique I'm using now removes flaps from both sides of a "smooth" seam so the cardstock sets level on both sides of the seam. The parts are so much smoother this way and means less sanding and filling later on.

I'll look more into tab sizes and adjusting them. In some cases I've gotten used to just cutting off the tab and making custom ones that glue on the inside of both. I did that on the shoulders because some of the tabs slanted, and that last bit gets so small it's hard to fold.

Thanks for the tips guys. Tips and constructive criticisms are always welcome. Especially when I get to bond (dreading/fearing it).
 
Re: ZP's ODST WIP

Weekend update:

So far I have pepped forearms, biceps, shoulders, and hips for both left and right sides as well as the front hip plate, butt plate, belt buckle.

2016-01-28 20.13.06.jpg2016-01-28 20.12.58.jpg2016-01-28 20.13.14.jpg2016-01-30 11.50.44.jpg


Thanks to a break in the winter weather, I was able to get outside the past couple of days to resin and fiberglass. Yesterday, I set up early in the morning and started coated the outside of my models with resin. I added a little bit of pain to the mix to help me see where I was spreading it. Put one coat on the outside and two coats on the inside of each piece. This morning, I used some adhesive spray and laid down the fiberglass cloth in each piece. I did not get to do the forearms as I ran out of fiberglass cloth. The temperatures are already dropping, so I'll have to wait until the weather breaks again to do those. In the meantime I'll buy plenty of fiberglass cloth and cut out strips.
2016-01-31 13.10.35.jpg


Though it might be useful to document some of my process for pepping, so here it is. First, I create my files following the method shown in RobotChickens cameo tutorial. I adjust it slightly for what works best for me. When I have my cameo files prepped, I print out the files for each page and store them in a Ziplock bag until I'm ready to cut them.
2016-01-23 12.49.54.jpg

Below is the image of my cameo and part of my workspace including some of my McFarlane figures. Since this picture was taken, I was able to add The Rookie from Halo 3: ODST (yay!). I run each page through the cameo at minimum once to score the folds and a second time to cut the pieces out. In some cases I didn't print the lines out, so I have to go through it two more times to color the fold lines with the sketch pen. When those are cut out, I remove them from the cut mat with a razorblade and put the pieces in the bag.
2016-01-23 12.53.01.jpg2016-01-31 16.09.00.jpg

Finally, it's time to set pepping the file. Set up the model on one screen and often times either Netflix or Pandora on the other to pass the time. On weekdays I can get in about 30-90min of pepping, but weekends I try to pep until I just can't anymore.
2016-01-23 12.53.13.jpg
part 1/2​
 
Re: ZP's ODST WIP

Great work! I like how you're keeping progress with the picture on the first post :b
 
Re: ZP's ODST WIP

part 2/2​
Thoughts and Plan

I've done a lot of thinking about where I want to go with this project, and how I want to accomplish everything. My goal is to have the suit done by August for a con in Chicago.

The Plan

Papakura

  • Helmet
  • Chest
  • Shoulder Plates
  • Biceps
  • Hips
  • Belt Buckle
  • Thigh Plates
  • Shins
  • Forearms

Foam

  • Chest core
  • Shoulders (under plates)
  • Thighs

Purchased Gear

  • Under suit camo
  • Gloves
  • Boots(already owned)

Other things that I've been working through mentally are my weapon props. I have a BoomCo Magnum already which I've painted. I still want to add a light and fix some things like sanding off logos. If anyone knows, another gun I've been looking into for a simple prop would be the SMG by BoomCo which I would paint and make a silencer. Can anyone give me an idea as to the size of this gun?

My ultimate goal with props should I have the time is to build one of the assault rifles(version TBD) which I would then use an Arduino to build and program an ammo counter. That project is far in the future right now, but it never hurts to plan and work through what skills I need to work on.

As always any suggestions, advice are welcome.
 
Last edited by a moderator:
Haven't posted an update in a short while. Updates are probably going to be farther between for awhile as I'm starting on some of the larger pieces that require more time and effort to get done. Last week, I started on the first shin piece. Had a few issues with fold lines not getting scored well enough with my cameo. Probably wasn't paying enough attention as I set up each page. This led to wasted pages and having to redo things. Put together some of the smaller sections first(especially those pieces that go inside others and are awkward to put together within the larger context.

When putting the actual form together, I started with the back, because if the calf section doesn't work when bending my knee and pointing my foot (think shortest distance you'd get) then the piece won't work for movement. Unfortunately, despite using measure distance between two points, the piece was too long to be comfortable, and the amount I would have to trim off would be too much to be worth it. So I pushed it aside to finish later to use for testing things like strapping and paints.

Needed some motivation to keep going, so I'm starting on the most exciting piece, the helmet. There's just something about a helmet that makes me want to work harder. The model I'm using is the ODST Helmet by Hugh V2.
helmetModel-Original.png

I like how this helmet is modular in design. I'm building up each module individually, then I'll start piecing them together working from front to back. In the below, the pieces are simply being held by some bull clips and are not glued.
2016-02-07 22.00.25.jpg2016-02-08 20.32.33.jpg2016-02-03 21.45.04.jpg

As for the visor, I intend to do similar to what several other ODST projects have done without building a vacuum form machine, a walkthrough can be found here with the original tutorial here.

Probably won't have another update until next week, but if anyone has some suggestions for more accurate measuring of shin pieces please share.
 
Well I've got a brain bucket pepped. Liked the modular build of the helmet for the most part. It was nice being able to come home from work and be able to pep out several pieces within an hour or so. Got the pieces done yesterday, and finished putting it all together today.
2016-02-13 14.07.45.jpg2016-02-10 20.19.31.jpg2016-02-13 14.55.51.jpg


I sized it based on the distance to get it over my ears, and I still had to trim about a cm out to slide on easily which should give me space enough when it's hardened and I've added some depth and weather stripping around the bottom.
2016-02-13 20.10.58.jpg2016-02-13 20.16.01.jpg

Looking at the image of the helmet on my head, it looks like it might actually be a little large. Should I redo it smaller and trim out more to be able to fit it over my head?

Next part: Outer thigh plates. I'll do the inner thighs in foam and outer pepped.

Updated: Here's a photo without the hoodie and taking Duke's advice from below on putting a shirt inside to replicate having foam inside. Without help from someone or a mirror, I can't get a further away pic.

2016-02-142014.20.56.jpg
 

Attachments

  • 2016-02-142014.20.56.jpg
    2016-02-142014.20.56.jpg
    111.9 KB · Views: 149
Yes, I definitely think that you should do another helm. I say that because it looks to be rather large length wise. Also, I'm editing this post because I just scrolled up the page, and noticed that you mentioned removing the parts off the cutting mat with a razor blade. I know that the tool that was included with the Cameo doesn't work very well. For me I went to Hobby Lobby, and purchased a small spatula shape tool. Its made for the Cricut cutting machine. Works very well!

281104__1_2_zpsqu9n0rrr.jpg
 

Attachments

  • 281104__1_2_zpsqu9n0rrr.jpg
    281104__1_2_zpsqu9n0rrr.jpg
    16.1 KB · Views: 154
View attachment 23638

Looking at the image of the helmet on my head, it looks like it might actually be a little large. Should I redo it smaller and trim out more to be able to fit it over my head?

The one, difficult to view because it's sideways, close up picture of your head is not enough to judge off of. Your bunched up hood around your neck changes the perception. Second, judging it without seeing it compared to the rest of your limbs is a bit one sided. So far, nothing jumps out at me saying that it is too big. If you do take another picture, be sure to also throw a wadded up thin t-shirt in there or something to simulate the padding. Either way, excellent pep work as usual!

Yes, I definitely think that you should do another helm.

I don't think it's very constructive to tell someone they should redo their work without attempting to explain why..
 
I don't think it's very constructive to tell someone they should redo their work without attempting to explain why..[/QUOTE]

Wasn't my intent to come across that way. Thanks for pointing that out.
 
Status
Not open for further replies.
Back
Top