So after being inactive for about two and a half years... Here I go again.

Status
Not open for further replies.

Jason225

Active Member
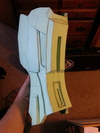
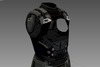
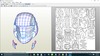
It's nice to see that this forum is still going strong after all this time. Activity seems a lot lower than before, which is a bit disheartening, but I've been a member since 2007 so I've seen this place at it's peak. It's time to celebrate my own return to costume and prop building by starting a new build, an old-school ODST. I've attempted this many times before and contributed a ton of ripped and unfolded in-game assets but never actually went any further than getting a few parts pepped. Here's the helmet file I'll be starting with: A rip of the ODST helmet from Halo Reach. The file is available for download here. http://www.4shared.com/file/iwlR1LEdce/Helmet.html
odst%20helmet_zpsjqdph9xj.png
 

Attachments

  • odst%20helmet_zpsjqdph9xj.png
    odst%20helmet_zpsjqdph9xj.png
    413.7 KB · Views: 265
Best of luck to you on your odst helm. Mine turned out sloppy the first time so I went with the halo 3 recon. But im sure an oldie like yourself will have no problem! Keep us informed on your progress!
 
I started pepping my ODST helmet. So might pull some of that 'senior' knowledge as I build. Looking forward to this build.
 
ALRIGHT, first update! Gonna be pic-heavy, mostly planning but also a piece update.

Part 1: What I Have Done

Alright, so to get myself started back in the pep game, I decided to do the shin piece first before tackling that helmet. I found one I liked on the file archive detail-wise, but it was a bit too thin for my liking compared to the in-game appearance. So I pulled the .obj for the one in the file archive and superimposed it on the (significantly lower-res) game model from H3:ODST, and stretched it sideways until I got it just right. I just finished the shin piece a couple days ago, as you can see here.

Side note: The tubular nature of this piece allows for some flexibility in regards to the shape when it's in paper. To prevent it from squishing from one side to the other, I'm actually going to have to bring the file back into 3DS Max and create some support struts for it.

20160304_132553_zpsnlliy7kz.jpg


Part 2: Undersuit Plans

Now, I have seen a lot of incredible ODST builds throughout the years, and the one thing that always takes away from the incredible paint jobs, weathering, and physical details of the armor in my opinion, is the undersuit. A lot of great armor pieces have been, I wouldn't say RUINED, but maybe kept from looking as good as they could because they're just thrown over a black Underarmor bodysuit. I plan to go all out with my undersuit, making it as game accurate to the H3:ODST BDU as possible. To start with the base, as you can see by this picture of the arm of the in-game model in 3DS Max, It appears to be a black thermal underwear kind of material, so I'm going to start with a tight-fitting long-sleeve thermal top. The gray parts on the shoulders appear to be some type of neoprene or vinyl padding, to attach the shoulder armor to. I'll have to make a pattern and choose a material, then sew those patches on. There's also a small part in the armpit that appears to be a straight-up T-shirt material, so I'll probably just add a little patch of that as well.

underarm_zpssjp3eukl.png


Now here, the piece I have circled in red I'm not sure about. It definitely has a different texture than the grey material on the shoulder, and it actually looks like metal. It's a small piece, so cutting and bending some small sheet metal to go on there isn't totally out of the question, but for the sake of not having to figure out how to attach a piece of metal to the thermal shirt, I may just go ahead and use the same vinyl or neoprene I end up using for the shoulder in a slightly different shade.

bicep_zps21bu81dc.png


Here's where things get interesting. When the stomach armor is removed, a whole new world of detail emerges. All of this will most likely be done in foam, but it'll be my first ever attempt at using foam for anything so I'll have to figure out what I'm doing with that.

stomach_zpsqidtkxfe.png


And above that foam detail on the stomach, things get a little less set-in-stone. The underarmor for the chest isn't modeled or textured, likely to save room on the bitmap and to save polys since you'll never see under the chestpiece anyway. You can tell by the area that circles the armholes that there's certainly hard armor on the front and the back. I'd like to go ahead and pep it, but it's obvious that the hard armor on the front and the back are two separate pieces, as evidenced by the straps on the sides of the midsection. Figuring out where to blend the solid armor and the foam on the stomach will also be tricky, since the texture is so dark, it's hard to see where one's supposed to end and one begins. The big shoulder straps shouldn't be any trouble, they'll just be EVA foam with a gray overlay material stretched over it and glued to the bottom, and nylon webbing sewn onto it. The metal connectors I'll just cut out of sheet metal and attach to the chest armor just by inserting it in the Bondo filler before it's dry.

chest_zpsogkurtb1.png


So that's it for now. Any ideas on the massive undersuit project would be much appreciated. I'm mainly focused on the torso, as the legs appear to just be the same black thermal material with some kind of gray khaki material over the crotch area.
 

Attachments

  • 20160304_132553_zpsnlliy7kz.jpg
    20160304_132553_zpsnlliy7kz.jpg
    578.9 KB · Views: 323
  • underarm_zpssjp3eukl.png
    underarm_zpssjp3eukl.png
    285.8 KB · Views: 250
  • stomach_zpsqidtkxfe.png
    stomach_zpsqidtkxfe.png
    534.4 KB · Views: 254
  • bicep_zps21bu81dc.png
    bicep_zps21bu81dc.png
    392.9 KB · Views: 273
  • chest_zpsogkurtb1.png
    chest_zpsogkurtb1.png
    219.5 KB · Views: 283
Shin looks amazing! keep up the great work!
Thanks! I unfortunately may end up redoing it, it's SLIGHTLY (like an inch and a half maybe) too tall. I also edited the file a bit more to make the knee piece fit more where it's supposed to and gave it a proper way to attach, created some support struts, and overall just made a couple (subjective) improvements to fit my tastes, so I'd like to use my new file anyway. Glad you're enjoying the build though, I really am too. I haven't been this excited about a project in a long time. I'd like to find somewhere to buy an M7S raw cast though, because weapons are absolutely not my forte. I'd be more likely to buy a block of aluminum (expensive) and mill it out to make an all metal SMG than to do any kind of wood carving or weapon pepping. Layered MDF might be an option though, if I feel like I can get the amount of detail I want out of it. 3D printing also has potential, but it's also expensive. Come to think of it though, a metal SMG prop would be incredibly badass. Might keep that in mind for when I can buy my own bench mill or at least have a machine shop that I can use for personal projects. Might be fun to mill it out to receive Glock 17 internals and get an SBR tax stamp. Not sure how I'd solve the issue of the slide punching me in the face if I tried to attach the stock, but hey, a man can dream, right?
 
Good luck! I was gone long enough that my 4shared account got deleted :(

Is this a Reach or Halo 3 ODST?
 
Bobby: definitely Halo 3 ODST.

Jason: Sean Bradley includes patterns for the grey shoulders and crouch area. If you can contact him, he might share that even though you aren't buying his kit. Personally, I used some detailed airsoft armor, so I didn't have to add my own details. But I did make the shoulders out of fabric (same as the shoulder straps) and plan to replace them with vinyl soon.

Sent using Tapatalk.
 
Status
Not open for further replies.
Back
Top