Jme's H3 MKVI Foam build

Status
Not open for further replies.
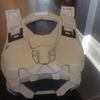
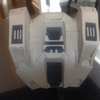
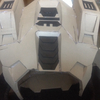
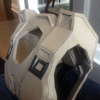
Some of the piece safe very rough. I now have a huge appreciation for people who do really clean foam work. However, I am very confident in my ability to fill and sand the rough spots (after doing a stormtrooper build which involved bondo, filling and sanding foam is easy!).


"I'm just a witness"

This is all Eva foam? i am looking into starting my own build and have seen many different ways to build suits (ect.: foam, card-stock, ...). i think I'm going to go the foam rout and mount all the arm pieces to a cheap pressure suit. is the foam easy to work with though?
 
Kaween touched on a few good points, there.

Jme, you're doing a wonderful job by forking out this much progress in a matter of days. Keep in mind to not rush the project either. That will certainly cause you more headaches than it's worth. There's great potential here, especially from your previous projects. I look forward to following this build. :cool

Thanks!

I do plan to take my time, I just wanted to get a good start while the family was away.
 
This is all Eva foam? i am looking into starting my own build and have seen many different ways to build suits (ect.: foam, card-stock, ...). i think I'm going to go the foam rout and mount all the arm pieces to a cheap pressure suit. is the foam easy to work with though?

Yes, it is all foam. I am finding it pretty easy to work with. There is a definite learning curve, but the nice thing about foam is that it is forgiving. I am using a hot knife which I have (unexpectedly) found I can use to take pieces apart if I make a mistake. I ease the hot knife into the joint and slowly melt the glue until it comes apart. Also, with foam it is easy to add/remove pieces if something isn't quite right.

There are a number f fixes that I need to make to my chest piece but with what I have learned so far I know it won't be too much trouble.

do you think it would be possible to have the arm pieces mounted to a pressure suit then the chest and back piece connect via clips
 
I would mount the bicep pieces to the chest using straps and Velcro to keep them in place. There are a couple of good threads on strapping.


"I'm just a witness"
 
Your skills with foam are amazing. I love the clean cuts and how AWESOME everything looks so far. ;_; Really great job!


Also, to be honest I only saw the asymmetrical parts when kaween pointed out! O_O
But yeah - mostly we are our own biggest critics. XD
 
Last edited by a moderator:
  • Like
Reactions: Jme
Thanks Mara!

I consider this high praise considering how nice your armour is turning out.

And yes, we are our own worst critics!


"I'm just a witness"
 
Your skills with foam are amazing. I love the clean cuts and how AWESOME everything looks so far. ;_; Really great job!


Also, to be honest I only saw the asymmetrical parts when kaween pointed out! O_O
But yeah - mostly we are our own biggest critics. XD


... call it professional-induced behaviour. I've been a QA-Engineer for a bigger part of my professional life. Somehow, I don't even have to search for stuff like that. I just SEE it.
I think/hope Jme knows full well that nothing I said was meant as negative critisism and he's doing an amazing job for sure.
But symmetry is the main reason why I'm going for 3D print as I KNOW how bloody hard it is to achieve full symmetry on such a build, and the more I look at my armor, the more the countless symmetry errors I made are driving me wild.
When I look at his pictures, (PLEAAASE DO NOT MISUNDERSTAND ME) I see several other symmetry issues (mainly at the back portion, but those won't matter as they will normally not be the point of attention. No one will EVER see that.

But light ports that aren't evenly wide ? That's like shouthing "hey look at me, I'm not the same size as the other side". :D
 
  • Like
Reactions: Jme
No worries, you were bang on!

As soon as I looked at it again I saw the same symmetry issues you were talking about.

Luckily, I am nowhere near close to finished the chest and all ready have a plan to fix the problem.

I will never take suggestions and help the wrong way.


"I'm just a witness"
 
Truth be told, when I was looking around for a better biceps template I found a chest template that I like better than the one I did.

This one may just become the test build. I am going to complete this chest and see how I feel about it.


"I'm just a witness"
 
Truth be told, when I was looking around for a better biceps template I found a chest template that I like better than the one I did.

This one may just become the test build. I am going to complete this chest and see how I feel about it.


"I'm just a witness"

if you can, i would greatly appreciate a link to the chest piece template you found.
 
... call it professional-induced behaviour. I've been a QA-Engineer for a bigger part of my professional life. Somehow, I don't even have to search for stuff like that. I just SEE it.
I think/hope Jme knows full well that nothing I said was meant as negative critisism and he's doing an amazing job for sure.
But symmetry is the main reason why I'm going for 3D print as I KNOW how bloody hard it is to achieve full symmetry on such a build, and the more I look at my armor, the more the countless symmetry errors I made are driving me wild.
When I look at his pictures, (PLEAAASE DO NOT MISUNDERSTAND ME) I see several other symmetry issues (mainly at the back portion, but those won't matter as they will normally not be the point of attention. No one will EVER see that.

But light ports that aren't evenly wide ? That's like shouthing "hey look at me, I'm not the same size as the other side". :D

To that, I agree.
I can understand that working with foam makes symmetry harder to achieve. O_O
But yeah, I agree, the holes for light should be evenly wide and long, especially on chest piece - you move your arms and legs which isn't as recognizable as front/back of the chest piece.
 
Totally agree too. After taking a long look at the piece and really thinking about it, I have decided to re-do the chest. It's not just the symmetry, I have done some other parts wrong.

I am going to start right from the design phase. I am going to use the same pattern but make some changes in pepakura to overcome some of the mistakes I made on this one.

And then I am going to add in the extra details while cutting so it is not left to the end.

It will be awesome!

But first I am going to finish my helmet...t


"I'm just a witness"
 
I really appreciate the comments and discussion by the way..[emoji1303]


"I'm just a witness"
 
Why did I have voice of Caboose in my head when I wrote "it will be awesome"?


"I'm just a witness"
 
Well, I got most if the way finished my helmet tonight.

And then realized it is way too small.

Time to re-scale.


"I'm just a witness"
 
Finally an update!

Okay, over the last month I have re-done the chest plate. I went right back to pepakura and fixed some of the symmetry issues. I also really tried to take my time in the build and added in detail as I went.

35f0431c5d7d95b7bb15e3f8029e466e.jpg

925dd68bc9e11faa6fb99e679a2df275.jpg

eb680fca8b52bdd1c175235aac847079.jpg

a6acd5c72bce41f61f9e98c9b6c8cd3d.jpg


I am really happy with how it turned out. After taking the photos I cut it and added attachment clips. I also tried it on with the motocross armour. It fits pretty much perfectly.

Oh, you may notice some unintentional battle damage caused by inadvertent hot knife exposure.
 

Attachments

  • 35f0431c5d7d95b7bb15e3f8029e466e.jpg
    35f0431c5d7d95b7bb15e3f8029e466e.jpg
    349.9 KB · Views: 152
  • 925dd68bc9e11faa6fb99e679a2df275.jpg
    925dd68bc9e11faa6fb99e679a2df275.jpg
    329.9 KB · Views: 168
  • eb680fca8b52bdd1c175235aac847079.jpg
    eb680fca8b52bdd1c175235aac847079.jpg
    342 KB · Views: 153
  • a6acd5c72bce41f61f9e98c9b6c8cd3d.jpg
    a6acd5c72bce41f61f9e98c9b6c8cd3d.jpg
    352.1 KB · Views: 172
Status
Not open for further replies.
Back
Top