Jme's H3 MKVI Foam build

Status
Not open for further replies.
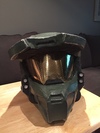
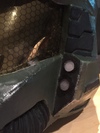
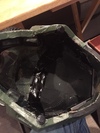
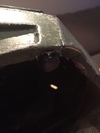
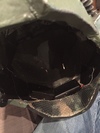
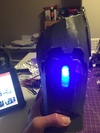
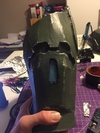
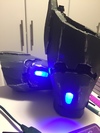
Now the bad news. I was trying on my chest piece to see if my voice amp fit in the booster and the opposite side from my buckle ripped. Not completely awful as I will just add a buckle on that side but it means a new seam.

This is the worst. I pretty much had the same issue with my VoiceBooster and ended up resorting to carrying it in a chest rig, which I mean is an option for an ODST but maybe not so much for the Chief. Are you mounting it against your chest or in the shoulder?
 
This is the worst. I pretty much had the same issue with my VoiceBooster and ended up resorting to carrying it in a chest rig, which I mean is an option for an ODST but maybe not so much for the Chief. Are you mounting it against your chest or in the shoulder?

I am planning to mount it up in the jet pack booster. I will see if there is room in the chest, but I really don't think there will be.


"I don't know what is weirder - that you're fighting a stuffed animal, or that you seem to be losing." - Suzie
 
Helmet wiring is done.

f95397f2e43aa46e0880a5ee390589b8.jpg


Search lights are clear cabinet door pads backed with CD case plastic and some paper as a diffuser. Side are painted with acrylic.

4a3b96b079cae255119c3031d1391fb1.jpg


I really wanted to diffuse the lights so that they didn't blind people or spoil photos [emoji51]

8ede1eac76cd47c87edac1f1180d2469.jpg


The wires inside are covered with gorilla tape that I glued down.

7c1aaac79560e09eadd4da5a448d884a.jpg


The lights and fan are each controlled with button switches

3ca94569a681c7d991334129c3f03bad.jpg


Fan is mounted as before over the accordion tube in the front.

f85d681c4b4375966b30bb79e9f61d4a.jpg


Batteries are located in the neck scoop in the back, which gives the helmet a nicely balanced weight

3728d0a4e3c463b2ecdaf8df9c0d41fc.jpg


"I don't know what is weirder - that you're fighting a stuffed animal, or that you seem to be losing." - Suzie
 

Attachments

  • f95397f2e43aa46e0880a5ee390589b8.jpg
    f95397f2e43aa46e0880a5ee390589b8.jpg
    186.3 KB · Views: 160
  • 4a3b96b079cae255119c3031d1391fb1.jpg
    4a3b96b079cae255119c3031d1391fb1.jpg
    197 KB · Views: 179
  • 8ede1eac76cd47c87edac1f1180d2469.jpg
    8ede1eac76cd47c87edac1f1180d2469.jpg
    178.1 KB · Views: 169
  • 7c1aaac79560e09eadd4da5a448d884a.jpg
    7c1aaac79560e09eadd4da5a448d884a.jpg
    232.2 KB · Views: 157
  • f85d681c4b4375966b30bb79e9f61d4a.jpg
    f85d681c4b4375966b30bb79e9f61d4a.jpg
    200 KB · Views: 147
  • 3ca94569a681c7d991334129c3f03bad.jpg
    3ca94569a681c7d991334129c3f03bad.jpg
    146.6 KB · Views: 159
  • 3728d0a4e3c463b2ecdaf8df9c0d41fc.jpg
    3728d0a4e3c463b2ecdaf8df9c0d41fc.jpg
    221.6 KB · Views: 156
nice job with the helmet lights and good thinking on diffusing them. i bought 10mm diffused LEDs and they are still very very bright. So plan on braking the suit out for haloween?
 
nice job with the helmet lights and good thinking on diffusing them. i bought 10mm diffused LEDs and they are still very very bright. So plan on braking the suit out for haloween?

Thank you.

I live for Halloween. I actually made the suit specifically for Halloween (the ability to suit up for cons is an added bonus).

It should (hopefully) be finished this weekend.


"I don't know what is weirder - that you're fighting a stuffed animal, or that you seem to be losing." - Suzie
 
I see those cuts in the helmet and lights worked out for you :thumbsup. Looking awesome Jme, keep up the amazing work!
 
Thank you.

I live for Halloween. I actually made the suit specifically for Halloween (the ability to suit up for cons is an added bonus).

It should (hopefully) be finished this weekend.


"I don't know what is weirder - that you're fighting a stuffed animal, or that you seem to be losing." - Suzie

I cant wait to see all your hard work finished up this weekend. looks great, I like how you made the lights diffuse so well. Great location for the batteries as well. I didn't see one but do you have a bill of materials list on the lights and what not? im thinking of adding something like this to the kids Halo costume for next months build! I need to order those fans that you have. those look like they can really move some air!

Thanks again for sharing!

Thanks!

I don't have a bill of sale but all of the components were bought off of eBay from Hong Kong or mainland China sellers. The total cost, including the soldering iron was something like $20 USD.

I bought all of the components separately but I have to say that if I did it all again I would buy pre-wired LEDs. Wiring the LED to the resistor to the wire is a total time-consuming PITA. I spent two hours last night just doing that and I'm not done yet. I would be finished by now if I had just gone with pre-wired LEDs, wire, battery boxes and some shrink tubing.

The fan doesn't move a ton of air as it is only 5w but it is enough to keep the visor clear while still being able to hear.


"I don't know what is weirder - that you're fighting a stuffed animal, or that you seem to be losing." - Suzie
 
Forearm lights are done.

I am actually soldering the entire lighting sequence myself (if anyone is listening save yourself a ton of time and buy pre-wired LEDs. Wiring the LEDs with the resistor is a pain).

I used an old blueray CD case as the port cover and sanded the inside to diffuse the light. I also covered the inside of the port with aluminum foil to reflect the light and hot glued Gorilla Tape over everything inside to protect the lights and wires.

The LEDs are wired in parallel off a 3xAA box with a button switch.

cea1942469d2ca6b2d3fda4fa21e0301.jpg

a7950cbc340d222d8270f7bc653a9c39.jpg

5d0070d0ef9bbf914517a5ee396ff913.jpg

592492222c030ba791720377c84c3423.jpg


"I don't know what is weirder - that you're fighting a stuffed animal, or that you seem to be losing." - Suzie
 

Attachments

  • a7950cbc340d222d8270f7bc653a9c39.jpg
    a7950cbc340d222d8270f7bc653a9c39.jpg
    184.4 KB · Views: 164
  • cea1942469d2ca6b2d3fda4fa21e0301.jpg
    cea1942469d2ca6b2d3fda4fa21e0301.jpg
    208.7 KB · Views: 158
  • 5d0070d0ef9bbf914517a5ee396ff913.jpg
    5d0070d0ef9bbf914517a5ee396ff913.jpg
    154.2 KB · Views: 156
  • 592492222c030ba791720377c84c3423.jpg
    592492222c030ba791720377c84c3423.jpg
    179.3 KB · Views: 158
Almost ready for battle. Great job w/ the lights.

Getting there slowly...


"I don't know what is weirder - that you're fighting a stuffed animal, or that you seem to be losing." - Suzie
 
Getting there slowly...


"I don't know what is weirder - that you're fighting a stuffed animal, or that you seem to be losing." - Suzie

Slowly is better than nothing right? :p Awesome work with the lights, I'm excited to see everything put together!
 
  • Like
Reactions: Jme
Slowly is better than nothing right? :p Awesome work with the lights, I'm excited to see everything put together!

Yes indeed and thank you.

Really trying for completion this weekend.


"I don't know what is weirder - that you're fighting a stuffed animal, or that you seem to be losing." - Suzie
 
JME, sorry for all the questions but i have yet to find this in the searches of multiple different forums here.

1. Did you use anyone in particulars "unfold" for foam?
2. Do you have access to any of the unfolds for the Mark VI in PDF format? or do they all have the PDO for pep?
3. Do you know where i could find the files in PDF format?

I love your build... the lights, the vents, the fans... genius!
 
  • Like
Reactions: Jme
JME, sorry for all the questions but i have yet to find this in the searches of multiple different forums here.

1. Did you use anyone in particulars "unfold" for foam?
2. Do you have access to any of the unfolds for the Mark VI in PDF format? or do they all have the PDO for pep?
3. Do you know where i could find the files in PDF format?

I love your build... the lights, the vents, the fans... genius!

Thank you very much for the compliment!

I used the Robogenesis unfolds edited for foam by Demolition found in this RPF thread: http://www.therpf.com/showthread.php?t=130172 they are probably in the archive but I had already saved them from the RPF thread...

With the exception of the forearms. For those I used the Flyingsquirel Forearms found in the medium detail Mark Vi file in the archive: http://www.405th.com/medium-detail-...-751-halo-3-mk-vi-medium-detail-forearms.html

I don't have them in PDF and haven't seen the files in PDF. The problem with PDF for building armour is how you are going to scale the files. Theoretically you could give your measurements to someone, have them scale it for you in Pepakura and save or scan the individual sheets as PDFs?

The problem with doing it this way though, is that you have no basis of reference for putting the pieces together. The pep pieces come out like a big jigsaw puzzle. It is hard to understand how the pieces fit together even using pepakura. Having the pieces as PDF without the pepakura for reference would be nearly impossible.
 
Work on the lights continues. However, I tried something that came out super cool!

Acetone image transfer.

Here is a helpful YouTube video by SteelSpartan


As this is an image transfer, you have to make sure that your image is reversed (I had the Canadian Regiment and Spartan Branch images saved in my templates folder and just used an online imaging site to make a mirror image)

I found that after I wet the paper with acetone I needed to let it sit for a about 10-20 seconds for the image to transfer. The nice thing was that not all of the ink transferred so it made it look old.

71f8bd89e743eef0126190e54969c546.jpg

79753b772b7c5c7e78ea8903380da287.jpg

c434ff9c15595781330d3ca7a0d7f74e.jpg

3269547ce2aa452b575004bcaa01e4b9.jpg


I think it turned out great and will be using it to put the same images on the back of my chest piece and my username on the front of the chest.

Note: I tried both a laser printed image and a photocopied one and only the laser print would transfer.

"I don't know what is weirder - that you're fighting a stuffed animal, or that you seem to be losing." - Suzie

71f8bd89e743eef0126190e54969c546.jpg


79753b772b7c5c7e78ea8903380da287.jpg


c434ff9c15595781330d3ca7a0d7f74e.jpg


3269547ce2aa452b575004bcaa01e4b9.jpg
 
Last edited by a moderator:
That's awesome! I'm definitely checking this out when I get to that stage in my build!
 
  • Like
Reactions: Jme
Dang, thanks for that. That's one of the issues I've been stuck on. All the markings on my suit I had planned on hand painting, then going through the weathering process, but this might be a nice solution for some logos and such, then deal with only having to weather some of the other markings.
 
  • Like
Reactions: Jme
Status
Not open for further replies.
Back
Top