Halo 5 Cortana Project

Status
Not open for further replies.
Oh my goodness! Thank you a bunch! It looks great! I'm assuming I can open this in blender right?

Yep. I've left it as an OBJ file in case I needed to do any further work to it.

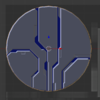
I gave it a look over, it's a little on the large side- should be roughly 5cm in diameter if my measurements are accurate

You can enter the scale manually in Pepakura.

and is inverted but is otherwise perfectly on point!

Inverted how, exactly? I followed references from appearances of the glyph throughout the Halo series, it's pretty much spot-on.

What did you make it in?

Blender. I'll probably need to go back in and extrude some edges so it's a little thicker - it's only 2mm thick at the moment, at current scale, so giving it a little more thickness (another 5-8mm) should make it pretty much good to do. I designed it mostly with 3D printing in mind, however.

EDIT: I've thickened the file out to 6mm (at your suggested scale of 50mm diameter), if you like I'll package the file up and send it your way.

EDIT THE SECOND: I've checked my model against larger-resolution screenshots I've found, and the model certainly seems on-point.
 
Inverted how, exactly? I followed references from appearances of the glyph throughout the Halo series, it's pretty much spot-on.

I think inverted, because on Cortana's chest it looks like the Mantle sign is 'inside' and doesn't go outside.
It's lit up inside, resembles hardlight with some metal-looking cover on top of it.
 
I think inverted, because on Cortana's chest it looks like the Mantle sign is 'inside' and doesn't go outside.
It's lit up inside, resembles hardlight with some metal-looking cover on top of it.

It's worth noting that I used THIS as a reference for the bevels and overall construction of the model - this is a render of the in-game model of the Mantle of Responsibility icon used in the Halo 4 mission, Composer. Unfortunately I can't seem to access the model itself.

EDIT: I do see that I need to mirror the icon, I can do this quite easily.

I know this Eld symbol, I remember. Even 343 Guilty Spark had it.
The 'blue' is always underneath, however.

Halo3-343GS-MantleSymbol-Eld.jpg

Found a nicer ref, you can see clearer, the Eld symbol never really changed.

H2A-Cell_Eld.png

If you manage to invert the model, it'd be very helpful for Ishida... just hope Ishida has access to 3D printer. o.o
 
The 'blue' is always underneath, however.

Check out the attached image - I adjusted one of the model's materials to account for the colouring suggestion, as well as having mirrored the file and thickened it out to about a 8mm. I'm slightly curious as to whether or not the icon itself is double-sided - it wouldn't be a difficult thing to adjust it.

That said: I'm fairly certain that the model's reasonably on-point. It doesn't look to be too difficult to assemble even in Pepakura.

EDIT: the icon's orientation seems to conflict between Bungie's style and 343i's style. I've mirrored the file as requested, mainly to link up with game accuracy, though I question the reasons behind the icon's being mirrored.
 

Attachments

  • Mantle Icon v2.zip
    7.2 KB · Views: 335
  • mantle icon thumb 2.PNG
    mantle icon thumb 2.PNG
    64.1 KB · Views: 355
With all these reference tidbits and help....I think your 4 year completion time is an over estimation. Even w/ the as "close to game accuracy" as possible your shooting for, I think you'll beat that time frame....Looking forward to your start on this eagerly.
 
Check out the attached image - I adjusted one of the model's materials to account for the colouring suggestion, as well as having mirrored the file and thickened it out to about a 8mm. I'm slightly curious as to whether or not the icon itself is double-sided - it wouldn't be a difficult thing to adjust it.

That said: I'm fairly certain that the model's reasonably on-point. It doesn't look to be too difficult to assemble even in Pepakura.

EDIT: the icon's orientation seems to conflict between Bungie's style and 343i's style. I've mirrored the file as requested, mainly to link up with game accuracy, though I question the reasons behind the icon's being mirrored.

I know this Eld symbol, I remember. Even 343 Guilty Spark had it.
The 'blue' is always underneath, however.

View attachment 27327

Found a nicer ref, you can see clearer, the Eld symbol never really changed.

View attachment 27328

If you manage to invert the model, it'd be very helpful for Ishida... just hope Ishida has access to 3D printer. o.o

Thanks for the help and support guys! Yeah, I meant that it needed to be mirrored haha it's perfect otherwise and very on point. Thank you for scaling it down too, Chernobyl. I'll probably need to scale it up for the one on the back panel but that's not a big deal. For whatever reason I can't seem to open it in blender.It just doesn't want to read it.

I don't actually have active access to a 3d printer unless I go to the library, I may have to get it done custom from someone or go bug a craft and design student lol.

I know 4 years is probably an overestimation for time but I'm mostly factoring in available time and funds as I am still a student and will be returning to college in September which will cost me a fair bit on both fronts and also the fact that I don't intend to attend any conventions for at least a little while until I finish my studies or I have the extra cash and it's worth my time. This project is not really something I'd want to wear to a cosplay picnic simply because of the electronics involved in it and it's something more for the convention masses in my books :) I'd rather wear a slightly more casual cosplay or a MJOLNIR suit for a picnic XD.

SIde note: My friend was saying that I should find a Chief when I debut her and follow him around the con. Lol any volunteers?
 
I may have just convinced my friend to be Cortana for our august con, so I am going to be following your thread closely now yay! IDK why she wants to start with 2 months left but...

Your research is very thorough, looking forward to more updates :p
 
Chernobyl
Do you have any resource materials or references of Cortana's model in active mode? I'm trying to figure out the lights and everything but the hardest part is below the waist where there's very few actual scenes in-game that show that region. Basically if you have anything I can use for reference I'd really appreciate it. Also, how do I tag?

For the hard-light armour I'm thinking of using PETG plastics (Link here). It's much cheaper and you get more for your dollar than purchasing clear worbla which runs close to $90 for the Jumbo sheet. If mistakes are made it's less of a loss than if I purchased the clear worbla. I'm curious to know if anyone else has used the stuff or has an opinion? Is it easy to use and form?
 
Do you have any resource materials or references of Cortana's model in active mode?

I'm afraid not. Any reference material we have comes either from the game cutscenes or the renders 343i put out for us - I don't have access to the game model for Cortana.

...yet :p

Also, how do I tag?

Use the 'mention' tag - it functions in the same way as quote tags, simply add my name between the tag open and close. If you're using the full reply editor, it's the blue speaker icon on the bottom row of icons, at the top of the editor window.

For the hard-light armour I'm thinking of using PETG plastics (Link here). I'm curious to know if anyone else has used the stuff or has an opinion? Is it easy to use and form?

You can form this quite easily, assuming you have a decent base from which to do so. My advice would be to seek out a method for vacuum-forming the pieces - you're going to have a fun time making the buck for your mould given how there are a lot of curves, however. Following the contours of your body might be a challenge - if you could make a bodyform of yourself and then use that as a base, you'd be some way towards your goal.

Aside from that - the hard-light armour seems to be a multi-layered one-piece leotard. I fear you may have issues with bending and moving, particularly around the bust area. I would advise sitting down and sketching out a basic brain-storm of how you'd like the set laid out.
 
IshidaRyusei You can also just type the @ sign and then without a space type the person's name like @ Chernobyl becomes Chernobyl :) If you spell it right it works, if you don't spell it write you can just go back and edit it.
 
I'm afraid not. Any reference material we have comes either from the game cutscenes or the renders 343i put out for us - I don't have access to the game model for Cortana.

...yet :p

Keep me posted I guess lol. I'll try to study what I have.

Use the 'mention' tag - it functions in the same way as quote tags, simply add my name between the tag open and close. If you're using the full reply editor, it's the blue speaker icon on the bottom row of icons, at the top of the editor window.
Thanks, that will make things much easier.


You can form this quite easily, assuming you have a decent base from which to do so. My advice would be to seek out a method for vacuum-forming the pieces - you're going to have a fun time making the buck for your mould given how there are a lot of curves, however. Following the contours of your body might be a challenge - if you could make a bodyform of yourself and then use that as a base, you'd be some way towards your goal.

Aside from that - the hard-light armour seems to be a multi-layered one-piece leotard. I fear you may have issues with bending and moving, particularly around the bust area. I would advise sitting down and sketching out a basic brain-storm of how you'd like the set laid out.

I'm not super familiar with vacu-forming plastics but I'm no stranger to it. I look forward to learning new techniques to say the least. I do understand your concerns about mobility, which thankfully seems to be something the designers took into consideration as well. Almost every portion of the armor is segmented in some way, especially around the bust, legs and back. Makes my job easier and I have a deep respect for them for that. Even the understructure was thouroughly planned and designed so that it's connected to specific areas. Most oof the understructure will be done with foam.

IshidaRyusei You can also just type the @ sign and then without a space type the person's name like @ Chernobyl becomes Chernobyl :) If you spell it right it works, if you don't spell it write you can just go back and edit it.

Thanks!
 
Rather than using vacuum-forming thing I'd use TranspArt worbla - transparent worbla.
It would be pretty much the same thing, but worbla is more flexible and won't break, whereas the the other can break easily - even Stormtroopers have problems that their armor can break quite easily.
Also, working with that worbla would be cheaper as you wouldn't have to do any vacuum-table as worbla can be heated and it becomes very flexible - then just put it on the form and work on pressing it on the details... wearing gloves of course.

This is supposed to be the same as worbla just cheaper and much more material for your buck. It's used for orthotics and prosthetics based on what I saw on the site. It should work about the same and molding shouldn't be too difficult with the right tools.
 
Tell you what, I have the TranspArt worbla specifically for Cortana's 'glass-look' after doing much research on what would be more cost-effective for myself. I'll be working on it in the coming weeks and am more than happy to share my trial and errors with you, should you find it useful as a second option. (Heat gun works wonders to shape it!) On the other hand, if you're seriously looking into vacuum-forming, Punished Props has an easy tutorial for constructing one on their YouTube channel by the same name.

At the end of the day, research every possibility and tutorials on the ideas you hope to use :)

I'd appreciate that. I'm not experienced with worbla at all but the PETG plastic came up when I was researching TranspaArt.
 
Expect some updates in the next day or two! It's not much but I have made some small progress here and there. Did a brief makeup test to get a feel of what I can do with what I have and what I can change and I have started a basic template for some of the armour layers.

Sidenote: It appears that I misinterpreted a small area of the armour near the arms and there's actually another layer just below the Hardlight that I failed to identify the first time around.
 
Status
Not open for further replies.
Back
Top