Rexosorous
New Member
sorry if this is in the wrong place, but i'm new here and i couldn't find a "help" forum or anything similar. i've also posted this on the rpf, but not getting many responses. anyway, i've just started trying my hand at making armors out of foam and i'm not satisfied with how it's turning out.
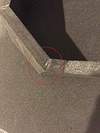
my main problem seems to be how angled i should be making cuts. when two faces need to be joined at an angle (see picture below), i obviously want them to line up and be flush with each other so that the outside is smooth and nothing is sticking out. i had to redo that specific join 3 or 4 times before i got it decent enough for me to accept it. often times i cut it and the angle is waaaay to acute or obtuse and then i'd have to scrap it.

the other thing is, when i form the angles, it looks good to me, but later on i realize that it's just a tad bit off and it throws off the whole piece. so if i'm doing my helmet and all these angles look good to me, by the time i've looped all the way around and now i'm supposed to connect to my starting point, i see that my angles have been a bit off and it doesn't line up correctly. if i try to force them to connect, then it warps the shape and it looks ugly. and my files (AZTLAN's armored batman files) don't tell me what angle these joins should be, and even if it did, there's no way i'd be able to replicate that in my cuts.
similar to that, i can't seem to reproduce the same shapes and angled cuts if it's supposed to be symmetrical. for example, if both the left and right sides need the same rectangular shape and i match up the two shapes i've cut out, they're a bit off from each other. maybe one is just smidge larger or maybe one extends vertically just a bit more, but they're almost never the same. ditto for angled cuts (angled cuts are a recurring problem for me). when i compare the two pieces, one is always a bit more acute than the other. so when i've completed the piece, all those little imperfections add up and one side looks a bit different than the other.
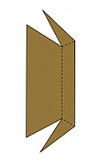
another thing that's giving me trouble is trying to read the pep files. so sometimes there are these thin strips of cuts i'm supposed to make (see picture below). i get that they're meant to help curve the foam, but i can't seem to execute it properly. for starters, that strip is pretty thin and i can't cut that cleanly. my blade will drag the foam just a teeny bit and it won't come out as a straight cut. the other thing i don't understand about this is how to join that together. am i just supposed to leave those as flat surfaces, glue them down, and then bend it all? or am i supposed to make angled cuts here so when i glue it together, it naturally curves.

the other part about reading pep files is i don't understand what to do when it says to fold. when you're doing paper pep, the dotted lines indicate where your'e supposed to fold your paper, but i can't fold foam. so how would i go about doing this with foam?

last thing is i don't understand how to paint it. and this is just me being dumb and literally knowing nothing about how to paint. i hear you're supposed to seal it and put something like 5 layers of wood glue. does that mean i apply a coat of wood glue, let it dry, and then do that again until i've done it 5 times? if i did that though, i'd probably end up with a bumpy surface, right? i mean some areas will be thicker than others because the glue can't be applied perfectly smooth. anyways, after that i'm supposed to add base coat and then a top coat. what's the difference between the base and top coats? are they supposed to be different colors? and if so, how do i decide which colors to use in order to achieve a certain effect.
i've tried searching for these things all over the place, but i can't seem to find the answers i want. maybe this is all intuitive and i'm just the one dumb idiot who doesn't understand any of it. anyway, i thank any and all of you who took the time to read and reply to me. and again, i'm sorry if this isn't the right place to post this stuff or if these are questions that get reposted often.
my main problem seems to be how angled i should be making cuts. when two faces need to be joined at an angle (see picture below), i obviously want them to line up and be flush with each other so that the outside is smooth and nothing is sticking out. i had to redo that specific join 3 or 4 times before i got it decent enough for me to accept it. often times i cut it and the angle is waaaay to acute or obtuse and then i'd have to scrap it.
the other thing is, when i form the angles, it looks good to me, but later on i realize that it's just a tad bit off and it throws off the whole piece. so if i'm doing my helmet and all these angles look good to me, by the time i've looped all the way around and now i'm supposed to connect to my starting point, i see that my angles have been a bit off and it doesn't line up correctly. if i try to force them to connect, then it warps the shape and it looks ugly. and my files (AZTLAN's armored batman files) don't tell me what angle these joins should be, and even if it did, there's no way i'd be able to replicate that in my cuts.
similar to that, i can't seem to reproduce the same shapes and angled cuts if it's supposed to be symmetrical. for example, if both the left and right sides need the same rectangular shape and i match up the two shapes i've cut out, they're a bit off from each other. maybe one is just smidge larger or maybe one extends vertically just a bit more, but they're almost never the same. ditto for angled cuts (angled cuts are a recurring problem for me). when i compare the two pieces, one is always a bit more acute than the other. so when i've completed the piece, all those little imperfections add up and one side looks a bit different than the other.
another thing that's giving me trouble is trying to read the pep files. so sometimes there are these thin strips of cuts i'm supposed to make (see picture below). i get that they're meant to help curve the foam, but i can't seem to execute it properly. for starters, that strip is pretty thin and i can't cut that cleanly. my blade will drag the foam just a teeny bit and it won't come out as a straight cut. the other thing i don't understand about this is how to join that together. am i just supposed to leave those as flat surfaces, glue them down, and then bend it all? or am i supposed to make angled cuts here so when i glue it together, it naturally curves.
the other part about reading pep files is i don't understand what to do when it says to fold. when you're doing paper pep, the dotted lines indicate where your'e supposed to fold your paper, but i can't fold foam. so how would i go about doing this with foam?
last thing is i don't understand how to paint it. and this is just me being dumb and literally knowing nothing about how to paint. i hear you're supposed to seal it and put something like 5 layers of wood glue. does that mean i apply a coat of wood glue, let it dry, and then do that again until i've done it 5 times? if i did that though, i'd probably end up with a bumpy surface, right? i mean some areas will be thicker than others because the glue can't be applied perfectly smooth. anyways, after that i'm supposed to add base coat and then a top coat. what's the difference between the base and top coats? are they supposed to be different colors? and if so, how do i decide which colors to use in order to achieve a certain effect.
i've tried searching for these things all over the place, but i can't seem to find the answers i want. maybe this is all intuitive and i'm just the one dumb idiot who doesn't understand any of it. anyway, i thank any and all of you who took the time to read and reply to me. and again, i'm sorry if this isn't the right place to post this stuff or if these are questions that get reposted often.