You are using an out of date browser. It may not display this or other websites correctly.
You should upgrade or use an alternative browser.
You should upgrade or use an alternative browser.
Duke's Custom Reach Suit Pep +photos!! *COMPLETE*
- Thread starter PerniciousDuke
- Start date
- Status
- Not open for further replies.
- Member DIN
- S128
Re: Duke's Custom Reach Suit with Bruteshot (with Step by Step) +photos!!
Thank you. Yes, people will certainly be surprised when I start pulling drinks out of my belly. Been considering how to make the front part be like a cabinet so I can get my snack on too!
Thanks! I'm already wearing the undersuit in the picture, which is why the size is concerning me.
Progress:
With much consideration, and thanks for all the inputs, I have decided to repep it. It's a very large piece and could throw off the whole suit if not proportional. (Please note the vanity guy on my first post for sizing) While I could trim it to make it "fit" me better, it still won't be proportional. I'm mainly concerned with the neck hole and the canister, both currently are huge and would be difficult to trim. While I've still got the pieces fresh in my mind I will set out on the second attempt. Check back in a week or so and we'll see what we've got!
*Update 7/22 : I just reprinted the pieces. Shaved a couple inches off, changing the scale from 500mm Depth to 449mm Depth. Parts are looking more appropriate and the peping should go a little fast because I didn't have to cut as many pieces in half like before.
Dude that mod for the water bottle is awesome. I love it when people on here mod the suits to make a useful piece out of some part of it. No one is even going to know there is a water bottle in there until you pull it out.
Thank you. Yes, people will certainly be surprised when I start pulling drinks out of my belly.
Been considering how to make the front part be like a cabinet so I can get my snack on too!The chest is a little big but with the undersuit and once you trim it down after the hardening stage I think it will be perfect
The water bottle idea is great !
Thanks! I'm already wearing the undersuit in the picture, which is why the size is concerning me.
That is a good point, might as well see it through and see how the trimming goes before repepping it. Yeah, sorry you had to learn that one, doesn't sound fun. I will definitely keep it one piece for the hardening process, it will help retain it's shape. But, I do like to make the altercations in the paper stage as it is much quicker to make a change to paper than fiberglass.If you're going to be tweaking the fit of the chest to yourself, I wouldn't repep it now. But keep it in one piece until you've reinforced it, learned that the hard way myself...
Progress:
With much consideration, and thanks for all the inputs, I have decided to repep it.
It's a very large piece and could throw off the whole suit if not proportional. (Please note the vanity guy on my first post for sizing) While I could trim it to make it "fit" me better, it still won't be proportional. I'm mainly concerned with the neck hole and the canister, both currently are huge and would be difficult to trim. While I've still got the pieces fresh in my mind I will set out on the second attempt. Check back in a week or so and we'll see what we've got! *Update 7/22 : I just reprinted the pieces. Shaved a couple inches off, changing the scale from 500mm Depth to 449mm Depth. Parts are looking more appropriate and the peping should go a little fast because I didn't have to cut as many pieces in half like before.
Last edited by a moderator:
- Member DIN
- S128
Re: Duke's Custom Reach Suit with Bruteshot (with Step by Step) +photos!!
Progress:
I did it! Another chest piece and I am so happy with the new size. Not only does it feel right when I look down at it and where the edges come to my shoulder, but also that plastic lid I used before fits perfectly.

I'm going to resin it this morning. It is such an awkward shape and weak at keeping itself together, I want to get it solid before it starts tearing itself apart. After this I will show you the great progress I've been making on my brute shot!!
Last edited by a moderator:
TheBlueDragon25
New Member
Re: Duke's Custom Reach Suit with Bruteshot (with Step by Step) +photos!!
Duke this is amazing work for ur first go it looks great keep up the great work and effort
Duke this is amazing work for ur first go it looks great keep up the great work and effort
- Member DIN
- S713
Re: Duke's Custom Reach Suit with Bruteshot (with Step by Step) +photos!!
Your chest piece now looks fabulous! Totally fits now
And these plastic thingies, if they were white, you could say they are pepakura.
Your chest piece now looks fabulous! Totally fits now
And these plastic thingies, if they were white, you could say they are pepakura.
- Member DIN
- S128
Re: Duke's Custom Reach Suit with Bruteshot (with Step by Step) +photos!!
Ha! Thanks. I don't think I'm good enough to pep screw threads, but thanks for the vote of confidence.
Tips on Hardening Pepakura:
1. Look over your whole piece to fix any last minute issues, especially tears you made by trying on the paper! You may need a knife to cut stuff away and you may need your hot glue gun to reseal some tabs. Make sure your piece has proper supports on the inside. Cereal Kill3r has a great technique he uses in his videos involving Popsicle sticks and hot glue. See my Picture 1 to see how I supported the chest piece.
2. Wear a respirator!
3. Work in small batches (only 1oz or 2oz at a time.) Once the appropriate amount of catalyst is added you will typically have between 10-20 minutes to work with it.
4*. Your first coat should be applied to the outside of the piece and in a very thin coat. The idea is to make is to make it look wet. Be sure to wick up an drips or pools of resin. See my Picture 2 for my first half of the first coat
5.* Some times on larger pieces your first coat will take two passes. You don't want to soften a piece and then flip it over. After picture 2 dried I flipped it over and lightly coated the rest of the chest, see Picture 3. After this dries you should be able to remove your supports.
6*. Once fully dried, your second coat should be applied to the inside of the piece and the idea is to make it look saturated, and keep an eye out for holes where the resin may drip out onto the front. Pools are okay on the inside. See my Picture 4.
7. It should now be a decent integrity and any further coats will be at your own discretion. I like to add a thick layer now to the outside to help for when I file down the ridges.
*Make sure that before you walk away from your piece while it's drying, no matter which step, that it is not in an awkward position. I push stuff up against it and use cups to support certain spots so that I make sure it dries in the shape that I want.
Picture 1

Picture 2 -note how it just looks shiny.

Picture 3 -by now, some of the resin has saturated it, but all I really care about is that I apply as little resin as I can while still making sure that I hit 100% of the outside surfaces.

Picture 4 - the really bright white spots in this picture are reflections. There is so much more resin here that it reflects the light.

I also wanted to note, that on large flat areas I like to add extra support. This belly shelf here was done during pepping. I had noticed on my first chest attempt that this spot like to sag and warp a lot. These tongue depressors will actually get resined with the piece and save me lots of bondo work.


Your chest piece now looks fabulous! Totally fits now
And these plastic thingies, if they were white, you could say they are pepakura.
Ha! Thanks. I don't think I'm good enough to pep screw threads, but thanks for the vote of confidence.
Tips on Hardening Pepakura:
1. Look over your whole piece to fix any last minute issues, especially tears you made by trying on the paper!
You may need a knife to cut stuff away and you may need your hot glue gun to reseal some tabs. Make sure your piece has proper supports on the inside. Cereal Kill3r has a great technique he uses in his videos involving Popsicle sticks and hot glue. See my Picture 1 to see how I supported the chest piece.2. Wear a respirator!
3. Work in small batches (only 1oz or 2oz at a time.) Once the appropriate amount of catalyst is added you will typically have between 10-20 minutes to work with it.
4*. Your first coat should be applied to the outside of the piece and in a very thin coat. The idea is to make is to make it look wet. Be sure to wick up an drips or pools of resin. See my Picture 2 for my first half of the first coat
5.* Some times on larger pieces your first coat will take two passes. You don't want to soften a piece and then flip it over. After picture 2 dried I flipped it over and lightly coated the rest of the chest, see Picture 3. After this dries you should be able to remove your supports.
6*. Once fully dried, your second coat should be applied to the inside of the piece and the idea is to make it look saturated, and keep an eye out for holes where the resin may drip out onto the front. Pools are okay on the inside. See my Picture 4.
7. It should now be a decent integrity and any further coats will be at your own discretion. I like to add a thick layer now to the outside to help for when I file down the ridges.
*Make sure that before you walk away from your piece while it's drying, no matter which step, that it is not in an awkward position. I push stuff up against it and use cups to support certain spots so that I make sure it dries in the shape that I want.
Picture 1

Picture 2 -note how it just looks shiny.

Picture 3 -by now, some of the resin has saturated it, but all I really care about is that I apply as little resin as I can while still making sure that I hit 100% of the outside surfaces.

Picture 4 - the really bright white spots in this picture are reflections. There is so much more resin here that it reflects the light.

I also wanted to note, that on large flat areas I like to add extra support. This belly shelf here was done during pepping. I had noticed on my first chest attempt that this spot like to sag and warp a lot. These tongue depressors will actually get resined with the piece and save me lots of bondo work.

Last edited by a moderator:
CoolRextreme
New Member
Re: Duke's Custom Reach Suit with Bruteshot (with Step by Step) +photos!!
Thanks for the kind words:$ I might not have a bunch of experience, but might as well try to give back to the community that has given me the inspiration to even think about trying undertaking such a feat!
Indeed, trimming is very useful, though limited in what it can achieve.
While it is extremely helpful in fixing small mistakes, areas where the game model will not allow for a realistic size, or just to preserve sanity from rebuilding pieces, it DOES take a tad bit away from the actual 'halo accuracy'
But then again, when your strutting your stuff around, no ones going to say "OMG, HE MADE LIKE, THE BACK OF HIS BOOT TO SKINNY, LIKE, WOW, LIKE, MASTER CHIEF WOULD BE SO MAD, LIKE, THE NERVE OF THAT GUY *continued rants*"
Nah, they are going to be so impressed they wont notice half the details at first.
Then again, the paint job is really what the whole thing stands on. Amazing pepping/foam building can be ruined by a crappy paint job. But some amount of crappy pepping/foam building can certainly be hid, or camouflaged by an outstanding paint job!
And yes, Ill try to check up on this build as much as I can. I only regret I will not have much time in the upcoming months.
------
Awesome job so far! And I commend you for taking the time to resize that torso piece! It definitely looks proportionate now!
I also love how you decided to include the canister part, very creative! (but then again, why would I expect less from you)
Also thanks a ton for the resining tips. I wish I saw them sooner.
I did like 3 coats on each side on most of my pieces. To wayyy more resin then I ever needed to use. Oh well.
And yes, Cereal Kill3r's ideas are awesome!
I decided to use painter's stir sticks and clips for the main structure of my torso, then used popsicle sticks and clips to push out any smaller areas.
However in stead of hot glue, I used painter's tape. Simple, strong enough, and no need to mess around with a gun that squirts napalm glue ;D
Also, A quick tip (though it looks like you are already using it)
Painters tape is a resiner's friend!
Unlike most other tapes, it seems to be more paper related, and will actually (to some extent) soak up resin, just like paper (unlike plastic tapes. ie. household scotch tape). For holes, tie-together, or anything else you want to adjust or fix, I recommend using painters tape as an easy go-to. It resins almost exactly like paper, and can easily be applied. You can resin over or around it, and afterwards it can always be cut or just pulled off., or just left Not to mention it's bonding chemicals do not react negatively to the resin.
Not to mention it is easily ripped of a roll of tape by hand, and is plenty strong enough to 'weld' broken parts together, yet is considerable less sticky then ducktape.
There are places on my torso where the tape has just been resined down with the paper, and other then the obvious "there is a piece of tape right there!" there is no difference between it and the paper it is holding together. I will just bondo/paint right over it just like any paper part. Easy.
Keep up the great work, and I look forward to the progress pictures!
Thanks guys!
Update below, but first...
Dude! That is Awesome! Thanks for taking the time to highlight your problems during the sizing stages. It is something not talked a lot about and seeing as how that is exactly where I am right now I will definitely be taking your advice during the process.
I seriously think you should copy and paste what you wrote to me into your thread, in either the first or last post, as a "what I learned kind of thing" there was some really good stuff in there.
I agree with the "be too big, than too small" part as you can always trim this stuff down, but much harder to stretch it out. And yeah, I was going for the triangle shape as a tank type soldier, which your advise on the shoulders will help with.
Really though, I'll probably be calling some of your tips out as I go along, so thanks and I do hope you check back often.
.......
Thanks for the kind words:$ I might not have a bunch of experience, but might as well try to give back to the community that has given me the inspiration to even think about trying undertaking such a feat!
Indeed, trimming is very useful, though limited in what it can achieve.
While it is extremely helpful in fixing small mistakes, areas where the game model will not allow for a realistic size, or just to preserve sanity from rebuilding pieces, it DOES take a tad bit away from the actual 'halo accuracy'
But then again, when your strutting your stuff around, no ones going to say "OMG, HE MADE LIKE, THE BACK OF HIS BOOT TO SKINNY, LIKE, WOW, LIKE, MASTER CHIEF WOULD BE SO MAD, LIKE, THE NERVE OF THAT GUY *continued rants*"
Nah, they are going to be so impressed they wont notice half the details at first.
Then again, the paint job is really what the whole thing stands on. Amazing pepping/foam building can be ruined by a crappy paint job. But some amount of crappy pepping/foam building can certainly be hid, or camouflaged by an outstanding paint job!
And yes, Ill try to check up on this build as much as I can. I only regret I will not have much time in the upcoming months.
------
Awesome job so far! And I commend you for taking the time to resize that torso piece! It definitely looks proportionate now!
I also love how you decided to include the canister part, very creative! (but then again, why would I expect less from you
)Also thanks a ton for the resining tips. I wish I saw them sooner.
I did like 3 coats on each side on most of my pieces. To wayyy more resin then I ever needed to use. Oh well.
And yes, Cereal Kill3r's ideas are awesome!
I decided to use painter's stir sticks and clips for the main structure of my torso, then used popsicle sticks and clips to push out any smaller areas.
However in stead of hot glue, I used painter's tape. Simple, strong enough, and no need to mess around with a gun that squirts napalm glue ;D
Also, A quick tip (though it looks like you are already using it)
Painters tape is a resiner's friend!
Unlike most other tapes, it seems to be more paper related, and will actually (to some extent) soak up resin, just like paper (unlike plastic tapes. ie. household scotch tape). For holes, tie-together, or anything else you want to adjust or fix, I recommend using painters tape as an easy go-to. It resins almost exactly like paper, and can easily be applied. You can resin over or around it, and afterwards it can always be cut or just pulled off., or just left Not to mention it's bonding chemicals do not react negatively to the resin.
Not to mention it is easily ripped of a roll of tape by hand, and is plenty strong enough to 'weld' broken parts together, yet is considerable less sticky then ducktape.
There are places on my torso where the tape has just been resined down with the paper, and other then the obvious "there is a piece of tape right there!" there is no difference between it and the paper it is holding together. I will just bondo/paint right over it just like any paper part. Easy.
Keep up the great work, and I look forward to the progress pictures!
- Member DIN
- S128
Re: Duke's Custom Reach Suit with Bruteshot (with Step by Step) +photos!!
Thanks CoolRextreme ! Good luck at the fire academy! I'm sure I'll still be working on this when you get back and hopefully I can lend you more tips in the meantime. If not, at least there will be pictures.
Thanks CoolRextreme ! Good luck at the fire academy! I'm sure I'll still be working on this when you get back and hopefully I can lend you more tips in the meantime. If not, at least there will be pictures.
Last edited by a moderator:
Re: Duke's Custom Reach Suit with Bruteshot (with Step by Step) +photos!!
still waiting to see that brute shot!
still waiting to see that brute shot!
- Member DIN
- S128
Re: Duke's Custom Reach Suit with Bruteshot (with Step by Step) +photos!!
Ask and you shall receive.
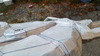
Update:
Here we go guys and gals. Not much different "image" wise, from the pepped piece, but it is solid now. It has a great weight to it. I made sure to never let it dry sitting on one side for too long. Took me 4 evenings to do 2 full coats of resin. After that I did two sessions of rondoing on the inside. I wasn't able to get it 100% rondoed since it is so big, but I will file down the edges and then resin it again. After that it should be ready for shaping. As usual I will document my progress as a tips section since it is my first post doing rondo.

Tips on Rondo-ing a weapon:
1. After you resin the outside of a fully enclosed pep, like a weapon, you will not be able to get inside to fiberglass. Some people have posed using expanding foam, but that is risky. Expanding foam can keep expanding for months after you apply it, which means it could pop your pep like a kernel. So get out your Bondo, or other body filler, and your resin from earlier.
2. Mix the bondo and resin together to make rondo, roughly a 50-50 mix. I like it a little runnier so I did a 5:3 or 5:4 ratio. Meaning 5oz of resin for every 3-4oz of bondo.
3. Be sure to use the same amount of catalysts for bothproducts.
4. Here is the whole process: 5oz resin > 3-4oz bondo > 50 drops of resin catalyst > few circles of cream hardener > stir until no lumps
5. From here simply get it inside the piece and then shake. It should stop running after about 10-15 minutes.
6. Remember to support your piece and check for warping/caving before walking away.
For my big guy here, I drilled about ten 7/32" holes evenly throughout the piece. I picked up some condiment squeezers from the dollar store and from here I was able to get the rondo in without too much getting out. I ended up filling one of the squeezers twice, then let it dry. Then I added another squeezer full, I feel like I should have done two though.

It was a nice sunny day, so while I was squeezing the rondo into the piece I was able to hold it up and see the silhouette of the rondo and attempt to move it around accordingly.
Right now I have to file the edges that stick up down to help smooth out the poly shapes. I broke through the paper in some spots, instead of using krazy glue to re-saturate the paper I am just going to give it another once over with resin. Before I do that I have to fix the curved aimer piece that I pepped wrong. This is the first time I've done a fix like this. I reppped the aiming bar and resined it, then rondoed it. Now I'm going to hot glue it into place and then resin it again.

Thanks everybody!


still waiting to see that brute shot!
Ask and you shall receive.
Update:
Here we go guys and gals. Not much different "image" wise, from the pepped piece, but it is solid now. It has a great weight to it. I made sure to never let it dry sitting on one side for too long. Took me 4 evenings to do 2 full coats of resin. After that I did two sessions of rondoing on the inside. I wasn't able to get it 100% rondoed since it is so big, but I will file down the edges and then resin it again. After that it should be ready for shaping. As usual I will document my progress as a tips section since it is my first post doing rondo.

Tips on Rondo-ing a weapon:
1. After you resin the outside of a fully enclosed pep, like a weapon, you will not be able to get inside to fiberglass. Some people have posed using expanding foam, but that is risky. Expanding foam can keep expanding for months after you apply it, which means it could pop your pep like a kernel. So get out your Bondo, or other body filler, and your resin from earlier.
2. Mix the bondo and resin together to make rondo, roughly a 50-50 mix. I like it a little runnier so I did a 5:3 or 5:4 ratio. Meaning 5oz of resin for every 3-4oz of bondo.
3. Be sure to use the same amount of catalysts for bothproducts.
4. Here is the whole process: 5oz resin > 3-4oz bondo > 50 drops of resin catalyst > few circles of cream hardener > stir until no lumps
5. From here simply get it inside the piece and then shake. It should stop running after about 10-15 minutes.
6. Remember to support your piece and check for warping/caving before walking away.
For my big guy here, I drilled about ten 7/32" holes evenly throughout the piece. I picked up some condiment squeezers from the dollar store and from here I was able to get the rondo in without too much getting out. I ended up filling one of the squeezers twice, then let it dry. Then I added another squeezer full, I feel like I should have done two though.

It was a nice sunny day, so while I was squeezing the rondo into the piece I was able to hold it up and see the silhouette of the rondo and attempt to move it around accordingly.
Right now I have to file the edges that stick up down to help smooth out the poly shapes. I broke through the paper in some spots, instead of using krazy glue to re-saturate the paper I am just going to give it another once over with resin. Before I do that I have to fix the curved aimer piece that I pepped wrong. This is the first time I've done a fix like this. I reppped the aiming bar and resined it, then rondoed it. Now I'm going to hot glue it into place and then resin it again.

Thanks everybody!
Last edited by a moderator:
Re: Duke's Custom Reach Suit with Bruteshot (with Step by Step) +photos!!
Nice to see progress on the brute. Overall how is the warping, especially from the top view?
Nice to see progress on the brute. Overall how is the warping, especially from the top view?
- Member DIN
- S128
Re: Duke's Custom Reach Suit with Bruteshot (with Step by Step) +photos!!
Warping is pretty much the same that was there during the pepping. I made sure to not resin or rondo too much in one session for that reason. First coat I did about 1/3 of the piece, let it dry and did another 1/3 and so on until I did 2 full coats.
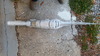
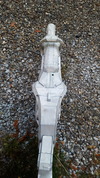
Top view: (the top three little things that stick up, in like a triad, the middle one caved down around it, bummer but fixable)

Bottom view: (still has that warp in the blade around the middle of it, evens itself out though so I'm okay with it)

Side view: (This shows the only other two spots that have warped. One on both sides where the biggest "panel" around the middle of the gun, and then again on the bottom of the gun right side in the picture)

The extra warpage only occurred because I forgot that the bondo in the rondo makes it warm up and warming up the resin makes it bendable again. In any case the changes are all fixable with some slight bondo work.
Thanks for asking.
Nice to see progress on the brute. Overall how is the warping, especially from the top view?
Warping is pretty much the same that was there during the pepping. I made sure to not resin or rondo too much in one session for that reason. First coat I did about 1/3 of the piece, let it dry and did another 1/3 and so on until I did 2 full coats.
Top view: (the top three little things that stick up, in like a triad, the middle one caved down around it, bummer but fixable)

Bottom view: (still has that warp in the blade around the middle of it, evens itself out though so I'm okay with it)

Side view: (This shows the only other two spots that have warped. One on both sides where the biggest "panel" around the middle of the gun, and then again on the bottom of the gun right side in the picture)

The extra warpage only occurred because I forgot that the bondo in the rondo makes it warm up and warming up the resin makes it bendable again. In any case the changes are all fixable with some slight bondo work.
Thanks for asking.
Attachments
- Member DIN
- S2424
Re: Duke's Custom Reach Suit with Bruteshot (with Step by Step) +photos!!
PerniciousDuke, everything is looking FANTASTIC!!!!!
PerniciousDuke, everything is looking FANTASTIC!!!!!
Last edited by a moderator:
- Member DIN
- S713
Re: Duke's Custom Reach Suit with Bruteshot (with Step by Step) +photos!!
This thing is huuge and it came out perfect.
Great information, I hope many people will find it useful.
This thing is huuge and it came out perfect.
Great information, I hope many people will find it useful.
Re: Duke's Custom Reach Suit with Bruteshot (with Step by Step) +photos!!
Warping is barely even noticeable. Good work bro!
PerniciousDuke
Warping is barely even noticeable. Good work bro!
TheBlueDragon25
New Member
Re: Duke's Custom Reach Suit with Bruteshot (with Step by Step) +photos!!
The brute shot looks amazing and does look like it came out pretty much perfectly keep working hard
The brute shot looks amazing and does look like it came out pretty much perfectly keep working hard
- Member DIN
- S128
Re: Duke's Custom Reach Suit with Bruteshot (with Step by Step) +photos!!
Thank you all so much. That was really nice to hear all of that. I was worried that it wasn't very good because there is still a lot of work to do, but your kind words have pushed along the process and made me get out there and get some bondo on it. Little snag in the bondo though, it's not curing properly.. I'm thinking that it is the humidity. That is the only thing I can think of that is different from when I've done bondo work before, which was in the winter. Which leads me to my update:
Sorry to say, but I will be putting the Bruteshot on hold for awhile. This is not because I am giving up or anything, just that I need to use my time wisely. All that is really left on it is the bondo work and detailing which needs decent weather, but it doesn't need hot weather. On the same hand, I have a Lot of pieces to pep for the armor and I really should be using the good weather these few months to get my suit from concept to fiberglassed. So..
Update!
I started on this left bicep last night and I am really happy with the size. Any smaller and I wouldn't be able to get it on and any bigger and I wouldn't be able to put my arms down, like ever. Lol.

Right gun show to follow.
Question:
Anyone who has made this bicep or just knows these suits a little better than me... I can't figure out where this weird piece floating in the middle of the model is supposed to go. It is hard to get good refernce shots of this area as it is usually covered up by the shoulder, which makes me think it is used to connect the shoulder piece to the bicep? Any suggestions would be appreciated.


PerniciousDuke, everything is looking FANTASTIC!!!!!
This thing is INSANE!!! Nice work!
This thing is huuge and it came out perfect.
Great information, I hope many people will find it useful.
Warping is barely even noticeable. Good work bro!
The brute shot looks amazing and does look like it came out pretty much perfectly keep working hard
Thank you all so much. That was really nice to hear all of that. I was worried that it wasn't very good because there is still a lot of work to do, but your kind words have pushed along the process and made me get out there and get some bondo on it. Little snag in the bondo though, it's not curing properly.. I'm thinking that it is the humidity. That is the only thing I can think of that is different from when I've done bondo work before, which was in the winter. Which leads me to my update:
Sorry to say, but I will be putting the Bruteshot on hold for awhile. This is not because I am giving up or anything, just that I need to use my time wisely. All that is really left on it is the bondo work and detailing which needs decent weather, but it doesn't need hot weather. On the same hand, I have a Lot of pieces to pep for the armor and I really should be using the good weather these few months to get my suit from concept to fiberglassed. So..
Update!
I started on this left bicep last night and I am really happy with the size. Any smaller and I wouldn't be able to get it on and any bigger and I wouldn't be able to put my arms down, like ever. Lol.

Right gun show to follow.
Question:
Anyone who has made this bicep or just knows these suits a little better than me... I can't figure out where this weird piece floating in the middle of the model is supposed to go. It is hard to get good refernce shots of this area as it is usually covered up by the shoulder, which makes me think it is used to connect the shoulder piece to the bicep? Any suggestions would be appreciated.

Last edited by a moderator:
Re: Duke's Custom Reach Suit with Bruteshot (with Step by Step) +photos!!
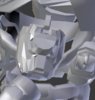
Straight from my computer to your brain. Game-ripped model shot for your enjoyment and amusement.
Any suggestions would be appreciated.
Straight from my computer to your brain. Game-ripped model shot for your enjoyment and amusement.
Attachments
- Member DIN
- S128
Re: Duke's Custom Reach Suit with Bruteshot (with Step by Step) +photos!!
Wow! Thanks Chernobyl! I'm not really sure what is going on in that picture, but it very clearly shows where that doohickey is attached to.
Straight from my computer to your brain. Game-ripped model shot for your enjoyment and amusement.
Wow! Thanks Chernobyl! I'm not really sure what is going on in that picture, but it very clearly shows where that doohickey is attached to.
- Status
- Not open for further replies.
Similar threads
- Replies
- 6
- Views
- 459
- Replies
- 61
- Views
- 5,051
Similar threads
- Replies
- 61
- Views
- 5,051