Duke's Custom Reach Suit Pep +photos!! *COMPLETE*

Status
Not open for further replies.
Re: Duke's Custom Reach Suit with Bruteshot (with Step by Step) +photos!!

Wow! Thanks Chernobyl! I'm not really sure what is going on in that picture, but it very clearly shows where that doohickey is attached to. :)

I had to remove some of the body geometry to make things a little more clear - I assumed (correctly!) that you'd be able to cut the signal from the noise :)
 
Re: Duke's Custom Reach Suit with Bruteshot (with Step by Step) +photos!!

Chernobyl making a strong play for MVP up in here haha!


That bicep looks great, Duke. Was that the first pep or did you do a couple size testers?
 
Re: Duke's Custom Reach Suit with Bruteshot (with Step by Step) +photos!!

Chernobyl making a strong play for MVP up in here haha!
That bicep looks great, Duke. Was that the first pep or did you do a couple size testers?

Haha! I know, right! So helpful! If by in here you mean everywhere on the 405th. Girl has superpowers or something. :ninja
Oh and thanks, yeah first pep. :D I poke around a lot with the "measure distance tool" before I print.

Update:

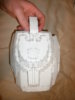
Woo! A pair of muscly biceps. :)
20160809_220721_zps1wslmcep.jpg

Thanks to ForgedReclaimer for the unfold!
For the record I did not change the scale. I kept them at their original 215mm Height.

One note on pepping these biceps. You will need to mirror/invert them. The right and left may look the same, but they are not. There is a squarish side that should be pointing forward. I know, currently there is a Left and a Right file in the archive, but be warned they are the same exact file and you will need to mirror/invert one of them to be able to make both the left and the right. Maybe Chernobyl will be able to invert one and re-upload it or just delete one to avoid the confusion. I have seen people's builds on here who have one good bicep and one backwards one. To avoid that.. the process is simple.

How to Invert (or Mirror) a pep model:


1. Sometimes there is only one pep unfold for a part that needs a left and a right. Some of these parts, are exactly the same and don't need to be mirrored, but others do. The easiest way to tell if it needs to be mirrored is if the front looks different than the back.
2. Once you know you need to print a mirrored piece simply go into the "Other" menu tab and select "Mirror Invertion (both 2d and 3d)"
3. You'll notice that the model has changed, but be aware that the unfolded pieces also moved. Make sure that they are all going to print properly and you're done.

20160809_220721_zps1wslmcep.jpg
 
Last edited by a moderator:
Re: Duke's Custom Reach Suit with Bruteshot (with Step by Step) +photos!!

Good work, Duke, but... I really hope you haven't glued those pieces down, though. I could've sworn I'd made the images more clear, but I obviously fluffed it a little. I've uploaded two images that should make the positioning that bit clearer - one of the file, and one of my own work.
 

Attachments

  • Bicep Piece Location.JPG
    Bicep Piece Location.JPG
    115.2 KB · Views: 364
  • GEDC0028.JPG
    GEDC0028.JPG
    2.1 MB · Views: 420
Re: Duke's Custom Reach Suit with Bruteshot (with Step by Step) +photos!!

The 'Measure Distance" tool is so much a life saver... Can't wait to see this suit pan out Duke. That Metrocop mask got my gears turning again, and this is keeping them at speed haha!
 
Re: Duke's Custom Reach Suit with Bruteshot (with Step by Step) +photos!!

Outstanding project!

I know a guy that wants to do an Agent Maine, this is really going to help
 
Re: Duke's Custom Reach Suit with Bruteshot (with Step by Step) +photos!!

Good work, Duke, but... I really hope you haven't glued those pieces down, though. I could've sworn I'd made the images more clear, but I obviously fluffed it a little. I've uploaded two images that should make the positioning that bit clearer - one of the file, and one of my own work.

No, your picture was clear, I just thought that it stuck up too tall for IRL. And the angles where I glued them matched up perfectly. In any case, I only hot glued them so no big deal. Once I pep the shoulders I can play around and see what will work for my suit. Thanks for the heads up though!
 
Re: Duke's Custom Reach Suit with Bruteshot (with Step by Step) +photos!!

No, your picture was clear, I just thought that it stuck up too tall for IRL. And the angles where I glued them matched up perfectly. In any case, I only hot glued them so no big deal. Once I pep the shoulders I can play around and see what will work for my suit. Thanks for the heads up though!

Oh, thank goodness. I saw your images and had a little 'aaaagh! I screwed up and didn't give him decent enough references!' moment.

Panic over, though. Whew!
 
Re: Duke's Custom Reach Suit with Bruteshot (with Step by Step) +photos!!

and one of my own work.

I didn't know you've made Reach peps! I thought you were secretly working on a Halo 5 build...

Also, did you see what I was talking about with the left and right bicep files in the archive?
 
Re: Duke's Custom Reach Suit with Bruteshot (with Step by Step) +photos!!

I didn't know you've made Reach peps! I thought you were secretly working on a Halo 5 build...

I am working on a Halo 5 build. The Reach build's an older project.

Also, did you see what I was talking about with the left and right bicep files in the archive?

I did. If you have a left/right bicep pair I can upload instead, throw it at me.
 
Re: Duke's Custom Reach Suit with Bruteshot (with Step by Step) +photos!!

I am working on a Halo 5 build. The Reach build's an older project.

I did. If you have a left/right bicep pair I can upload instead, throw it at me.

When I cave and buy the keycode, I will definitely do that! :)


Update:

Kind of a sad update on more than one account. First, I shouldn't have bragged how unwarpy my brute shot was... I took it around to show some friends my progress, forgot about it later and left it in my car for a couple hours.. on the Hottest day of the year! Well, the weight of itself pressing into the car seat on either end made it bend into a U shape. :( Lesson learned that resin and bondo are not permanent, they can be pliable if heated again. It was about 89 degrees F that day and even hotter in my car. I think I can get it back (and possibly even better). Knowing this capability of heat, I put it in my car the next day the other direction and it almost went back to normal. I think with some well positioned weights and a few more hot days I can get back to being great. (I'll post some pictures of where it is at. I didn't take pictures of how bad it got because I was too upset).

On another front, I have figured out that I am not going to make my goal of having a suit in April for ECCC. I'm going to have to take a second job again in September working as a carny. Then after that I have decided to move in October into cheaper housing. (Still not sure what the garage situation will be like), but I definitely need a change, I can't keep working 40-60 hour weekends and cooking all my meals and cleaning a 1200 sq ft house and mowing the lawn etc. Getting way too tiring. But, that means that my progress is going to snail for a little bit. In similar news, I have been commissioned to make a Promethean Engineer helmet! So that is kind of exciting. Paying customers come first. Keep an eye out for a new build thread on that. I should be able to finish the helmet by the end of October. I've decided that my new goal for this thread will be to have a full suit for Pax Prime.. next year, which gives me a full year to finish. :)

PD out, for now.
 
Last edited by a moderator:
Re: Duke's Custom Reach Suit with Bruteshot (with Step by Step) +photos!!

Myeah, Temperatures and props : always problematic. I know it's little in terms of comfort, but you're not the first, neither will you be the last to bump into this.

PLA 3D prints ? Same problem. Starting 50 to 60°C centigrade (and on a hot day in the summer in a closed car .... you can reach such temps no problem) a PLA printed prop will get into trouble. Worse : even the so called "better termperature resistant" ABS can become really wobbly not much later up the temp scale, so still very much within the realm of temps in that closed car.

The only material I've come accross so far that resists these temps better is stuff made in PETG or specially developed "better ABS" that resists high temps better than the normal stuff.
Heck, even the ABS printed motor supports of one of my printers started to warp just by normal operation induced tempeartures making one of my printers temporary unusable.

Sad&Glad at the same time reading this post of yours. Thrilled about that commission, sad about the Brute Shot.

As for the shift in time frame : it will just serve to make your first armor looking all the more impressive, I'm sure. :D
 
I'm in Chicago! Any Chicagonites want to show me their awesome suits or progress before I leave on Wednesday? :D
20160821_195001_zps9uoxwt2b.jpg
 

Attachments

  • 20160821_195001_zps9uoxwt2b.jpg
    20160821_195001_zps9uoxwt2b.jpg
    154.8 KB · Views: 332
Re: Duke's Custom Reach Suit with Bruteshot (with Step by Step) +photos!!

That bruteshot turned out amazing. Cant wait to see it in person!!!
 
Well I fully expected to not touch this project for a few months due to my move. But, while working on my Prometheus helmet I figured I could double up and finish fiber glassing the pieces that I had ready. Not much, but all together it was quite a bit of work crammed into one weekend.

Here is the chest, previously resined, I added fiberglass to the inside and was a little surprised at how long that took. There is a lot of surface area on the inside of that thing. Also pictured, kinda hidden, are my two biceps with three coats of resin and fully glassed. This storage unit under the stairs now stinks to high heaven. My new neighbors are going to hate me. :/


20161030_151212_zps2qhyj5dq.jpg


The move was a success! I downsized from house/garage to now an apartment. Lots less work in maintenance and quite a bit less in rent and utilities. I'll be able to bondo on my balcony and I'll be able to spray paint in the cul de sac. The only issue I'll have is having the space to do and dry resin and fiberglass. Thankfully Maverick206 has kindly offered to house me a few evening here and there to be able to complete this Reach suit. Thanks Maverick! Once I get this Prometheus helmet finished I'll be back in full swing here.

Thanks for reading!
 

Attachments

  • 20161030_151212_zps2qhyj5dq.jpg
    20161030_151212_zps2qhyj5dq.jpg
    151.1 KB · Views: 345
Last edited by a moderator:
Not quite an armor update, but while moving and cleaning I found art!

20161101_211541_zpsznwviudf.jpg

I've titled it "kura" in honor of the craft.


As you can see, it is the left over resin from working on the peps. It just happened to come out of the cup free and clear. It is now displayed in my house. :)
20161101_211622_zpsonpuizmr.jpg

20161101_211541_zpsznwviudf.jpg


20161101_211622_zpsonpuizmr.jpg
 
Status
Not open for further replies.
Back
Top