[Build thread (newbie)] - A custom Reach Spartan suit... I̶n̶ ̶t̶w̶o̶ ̶m̶o̶n̶t̶h̶s...

Status
Not open for further replies.

CoolRextreme

New Member
.
ON HOLD
UNTIL DECEMBER 20-somthing


I have often been known for my patience. And that is gonna probably be put to the test here....

Here's the situation:

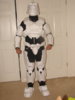
My names CoolRextreme, and I have wanted to build my own Reach Spartan for the past six months. So for my first ever pepekura piece, I had decided to Pep a ODST helmet.
That was just before my semester of college started.

It turned out quite well. But 19 college units + an EMT class later, I found I had been wayyy to busy with college to get anything else done, beside print off the torso and build the two biceps.


So here I am. One practice ODST Helmet (which actually wont be used in this build) and two Bicep armor pieces. The semester is over. And I want to build my Spartan.

But here is the catch: Fire academy starts August 1st.

Its currently June 4th.

I got 56 days to get this Spartan done, or wait another 21 weeks with no hope of being able to do anything else then study and train in the fire academy.


My deign idea:

Vanity_636005096257587086.png


What I need to Pep:

Scout Hemet
ODST shoulder
Sniper Shoulder
x2 Forearms
Tacpad (hopefully a modular removable from the forearm via magnets or something + able to carry a phone)
x2 Hand plates
Torso (already printed... Just needs pepping.
Codpiece
x2 Thighs
Tactical/soft case
x2 FG/Para Knees
x2 Shins.
x2 Boots

And hopefully a magnum pistol (foam) :p

Or two *dualwield*

And/or a combat knife. (foam as well)

Then I gotta resin and what-not it all, then paint it.

Fans/LEDs will probably not come. I am not expecting to get THAT far. But hey, if I, by some miracle, have time...


So ya. I doubt I will have time to do much updating on here, But I will try and keep yall posted.

Bring it.....
 
Re: [Build thread (newbie)] - A custom Reach Spartan suit... With a two month deadlin

You have your work cut out for you. Looking forward to watching your progress.
 
Re: [Build thread (newbie)] - A custom Reach Spartan suit... With a two month deadlin

Good luck dude. cant wait to see what happens. Don't forget to eat and sleep!
 
Re: [Build thread (newbie)] - A custom Reach Spartan suit... With a two month deadlin

Good luck. Though, I would personally recommend if you have the funds instead of pep'ing the case on the leg, just go to an Academy or similar and get one there that you can use to hold important things like wallet, keys, and the like.
 
Re: [Build thread (newbie)] - A custom Reach Spartan suit... With a two month deadlin

You have your work cut out for you. Looking forward to watching your progress.

Thanks for the support!
Yes, very well cut out thank you ;)


Good luck dude. cant wait to see what happens. Don't forget to eat and sleep!


When I need to focus attention on stuff, its always my social life that drops first. Then eating. Then sleeping. Then hygiene.
But I doubt anyone wants to see a smelly Spartan, so I think Ill make room for that last part!


Update No 1:


What I have started out with:

The ODST helmet I wont even be using for this build. It will likely be my test-piece for everything else, before getting painted and used as a display.
Or gift.
At least I know it fits me, so I can size the Recon helmet correctly in the future.

DSC07068.JPG


Biceps where a true pain I remember.
WAYYYYY to much unnecessary detail for the Pepping stage. But almost worth it! Was definably a struggle but came out semi-good enough for me!


Stupid amount of confusing pep detail:
DSC07072.JPG


First forearm has been cut out and is currently in progress. I hope it fits. I have gotten lucky so far with my ruler and guestimates....

DSC07068.JPG


DSC07072.JPG
 
Last edited by a moderator:
Re: [Build thread (newbie)] - A custom Reach Spartan suit... With a two month deadlin

Looking good man! What made you change from the ODST to a Recon helmet?
 
Re: [Build thread (newbie)] - A custom Reach Spartan suit... With a two month deadlin

get a project each day wake up with a plan to do a part today e.g. a boot and build it up may the helix help you my boy I'm saying this and trying to build my own marine armour for October XD
 
Re: [Build thread (newbie)] - A custom Reach Spartan suit... With a two month deadlin

Good luck. Though, I would personally recommend if you have the funds instead of pep'ing the case on the leg, just go to an Academy or similar and get one there that you can use to hold important things like wallet, keys, and the like.

Oh, did I say I was gonna pep the case? My bad xD
No, I am putting my sewing skills to work (I am wayyy to crafty. The quilt in the picture is actually made by me, from old jeans)

I will likely sew the pack myself, and/or get some supplies from my local army surplus!


Looking good man! What made you change from the ODST to a Recon helmet?

The ODST helmet was just a warm-up of my pep skills. Plus I thought (and still do) it is one of the most sexy helmets :p
Not to mention, if I get through this build, sometime in the future I WILL make a Spartan/ODST.


get a project each day wake up with a plan to do a part today e.g. a boot and build it up may the helix help you my boy I'm saying this and trying to build my own marine armour for October XD

Yep, that about wraps it up. I am aiming to pep one (large) piece per day. Knees and handplates will probably get bunch into one day.


And speaking of a project per day, that brings me to my next update!


Update No 2:
Day 2

Have two beautiful new forearms!


DSC07077.JPG


I picked a file with some good curves/detail, but not to hard.
And the best part: It fits! Lengthwise at least its perfect.
Ever so slightly big around my arm. Gotta go hit the gym some more I guess...
DSC07076.JPG


I have looked around, but I still don't know if anyone ever 'fills' their pep'ped armor? As in give it thickness.

Besides looks, I also want SOME amount of feel as well. I know resining hardens, and fiberglassing strengthen, but even after all that, the piece is still only what, 1/16-1/8 in. thick?

I was thinking perhaps I coat the inside with some expanding foam, then cut and smooth the inside out, flush with the armor piece's inside edge to make the piece about 1/4-1/3 inch thick, plus add a slight bit of weight.


Also, would it be too far out to say I want to install some magnets in the dipped part of the top/front forearm so that I can stick on and remove various future forearm gear? (Tac-pad, GPS, buckler, shotgun shells, ect)

Or perhaps I am only dreaming... :rolleyes


Thanks for all your help/interest/support!

Torso is up next....

DSC07077.JPG


DSC07076.JPG
 
Last edited by a moderator:
Re: [Build thread (newbie)] - A custom Reach Spartan suit... With a two month deadlin

when we do card stock pep, we resin and bondo for strength and to add thickness. you can also fiber glass to add thickness as well.

you do have your work cut out but keep grinding and you'll make your deadline.

good luck

Sent from my SM-G920R7 using Tapatalk
 
Re: [Build thread (newbie)] - A custom Reach Spartan suit... With a two month deadlin

To add volume to your pieces I would recommend rondoing the inside after you fiberglass. It covers up the little pokey spots, makes it look nice and smooth, and it gives it a better thickness. Rondo = 50% Resin 50% Bondo and be sure to mix both catalysts with it. Good luck with the build. Your work looks great! I'll be rooting for you. sub'd
 
Re: [Build thread (newbie)] - A custom Reach Spartan suit... With a two month deadlin

when we do card stock pep, we resin and bondo for strength and to add thickness. you can also fiber glass to add thickness as well.

you do have your work cut out but keep grinding and you'll make your deadline.

good luck

Righto. I just don't want to fill in some of the void space (such as the 'rail mount' on the forearm) with pure resin/bondo/fiberglass/rondo. As that might ad just a tad to much weight. But then again I have no idea how much fiberglass really weighs per area covered.


To add volume to your pieces I would recommend rondoing the inside after you fiberglass. It covers up the little pokey spots, makes it look nice and smooth, and it gives it a better thickness. Rondo = 50% Resin 50% Bondo and be sure to mix both catalysts with it. Good luck with the build. Your work looks great! I'll be rooting for you. sub'd

Thanks! And I will be sure to try that!


And now, for updates!
(sorry for the long wait, I have been to busy to update)


Update No 3:
Day 5


Talk about banging this stuff out overtime!

I probably spend 12 hours straight working on that torso piece. Totally forgot to eat, and ended it at 3 am in the morning. GG.


Torso piece and Cod Piece
DSC07093.JPG


Cod piece took much longer and was way harder then expected..
DSC07094.JPG


To much stupid un-needed pep detail in the back in my opinion!
DSC07096.JPG


As for torso armor; came out nicely.
DSC07097.JPG


The back details came out quite clear, and I really like them.
DSC07098.JPG


And here it is, all on me!
DSC07092.JPG


However I have one gripe:
I think I scaled the Torso piece to big... And that's still with a sweater underneath!
What do Y'all think?
DSC07086.JPG


Side View:
DSC07090.JPG


Next up: Leg armor
Cheers!

DSC07093.JPG


DSC07094.JPG


DSC07096.JPG


DSC07097.JPG


DSC07098.JPG


DSC07092.JPG


DSC07086.JPG


DSC07090.JPG
 
Last edited by a moderator:
Re: [Build thread (newbie)] - A custom Reach Spartan suit... With a two month deadlin

Torso looks fine to me. Good Luck and welcome to the forum!
 
Re: [Build thread (newbie)] - A custom Reach Spartan suit... With a two month deadlin

I agree. If it was too big you would really be able to tell from the side view photo you gave, but it looks spot on. Also looks to be the perfect size to wear motorcycle armor underneath, which many people do for the reach suits as they are pretty bulky. Your pep time is very impressive, keep it up!
 
Re: [Build thread (newbie)] - A custom Reach Spartan suit... With a two month deadlin

In your pepkura program set the the threshold to about 165. That hides almost flat folding lines.Also, eliminates unneeded folding lines. I believe the setting is found under OtherSettings. In the photo you posted, which I believe it looks to be the back of the cod. There is a piece with a random mountain fold line that doesn't quite make it to each end of the part. You can fix that by joining \unjoin tool by right clicking on your mouse while hovering over the 2d view port. That will separate the parts. It will increase parts count but it will make assembly of pep easier. Lowering the threshold should eliminate most of the unnecessary fold lines that makes it a litte confusing.:) Also, good work so far!
 
Re: [Build thread (newbie)] - A custom Reach Spartan suit... With a two month deadlin

I wouldn't worry about the chest piece, it looks to be a good fit. Maybe just add some extra foam under the shoulders to help hold it to the desired height. Besides that you're doing a great job man, keep up the good work and don't forget to eat!
 
Re: [Build thread (newbie)] - A custom Reach Spartan suit... With a two month deadlin

You're so fast! Wow.

I'm looking forward to see more progress.

Also, the chest piece looks alright, proportional.
 
Re: [Build thread (newbie)] - A custom Reach Spartan suit... With a two month deadlin

Torso looks fine to me. Good Luck and welcome to the forum!

I hope so. and thank you. I am honored to be here amongst so many other DIY builders. Its always fun when you can find fellow DIYers, all with a common goal, and where the comment constructively and encouragingly. Unlike youtube...
Youtube comments make me want to kill myself :unsure


I agree. If it was too big you would really be able to tell from the side view photo you gave, but it looks spot on. Also looks to be the perfect size to wear motorcycle armor underneath, which many people do for the reach suits as they are pretty bulky. Your pep time is very impressive, keep it up!

Well.... Compared with the Vanity guy, the chest area seems to be a bit large. Yet from the side view it fits me perfectly. I honestly have no idea how... But close enough for me! (for now)


In your pepkura program set the the threshold to about 165. That hides almost flat folding lines.Also, eliminates unneeded folding lines. I believe the setting is found under OtherSettings. In the photo you posted, which I believe it looks to be the back of the cod. There is a piece with a random mountain fold line that doesn't quite make it to each end of the part. You can fix that by joining \unjoin tool by right clicking on your mouse while hovering over the 2d view port. That will separate the parts. It will increase parts count but it will make assembly of pep easier. Lowering the threshold should eliminate most of the unnecessary fold lines that makes it a litte confusing.:) Also, good work so far!

Thanks! I will certainly try that. And you are correct, 'twas the back end of the cod.
The join/unjoin tool is my god in pepakura, though some things slip by and I don't notice how I could have simplified them, until I am gluing the pieces together (I THEN change what I missed in pep as well to simplify an future builds)


I wouldn't worry about the chest piece, it looks to be a good fit. Maybe just add some extra foam under the shoulders to help hold it to the desired height. Besides that you're doing a great job man, keep up the good work and don't forget to eat!

Indeed. I ended up foregoing the pepping of the torso arm stuff (the 'arm seals'?) I will be making that out of foam, so my movement is les restricted. However the drawback at the moment is that the under-arm part of the torso sags a bit due to not much support from the top part of the armor.
Plus, the torso sags slightly as a whole on my shoulders without that foam. But it WILL be coming. eventually.


You're so fast! Wow.

I'm looking forward to see more progress.

Also, the chest piece looks alright, proportional.


Ye. I work hard, and I play hard. And currently my play is demanding I spend 150% of my free time on this pepping business. (I have not gotten to sleep before 1AM since I started this build :lol)


MAJOR UPDATEEEESSSS!!!!

Update No 4:
Day 6 (posted on day 7)


This is what I got done in ONE day. No work, so it was 8am-2am banging straight. Lots O fun. Yall are missing out! (on the lack of sleep)
Note: Ecuse the sideways picture. Computer is doing somthin funky :p
DSC07110.JPG


Thighs:
I took a leap of faith in my scaling, and went ahead and printed both thighs out, cut them both out, then put them both together at the same time.
This was cool, as I glued a tab or two on one, then did the exact same on the other. If I messed up or noticed something, I would improve it on the other one. Felt good!
DSC07116.JPG


Some not to hard and well worth it detail on the side
However, note I did not do the ridge part, instead just gluing it flat with a self-made tab. I will be bondoing or something that detail later.
DSC07113.JPG


My one gripe with these guys however was the warping. Caused by millimeter-long mess-ups in the various seams I assume. :( Hopefully a good bit of bondo and clever resining/painting can fix it...
DSC07115.JPG


Next parts:
Shins.


And here they are!
DSC07117.JPG


Side view
DSC07119.JPG


Font/Back comparison.
DSC07118.JPG


The seemingly low-def of the pieces have me slightly worried. But I think they should pan out well!
The knee guard part (so far) was made myself, as the one in the model was not direct connected to the shin piece; instead having open edges all around (some of which dug into the shin piece in the 3D model)
So I used what they had as a base, and made it so I could actually attach it. A bit more gluing/custom tabbing, is required to make that edge over-hang, but for now it flys!
DSC07121.JPG


And with that out of the way... Glory pics!


(that Cod piece can never seem to stay straight...)
(could totally make a bad joke there ;))
DSC07100.JPG


Side view
DSC07102.JPG


Aaand back view...
Notice I had cut one of the under-arm parts of the torso in order to get in/out easier. It chose this exact moment to fall down without my knowledge.
DSC07105.JPG


And that wraps up this update! I cant believe its only been 7 days since I started.

Next up: Scout Helmet.

DSC07110.JPG


DSC07102.JPG


DSC07103.JPG


DSC07116.JPG


DSC07113.JPG


DSC07115.JPG


DSC07117.JPG


DSC07119.JPG


DSC07118.JPG


DSC07121.JPG


DSC07100.JPG


DSC07105.JPG
 
Last edited by a moderator:
Re: [Build thread (newbie)] - A custom Reach Spartan suit... With a two month deadlin

*furiously claps like Shia Labeouf*

Sorry, I just love progress pics and this is probably going to be my favorite build thru the summer. Because progress.
 
Re: [Build thread (newbie)] - A custom Reach Spartan suit... With a two month deadlin

Your armor is looking amazing! I recently finished my own scout helmet (build, resin, paint, etc.) and it took me roughly 2 weeks, given I was not staying up from 8am to 2am. Just out of curiosity, how much paper have you used throughout this? Can't wait to see further progress!
 
Re: [Build thread (newbie)] - A custom Reach Spartan suit... With a two month deadlin

*furiously claps like Shia Labeouf*

Sorry, I just love progress pics and this is probably going to be my favorite build thru the summer. Because progress.

I am afraid I just let you down in that regard :p


Your armor is looking amazing! I recently finished my own scout helmet (build, resin, paint, etc.) and it took me roughly 2 weeks, given I was not staying up from 8am to 2am. Just out of curiosity, how much paper have you used throughout this? Can't wait to see further progress!

Wow! Don't scare me away yet! xD
I have no idea how much paper, I just know I had to go out and buy more cardstock just a few days ago. Also I managed to work my way through an entire bottle and a half of Elmers school glue :p


ARRRRRRGGGGGGG
When life happens, nothing gets done :I
,
Between work, some family problems, and preparing fore fire academy, I have not been able to pay much attention to my armor.
At this rate Ill likely have it all resined, and the easy parts bonded by August 1st ;-;

Its been about a month since I last updated, but boy, I am on a roll!


Update No 5:
Day 34 (posted on day 35)


As I said before, I am using the Recon helmet vs the ODST helmet I already made.
So I pepped one.
However, I found I had made it way to big. I looked like a Tom Birgeron Bobble head :p Which meant I would have to re scale/pep it.
That was kinda the breaking point in my 8am-2am working. I had to take a break as I was quite burnt out at the moment.

Then life happened, and I didn't get to re-pepping it until I went on a trip to Grandma and Grandpa's house, away from all distractions.


The final helmet on the left
DSC07175.JPG


A scaled difference of 15% if I remember correctly
DSC07174.JPG


And that means, I have THREE helmets :p
Would it not be cool to make one of each different REACH Helmet? :3
DSC07173.JPG


The extra too-big helmet will probably be sold or gifted to a friend once it is all resined bondoed and painted.


I also finished some awesome kicks for my Spartan
DSC07153.JPG


Including that armor piece at the front
DSC07156.JPG


And without that piece....
DSC07155.JPG


Note how it was made in three pieces to allow some sort of flexibity
DSC07158.JPG


Heck yea!


I also completed both Recon shoulder plates
DSC07160.JPG


Sizing them was hard, as I had no definitive picture, so I did some searching around 405th, and using Vanity.
DSC07161.JPG


And man is that Vanity program so helpful!
DSC07162.JPG


Good, yet simple detailing make this piece look great
DSC07163.JPG


Side view
DSC07166.JPG


I also completed both knee armor plates (FJ/Para)
DSC07168.JPG


They came as a separate piece in the same pdo. file as the shin, but where much to small in comparison to the shin. So I made a copy of the shin file, pulled out all the shin parts, then scaled it up to where the knee part's scale would agree with the first shin file I had.


But I don't have a close up picture of them connected. So have a cute jumping spider picture!
szxiur.jpg


Ok, back to business.


GLORY PICS!!!!


This has been something I have wanted to see in my room for a loooonnnggg time.
Note the tired dog. Ruthie don't like it much when I do my late-night work.
DSC07171.JPG


And here it is! Everything -cept the recon shoulders and hand plates!
DSC07101.JPG


Photos courtesy of my mom and lil brother
DSC07133.JPG


Who is that sexy sideways guy? Oh, that's me... lol
DSC07135.JPG


Seriously though, 405th seems to ignor the fact I turned all the pictures right-way up. Sorry.
DSC07146.JPG


Excuse the mass amounts of sexy sidewaysness. And the BuzzBee gun. Closest thing I found to look 'cool' :p
DSC07151.JPG


No, seriously, it isn't your monitor. Its 405th.
Unfortunatly I am unable to do a proper arm cross with this stuff on, but hey, its still pretty cool!
DSC07148.JPG


Fabulous!
DSC07152 - Copy.JPG


AAAnnnnnddd. the lonely un-used pieces for future builds or what not.
ODST helmet, ODST shoulder, Half a thigh, a Too-big Recon helmet.

And that is all for now!
Sorry for the mass amounts of glory pics. It feels so good to be 'done' with that part!


Now comes resining (just picked up a can from Home Depot.
Bondoing (Already have some from an attempted un-finished hardly-started prop.
Rondoing.
And painting! (I love art!)


Personal tips/warnings on any of these parts much appreciated! I have done quite a bit of research, but I still feel like I am jumping in head first.


Wish me luck, and have an awesome day!

-C.R
 

Attachments

  • DSC07170.JPG
    DSC07170.JPG
    155.8 KB · Views: 202
  • DSC07130.JPG
    DSC07130.JPG
    40.4 KB · Views: 216
Status
Not open for further replies.
Back
Top