Hello my fellow Spartans, Marines, ODST, and other such Halo people. I am finally back and ready for action!
So, to start off my name is Justin aka Spartan Justin 1013. I started a Halo 4 Warrior foam build a while back, which ended up being put off and slacked on. I kept getting distracted by work, school, Halo 5, sleeping, eating, exercising, and various other distractions. However, I recently attended my first convention ever. SUPERCON MIAMI 2016! It was amazing, and I brought along the Halo 4 Warrior helmet I clumsily put together. But what could you expect from my first ever completed piece. While I was there though, I kept wishing I had finished my suit. So here we are, back with a passion! This time around I will be working on a suit of armor from the latest Halo, Halo 5. It's the Helioskrill armor and I chose this one because it is unique to me and also is based on one of my favorite races in the game. The Sangheili! And to go along with it I will be making a Carbine and combat knife etched with sangheili markings.
A little backstory I made to go along with the armor. I am a Spartan stationed on the planet of Sanghelios. Of course it makes sense that I wear the armor that was crafted with the help of a Sangheili. My mission there is to help make sure that piece is being kept between The Arbiter's forces and the civilian population of Sanghelios, as well as to keep watch of any sign of rebellion or invasions by covenant remnants or other invaders.

To start off, I have been watching tons of informative videos by many different and awesome fabricators. They have lots of tutorials if you guys have any questions about making armor with foam. If you have any questions for me about my build or foam building in general, feel free to shoot me a message and I will try my best to help you! The people I have been watching are James Bruton from Xrobots, Ted from EvilTedSmith, and Bill Doran from Punished Props. There are various other little videos I've watched but to cite them all would take a whole day so I am just giving a big shoutout to all of them in general. Thanks!
Now, onto my build. I'll start off the materials I will be using for this build:
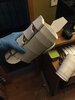
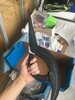
I think that covers all of my supplies. As for the armor building itself, I will be taking you guys along on the journey with me. I will be providing pictures and explanations of everything I do (I will try my best to post as often as I can, but it might be weekly due to work and school and other things I have going on at the moment.) Below is a picture of my workspace

On to the first update!
So for this build I will be using foam and pepakura. I will also be utilizing the actual 3d models provided by various modelers and Chernobyl. Thanks guys!
My method for doing this will be using a couple of different programs. The first program I will be talking about is Blender. This is a 3d modeling program I got for free online. I just literally google searched Blender 3D and it popped up on the first link. I then took the .OBJ file located in the file archives for the Halo 5 Helioskrill armor and exported it into the program. Once it got exported in, I just deleted every part of the file except for the one I wanted to save, then saved each individual part into their own separate file which I then exported back into a .OBJ file. (i.e. Helioskrill Torso, Helioskrill Thigh)
The next program I am going to talk about that you probably have heard about is Pepakura designer. I use this to actually plan out my templates. I take the .OBJ files I saved individually and load them into Pepakura Designer. From there I unfold it, modify some settings, and get to fixing it up! (Trust me it can be a MESS). I rearrange and modify the template so that it is "foam friendly", due to the fact that pepakura is actually designed with paper in mind. Basically I just account for the thickness and flexibility of the foam and create my own custom templates for the armor.
Once I modify the armor to the specifications I'm happy with, I print it out on regular printer paper. This is due to the fact that card stock is too thick to use in my printer. I then take the template from the paper, cut them out, and trace them onto the card stock. The reason for tracing it on to the card stock as well is because it gives me a thicker, more durable template I can reuse if I need to remake a piece of armor or to use in the future if I ever need it. I make sure to mark on the templates with a sharpie which side of the body the armor is on, as well as other markings that help me to line up the pieces.
Next I trace the card stock templates onto the EVA foam. Which thickness foam I use depends on which part or piece of armor/detail I am making. I use a sharpie to trace it on, and an Xacto blade to cut it out of the foam. From there I cut beveled edges or whatever else I need to in the foam, as well as use the heat gun to shape it if it needs a curve. From there I lay out all the pieces I cut out for a specific piece so I know where I need to glue, and get setup outside for the contact cement. This is where the heavy duty stuff comes in. Make sure you have a mask because the vapors are pretty strong and toxic, as well as gloves because it can get messy!


The way the contact cement works is you have to apply it to both of the surfaces you want to glue together, let it dry for about 5-10 minutes depending on the temperature and humidity of your location, and then when it is dry but still tacky, that's when you want to stick them together! Be careful because once you stick the cement together it will not come apart. Make sure you have the pieces right where you want them to be!!!The reason why I prefer contact cement over the hot glue, is because I like the durability and the flexibility of it. I also like that I don't have to hold it in position while it cools, which sometimes throws my seam lines off. Don't get me wrong, I made my whole first helmet out of foam and hot glue! But I just prefer the cement now that I have tried it and the hot glue for repairs or detail work that the cement would be too hard to handle.
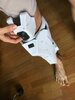
And that's basically it for the basic construction of the armor! Once I finish the base suit, I will get into the sealing and painting when I start that part. I have decided to work my way bottom up, from the feet to the helmet. I suggest for the newer builders to start on easy pieces, because if you start out with a complicated and big piece you might get burned out. I know I definitely did! I have already started the feet and am almost done with them, moving onto the shins next. I am trying to make this as close to 100% game accurate as I can, probably around 99% accurate. Of course with my own colors and style added into it.

This is what I have so far of the feet, and only a couple days work with getting my files and templates setup. I have been a bit busy the past couple weeks but I have a lot more free time now and am hoping to get this done in time for Dragon Con if I'm able to go. I would love to wear this there! Feel free once again to ask me any questions or to just follow along with me as I progress through my new project. Thanks everyone for taking the time to read!
P.S. I know this isn't a very detailed tutorial, I was intending on just doing my build but threw in a little advice here and there for the newer folks. If anyone has any more detailed or in-depth questions about how to use or do something feel free to let me know! Maybe after my build I will make an actual detailed tutorial for you guys....once I get a bit more experienced hehe.


So, to start off my name is Justin aka Spartan Justin 1013. I started a Halo 4 Warrior foam build a while back, which ended up being put off and slacked on. I kept getting distracted by work, school, Halo 5, sleeping, eating, exercising, and various other distractions. However, I recently attended my first convention ever. SUPERCON MIAMI 2016! It was amazing, and I brought along the Halo 4 Warrior helmet I clumsily put together. But what could you expect from my first ever completed piece. While I was there though, I kept wishing I had finished my suit. So here we are, back with a passion! This time around I will be working on a suit of armor from the latest Halo, Halo 5. It's the Helioskrill armor and I chose this one because it is unique to me and also is based on one of my favorite races in the game. The Sangheili! And to go along with it I will be making a Carbine and combat knife etched with sangheili markings.
A little backstory I made to go along with the armor. I am a Spartan stationed on the planet of Sanghelios. Of course it makes sense that I wear the armor that was crafted with the help of a Sangheili. My mission there is to help make sure that piece is being kept between The Arbiter's forces and the civilian population of Sanghelios, as well as to keep watch of any sign of rebellion or invasions by covenant remnants or other invaders.
To start off, I have been watching tons of informative videos by many different and awesome fabricators. They have lots of tutorials if you guys have any questions about making armor with foam. If you have any questions for me about my build or foam building in general, feel free to shoot me a message and I will try my best to help you! The people I have been watching are James Bruton from Xrobots, Ted from EvilTedSmith, and Bill Doran from Punished Props. There are various other little videos I've watched but to cite them all would take a whole day so I am just giving a big shoutout to all of them in general. Thanks!
Now, onto my build. I'll start off the materials I will be using for this build:
- EVA floor mat foam 6mm (Bought in a roll from Sears)
- EVA foam 12"x18" sheets 5mm, 3mm and 2 mm (Different colors from Hobby Lobby)
- Barge contact cement (Preferred method of gluing)
- Mini high temp glue gun and high temp glue sticks (For small pieces and repairs)
- Heat gun (For molding and shaping pieces)
- Cutting mat (So my table doesn't end up looking like a cat on catnip went crazy)
- Steel 15" ruler (Extra 3" just for convenience)
- Xacto blades and box cutter
- Pen, pencils, sharpies, and other such writing devices
- Cardstock
- Regular printer paper
- Computer and printer
- Latex gloves (When gluing)
- Organic air mask (When using chemicals such as Barge or Plastidip)
- Eye protection
- Hard plastic and tint for the visor
- DAP Kwik Seal Plus for sealing cracks in the armor
- Modge podge and water mix for sealing foam
- Plastidip for extra sealing on the foam
- Spray paint
- Various other supplies as needed
I think that covers all of my supplies. As for the armor building itself, I will be taking you guys along on the journey with me. I will be providing pictures and explanations of everything I do (I will try my best to post as often as I can, but it might be weekly due to work and school and other things I have going on at the moment.) Below is a picture of my workspace
On to the first update!
So for this build I will be using foam and pepakura. I will also be utilizing the actual 3d models provided by various modelers and Chernobyl. Thanks guys!
My method for doing this will be using a couple of different programs. The first program I will be talking about is Blender. This is a 3d modeling program I got for free online. I just literally google searched Blender 3D and it popped up on the first link. I then took the .OBJ file located in the file archives for the Halo 5 Helioskrill armor and exported it into the program. Once it got exported in, I just deleted every part of the file except for the one I wanted to save, then saved each individual part into their own separate file which I then exported back into a .OBJ file. (i.e. Helioskrill Torso, Helioskrill Thigh)
The next program I am going to talk about that you probably have heard about is Pepakura designer. I use this to actually plan out my templates. I take the .OBJ files I saved individually and load them into Pepakura Designer. From there I unfold it, modify some settings, and get to fixing it up! (Trust me it can be a MESS). I rearrange and modify the template so that it is "foam friendly", due to the fact that pepakura is actually designed with paper in mind. Basically I just account for the thickness and flexibility of the foam and create my own custom templates for the armor.
Once I modify the armor to the specifications I'm happy with, I print it out on regular printer paper. This is due to the fact that card stock is too thick to use in my printer. I then take the template from the paper, cut them out, and trace them onto the card stock. The reason for tracing it on to the card stock as well is because it gives me a thicker, more durable template I can reuse if I need to remake a piece of armor or to use in the future if I ever need it. I make sure to mark on the templates with a sharpie which side of the body the armor is on, as well as other markings that help me to line up the pieces.
Next I trace the card stock templates onto the EVA foam. Which thickness foam I use depends on which part or piece of armor/detail I am making. I use a sharpie to trace it on, and an Xacto blade to cut it out of the foam. From there I cut beveled edges or whatever else I need to in the foam, as well as use the heat gun to shape it if it needs a curve. From there I lay out all the pieces I cut out for a specific piece so I know where I need to glue, and get setup outside for the contact cement. This is where the heavy duty stuff comes in. Make sure you have a mask because the vapors are pretty strong and toxic, as well as gloves because it can get messy!
The way the contact cement works is you have to apply it to both of the surfaces you want to glue together, let it dry for about 5-10 minutes depending on the temperature and humidity of your location, and then when it is dry but still tacky, that's when you want to stick them together! Be careful because once you stick the cement together it will not come apart. Make sure you have the pieces right where you want them to be!!!The reason why I prefer contact cement over the hot glue, is because I like the durability and the flexibility of it. I also like that I don't have to hold it in position while it cools, which sometimes throws my seam lines off. Don't get me wrong, I made my whole first helmet out of foam and hot glue! But I just prefer the cement now that I have tried it and the hot glue for repairs or detail work that the cement would be too hard to handle.
And that's basically it for the basic construction of the armor! Once I finish the base suit, I will get into the sealing and painting when I start that part. I have decided to work my way bottom up, from the feet to the helmet. I suggest for the newer builders to start on easy pieces, because if you start out with a complicated and big piece you might get burned out. I know I definitely did! I have already started the feet and am almost done with them, moving onto the shins next. I am trying to make this as close to 100% game accurate as I can, probably around 99% accurate. Of course with my own colors and style added into it.
This is what I have so far of the feet, and only a couple days work with getting my files and templates setup. I have been a bit busy the past couple weeks but I have a lot more free time now and am hoping to get this done in time for Dragon Con if I'm able to go. I would love to wear this there! Feel free once again to ask me any questions or to just follow along with me as I progress through my new project. Thanks everyone for taking the time to read!
P.S. I know this isn't a very detailed tutorial, I was intending on just doing my build but threw in a little advice here and there for the newer folks. If anyone has any more detailed or in-depth questions about how to use or do something feel free to let me know! Maybe after my build I will make an actual detailed tutorial for you guys....once I get a bit more experienced hehe.
Last edited by a moderator: