Cherry's Gen-2 Argus Build

Status
Not open for further replies.

Chernobyl

Sr Member
Yes, yes. It's shocking, I know. I'm actually also working on my own costume as well as working on the Archives and directing members around the forums.

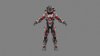
Soon after the release of Halo 5, I fell in love with the Argus armour set - enough so that I decided it would take over from my regular Scout set. I've been lucky enough to be able to obtain the game files for this armour set - otherwise, the project might've been much more difficult to realise, since I would have had to custom-model the assets myself.

This will certainly not be a 'speed' build - I currently lack the resources and the facilities with which to progress further than the basic 'Pepakura assembly' stage with my project. Work will be further hindered by my own exacting standards, given that I refuse to move on with a piece until I'm absolutely happy with it. However, I'm able to at least work on the models and get the raw files fit for assembly, and it's certainly high time that I came out from the shadows and actually showcased some of my work.

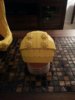
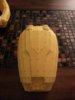
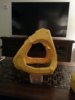
The first pieces I'll be showcasing are the 'core' of the torso - the basic structure I'll be wearing, minus any of the 'extra' components, such as the pods on the back or the shield on the front. The build I've put together currently isn't bad, by any stretch of the imagination, but given that I have quite a slender build, I may revisit this build using the female assets instead. This is due to my first 'wearing' showing that I'll definitely be seeing issues with holding my arms down at my sides and crossing them over my chest. If I can't resolve this issue, I'll be spending a lot of my time wearing this and standing with my hands on my hips.

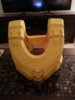
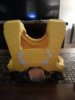
Likewise, I've had to look at the build with regards to bracing, given that the backplate isn't a 'solid' plate - it's three split components, which makes hardening a little bit of an issue.

Any thoughts or input would be greatly appreciated.
 

Attachments

  • back hump 02.jpg
    back hump 02.jpg
    131.7 KB · Views: 252
  • back hump 01.jpg
    back hump 01.jpg
    130.2 KB · Views: 257
  • torso front.jpg
    torso front.jpg
    122.9 KB · Views: 271
  • torso rear.jpg
    torso rear.jpg
    121 KB · Views: 257
  • torso side.jpg
    torso side.jpg
    119.7 KB · Views: 424
  • Arestor Front.jpg
    Arestor Front.jpg
    565.7 KB · Views: 426
WOW!
I'm positively shocked now to see you actually doing your armor!

//better late than ever, hah

But on serious note, your pep looks so far very crisp and clean.
Can't wait for more.
 
Definitely a shocker, lol! Strange seeing you having a build thread, but its also exciting to see you take that step forward. Are the back pods enclosed? I also have a issue with having arms kinda of bowed out. Biceps armor makes it worse. I'm going to have to dremel off the inside of the biceps, the part that is situated in between the inside of my arm, and the bottom of the torso armor. Maybe replace the cut off part with EVA foam, or mold and cast it into a silicone rubber, or with some type of foam. That way when resting my arms it will squish. When moving my arms out the way, it will form back to its original shape.
 
Are the back pods enclosed?

They are, yes, but I've already made allowances for this. I do aim to post my work once I'm done, so that other people will be able to use and enjoy them.

I also have a issue with having arms kinda of bowed out. Biceps armor makes it worse.

Mercifully, the shoulder armour for the Argus set is very much cut-down, and the inside of the bicep is bare. Even so, it may be worth my experimenting with the female torso at the same scale, to see if shaving off a half-inch or so might mitigate some of the movement issues I'd otherwise have. Failing that, I may construct the 'linking' piece across the bottom sides of the armour out of foam instead of Pepakura - this should allow a little 'squish', as you so eloquently put it, but it'll require a little bit of creative engineering to pull off.

The alternative, as Asgardianhammer has been drilling into me, is to begin work in foam instead - and, I have to admit, the prospect is very attractive, especially in regards to the larger sections of the torso plate. I prodded peterthethinker regarding 3D printing some of the smaller and more fiddly components (front shields, the mounted cameras, other small pieces of embellishments) to save myself some hassle and a headache down the line, so that may be something that bears fruit when I'm able to afford the expenses of a print job. I've also (supposedly) got a helmet on the way from nintendstroid that should be getting shipped soon, so there'll be a further update on that later down the road.

As it appears for the moment, the bulk of the large, complex work (back pods, back hump, forearms, thighs, shins) will be completed in Pepakura, with the less-complex pieces (knee pads, main torso plate, bicep/shoulder plates, boots, back plate, abdominal plate) completed in foam, and the remaining pieces (fingers/handplates, mounted cameras, torso shield components and flourishes) completed using 3D print methods. It'll certainly end up a composite costume of some variation or another, and I intend to use all the avenues open to me to get this costume finished to the highest quality I can manage.
 
BTW Cherry Ive been tinkering with HMDs( head mounted displays at home this week and Cams.
By the time you need it Ill have a care package ready for you . :thumbsup

Right now My marine is the test bed for the goods. tonight is a night vision test with IR LEDs
 
By the time you need it Ill have a care package ready for you . :thumbsup

We'll see. I probably won't need one; the vision out of my test-build for the helmet core was actually fairly acceptable, and the less 'cool features' I install means there'll be a lot less to go wrong down the road. My motto is 'keep it simple, stupid' - the more basic and rugged the design, the less likely it is to break down while in use and leave me having to effect repairs. I may look into having a small unit mounted down the line to record footage while on deployment (similar to a dashboard camera), but I'm going to try my best to limit the amount of expensive, easily-broken features. My core focus will be to get the armour itself completed and in a state for acceptance into a high deployment tier first, and then worry about adding cool stuff down the road.

Honestly, the biggest thing I need help with at the moment will be foam unfolds - not only do I not have experience with working with foam, I'm also completely new to the experience of unfolding for foam. My first test pieces will be simple - ab plate, back plate, boots - and once I have the technique down, I'll start to focus on larger and more critical components.
 
It's always humbling to hear someone w/ a huge knowledge base, respect, and experienced 405th-er to say they have no working experience in something. How much more humbling to the noob that is still working on their first suit like myself, to know that one doesn't know enough, nor have the experience to realize how far they still have to go to reach even the lowest levels of the Tiers. I'm pretty sure you will have loads of people lined up to assist just as you have assisted hundreds of others, if not thousands(?)........ myself included and if I can assist in any way I would be glad to......... As for the "Dashboard Cam", you might look in to the GoPro.......Something that could be mounted either on shoulder or helmet discreetly or even incorporated in to the armor.
 
It's always humbling to hear someone w/ a huge knowledge base, respect, and experienced 405th-er to say they have no working experience in something. How much more humbling to the noob that is still working on their first suit like myself, to know that one doesn't know enough, nor have the experience to realize how far they still have to go to reach even the lowest levels of the Tiers.

Any builder should be mindful of their limitations. It's not egotistical at all to say 'I know the limits of my knowledge' - it simply means you've marked out boundaries and you know where you need to develop. Saying 'hold my beer, I got this' when you don't really know what to do generally results in poor-quality work.

Working in foam will be an entirely new experience for me. I'll need to practise and develop my skills before I can call myself 'adept' with the technique - and that's okay. We all start from somewhere, I've not the ego to presume I'll be a star-grade foam builder overnight.

I'm pretty sure you will have loads of people lined up to assist just as you have assisted hundreds of others, if not thousands(?). myself included and if I can assist in any way I would be glad to.

That would be really cool. The main things I'll need to develop are my skills in unfolding for foam - which will come in tandem with actually working in foam. The best way to understand how to process a file for a certain medium is to actually work in that medium, and to learn the benefits and limitations of that material.

Help with foam unfolds would be greatly appreciated, however - I'll be splitting up the Argus armour into the components, and offering up the (edited) files for people to try out if they'd like.

As for the "Dashboard Cam", you might look in to the GoPro.......Something that could be mounted either on shoulder or helmet discreetly or even incorporated in to the armor.

I'd considered this, but GoPro cameras are larger and heavier than I'd feel comfortable with. Plus, they're relatively expensive and I'd prefer to not buy something so costly. I have researched into having a small on-board Raspberry Pi 2/3, but again, the main issues will be with power consumption and where to locate everything - so, for now, I'd prefer simply to work on the armour itself, and perhaps consider upgrades later on down the road.
 
I will deffinately keep an eye here as high quality builds always drove me toward keeping at it. I will try to help in amyway I can with anything pepekura, bondo and 3d modeling. While I'm certain you are quite resourcefull in those fields yourself, I still leave this here ! I wish you all the patience you'll need because if there is anything I learned it's that it takes time, time to get the resources needed, time to build. So the best of luck on this daunting project which I'm sure you'll pull off relatively flawlessly !

Vivid
 
Chernobyl

I must confess! It's funny what Dirtdives just mentioned about you needing help. Mara beat me to the punch. Your second poster was me, my first original thought was (Ummmm...... GOOGLE!) Jokingly by the way:D. Decided that I wouldn't be a terd, lol! Although that's usually your response to those who are seeking help. To clarify, often. Not all the time.
 
I must confess! It's funny what Dirtdives just mentioned about you needing help. Mara beat me to the punch. Your second poster was me, my first original thought was (Ummmm...... GOOGLE!) Jokingly by the way:D. Decided that I wouldn't be a terd, lol! Although that's usually your response to those who are seeking help. To clarify, often. Not all the time.

I've read enough threads on foam building to know the theory behind it, but knowing and doing are two entirely different things. Most of the time, my responses are geared towards people who haven't even bothered to go hunting for help on their own - people who simply turn up, sit down and say 'right, tell me everything I need to know about everything'.

Most of the 'help' I'll need will come in the form of critique - pointing out whether or not I've done something wrong, or could do better at something. I'm not expecting to be told how to do things.
 
Well, a non-update for you guys: please, if you're using sharp tools or snap-off blades, take care when swapping out or disposing of them. I've badly sliced my knuckle and, 24 hours later, the wound still hasn't begun healing. So... be careful, guys, or you'll end up bleeding for your art.
 

Attachments

  • eJwNwlkOwiAUAMC7cADexhJ6GUMooTWtEHh-Ge-umfmY97zMZg7VsTaA_Vylz90u7TO3alvv7ap5nMuWfkNWzeW460sXkCcn.jpg
    eJwNwlkOwiAUAMC7cADexhJ6GUMooTWtEHh-Ge-umfmY97zMZg7VsTaA_Vylz90u7TO3alvv7ap5nMuWfkNWzeW460sXkCcn.jpg
    148.7 KB · Views: 437
That looks nasty. U ok? It looks kind of deep. Worst part is, its on the knuckle. it's going to have a hard time scabbing. Every time you use the finger it will pull the scab and bleed again. If you can handle the pain, I would suggest Liquid Bandage. It burns like a MoFo at first but after.....it keeps the cut sealed tight. If you've only used the blade that cut you on foam, you should be alright. If you used it on anything else or was sharpened just before you cut yourself, you might consider getting a Tetanus shot. And anti-bacterial ointment for sure!!!
 
That looks nasty. U ok? It looks kind of deep. Worst part is, its on the knuckle. it's going to have a hard time scabbing. Every time you use the finger it will pull the scab and bleed again. If you can handle the pain, I would suggest Liquid Bandage. It burns like a MoFo at first but after.....it keeps the cut sealed tight. If you've only used the blade that cut you on foam, you should be alright. If you used it on anything else or was sharpened just before you cut yourself, you might consider getting a Tetanus shot. And anti-bacterial ointment for sure!!!

Nah, 's all good. I just have to keep the dressing on until it's properly begun to heal - peeling the dressing off last time re-opened the wound, which is why it's been bleeding so much. Otherwise - certainly, plenty of howling as I wash the wound and disinfect it.

I'm not sure what's worse - the pain of having done it, or the pain of the disinfectant (and having to hack off a part of my own skin).
 
Its the pain of having done it for sure. A long time ago, I was cutting out pieces of a model I was working on and my knife slipped. Sliced 1/2 way in to my thumb, and hit the bone. 5 stitches later. I now have an interesting texture on my nail when it grows in due to scarring. It was excruciating so I know the feeling of loosing some skin. Please be careful.
 
If you still need/want more foam reference and have some down time give""Angelegend" a watch if you haven't already. he is super thorough on the shaping,cutting, and painting side of foam building from what i have seen.
one of his foam tuts-
 
Last edited by a moderator:
Status
Not open for further replies.
Back
Top