Reach EOD Helmet WIP

Status
Not open for further replies.

Godwolfen

Member
Hey All,

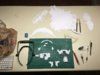
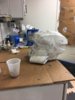
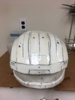
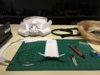
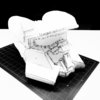
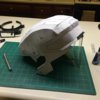
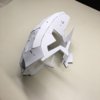
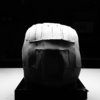
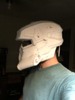
I got the itch to make one of these, so I dived into google and discovered both pepakura and 405th on the same day. You can see three weeks of progress in the photos attached.

I'm using 3mm EVA foam because I didn't realize cardstock was an option when I started, so this is purely a test helmet to get experience. Having said that, things are going pretty well considering I've never done this before. Advice welcome.
 

Attachments

  • IMG_0638.JPG
    IMG_0638.JPG
    805.1 KB · Views: 587
  • IMG_0641.JPG
    IMG_0641.JPG
    318.6 KB · Views: 460
  • IMG_0653.JPG
    IMG_0653.JPG
    631.8 KB · Views: 240
  • IMG_0659.JPG
    IMG_0659.JPG
    934.7 KB · Views: 288
  • IMG_0655.JPG
    IMG_0655.JPG
    621.8 KB · Views: 255
Nice work and welcome! Never hesitate to ask questions if you get stuck. The best advice I can give you is to just take your time and be patient with outcomes you might not have wanted. It's good that you said this is an experimental piece so if you make mistakes you won't get discouraged and quit. Keep up with it! Can't wait to see it complete!
 
Thanks, All. I'm enjoying this project a lot. Here's another professional grade pic for the night. I expect to get a lot done over the weekend, since this is all in my free time.
 

Attachments

  • FullSizeRender 9.jpg
    FullSizeRender 9.jpg
    587.8 KB · Views: 266
Finished assembly. Plans to start resin sealing hopefully today.
 

Attachments

  • FullSizeRender 10.jpg
    FullSizeRender 10.jpg
    639.8 KB · Views: 301
  • IMG_0668.png
    IMG_0668.png
    3 MB · Views: 309
  • IMG_0669.png
    IMG_0669.png
    3.1 MB · Views: 296
Couldn't get started on resin over the weekend, so I decided to start a second EOD helmet in the meantime made of cardstock. That way when I get to the curing, bondo and sanding stages I have something to work on during hurry up and wait periods.

No exciting pictures but that's just the stage I'm at right now. Still plugging away. I got 10/16 pages of cardstock cut out in less than 3 hours tonight. That's a huge improvement to my previous time.
 
Nothing exciting tonight. Just pepping the second helmet while I listen to Halo soundtracks and wait for an amazon order of fiberglass resin to arrive in the next two or three days. If I finish putting the second EOD helmet together, I will go ahead and test out a shoulder for size. I'm hesitant to start the torso because I don't know if I'll have to resize it. Eventually I will just go for it, but for now I'm still taking my time getting the skills down. I figure if the helmet is the most detailed than the rest will be easier, right? ;)
 

Attachments

  • pepping helmet.jpg
    pepping helmet.jpg
    1.7 MB · Views: 285
Nothing exciting tonight. Just pepping the second helmet while I listen to Halo soundtracks and wait for an amazon order of fiberglass resin to arrive in the next two or three days. If I finish putting the second EOD helmet together, I will go ahead and test out a shoulder for size. I'm hesitant to start the torso because I don't know if I'll have to resize it. Eventually I will just go for it, but for now I'm still taking my time getting the skills down. I figure if the helmet is the most detailed than the rest will be easier, right? ;)

That's not a solid rule, but the helmet is the focal point for the rest of the armour - get that right and you'll be well on your way for the rest of it.

Personally, I'd suggest taking your time and moving slowly and carefully on things. Your first attempt shows that you've got the technique down, now you just need to work on getting everything clean and straight before you even think of throwing anything else on your project to hardening it. You'll have a much easier time of things if you don't have to spend time on using bondo or a heatgun to straighten out warps and buckled areas, trust me.
 
Personally, I'd suggest taking your time and moving slowly and carefully on things. Your first attempt shows that you've got the technique down, now you just need to work on getting everything clean and straight before you even think of throwing anything else on your project to hardening it. You'll have a much easier time of things if you don't have to spend time on using bondo or a heatgun to straighten out warps and buckled areas, trust me.

Thanks for the advice. Thanks even more for stopping by my thread. This project is one of the most exciting hands-on projects I've worked on in years, and I'm completely open to the expertise of others. Pepping is going well, and I'm getting much cleaner edges on the cardstock vs my foam attempt.
 
I'm getting much cleaner edges on the cardstock vs my foam attempt.

Unsurprising. Foam can be good for helmets sometimes, but I personally advise against it. There's far too many small, intricate parts to effectively craft using foam - save it for the bodywork.
 
Alight, I am back and have some progress to show.

First off, I am now working on two helmets, both the same EOD design. The first is my practice helmet made of 3mm EVA foam. Because the foam disallows minute details, it has taken the role of practice and experimentation. I worked with resin for the first time and here is what I learned.

1. I made way more than I needed. 6 tbsp was far more than necessary for a single coat.
2. Brushing resin is like painting with toxic honey.
3. I know I laid it on too thickly.
4. I probably didn't use enough hardener because after 30 hours of curing it was still tacky.

Despite all this, I got exactly what I wanted: more experience. That way my official helmet won't suffer from pure rookie mistakes (hopefully!).

You can see in the attached photos how far I've gotten on the paper helmet.

Thanks for stopping by! I'll try to visit your threads when I have free time, but my updates will most likely wait until the weekends.
 

Attachments

  • IMG_0706.jpg
    IMG_0706.jpg
    696.7 KB · Views: 333
  • IMG_0707.jpg
    IMG_0707.jpg
    480.6 KB · Views: 237
  • IMG_0726.jpg
    IMG_0726.jpg
    657.5 KB · Views: 265
Quick late-night update with some paper helmet progress.
 

Attachments

  • PaperHelmet1.jpeg
    PaperHelmet1.jpeg
    888.6 KB · Views: 289
  • PaperHelmet2.jpeg
    PaperHelmet2.jpeg
    497.9 KB · Views: 258
The helmet is looking terrific! And the pictures, as always, are looking pristine, keep it up!
 
Great job on the helmet.......1 piece of advice, when building helmets, it's best to start at the crown and work your way down to the brim. This way, when you are trying to put in that last piece, you're not trying to shove both hands inside the helmet at the same time. Also, if the helmet is just slightly off, it translates to the next piece and the next ect, ect.. So you might end up w/ a piece that might not fit in the space for that last spot. If that happens at the brim, you could always cut it out.....most people end up trimming the opening of the helmet anyway to fit over their heads.....so 1 less piece isn't going to translate to much. But as I said, looking great. Looking forward to your EOD build.
 
Great job on the helmet.......1 piece of advice, when building helmets, it's best to start at the crown and work your way down to the brim. This way, when you are trying to put in that last piece, you're not trying to shove both hands inside the helmet at the same time. Also, if the helmet is just slightly off, it translates to the next piece and the next ect, ect.. So you might end up w/ a piece that might not fit in the space for that last spot. If that happens at the brim, you could always cut it out.....most people end up trimming the opening of the helmet anyway to fit over their heads.....so 1 less piece isn't going to translate to much. But as I said, looking great. Looking forward to your EOD build.

Right, I agree and see what you mean. I will probably remove the bottom to have room to reach the tabs for the crown. Thanks for the advice!

The helmet is looking terrific! And the pictures, as always, are looking pristine, keep it up!

Thanks a bunch! I got a few tests done tonight. Here's what I learned:

Hot glue does NOT work well with resin. Some hot glue seams in the foam helmet came apart after the resin coat, so I tried to patch them back with super glue. No luck. I moved on to a small smooth cast 300 test area. I made an very small batch, maybe 4 tablespoons, followed all instructions and safety precautions. Applied it as quickly as possible, but it gelled up really fast, felt faster than the three minutes the instructions stated, though I didn't time it so perhaps it's just my perception. Turned white and hardened in 5 minutes as expected. There was a significant amount of waste left in the mix cup.

Conclusion: Tacky resin is not fun, results in hot glue degradation, but at least a new coat can solve the problem. Smooth cast will be saved for the internal slush casting. I'm very impressed with the results of that stuff.

Thats all for now. Just finishing the paper helmet assembly tonight.
 
Rather than working on the helmet tonight, I spent time reading through a lot of the site looking to better understand the community I have become part of. I've always been aware of cosplay but had no idea the kind of detail and level of effort required to make these suits happen. I'm both impressed and humbled by the amazing work I get to take advantage of and experience I can learn from others.

So, a few thoughts and questions.

1. As I understand, the process of moving up in the community is New Recruit, then the required 50 post/90 day good standing, followed by regiment application, armor completion, and deployment. In that order. Did I miss anything?

2. Since I am still designing my Halo character, options are wide open for what I end up building. Everything revolves around the Reach EOD helmet I am currently building, since it inspired my research that led me to the 405th. (I do not like the other iterations of the EOD nearly as much.)
There was a section of the forum I read regarding deployment that mentioned the full armor builds must be something you can wear in-game. Since my build revolves around the EOD helmet, I dug through the file archives for any other EOD armor and came up with shoulders and chest piece. The rest I had planned on borrowing from the master chief suit from Halo 4 since I really like that design, and the files are readily available since 117 is so popular. Would mixing armor elements from different Halo games affect successful deployment? I ask because there are not a lot of EOD resources out there and I would be willing to select armor specific to Reach if that is the case.

3. How can this place be so AWESOME? I have never met a community so organized and willing to offer advice, while also making it clear that resources are out there for me to find for myself. I'm really glad to have dived straight in.

4. I built a list of all the armor pieces I plan to build and created a progress tracking sheet, making rough estimates of the time it will take to completion. This was a smart move and very eye opening. I will not complete a build of quality in the original 3 months I allotted for this first suit. Only if I am very dedicated will I have a complete suit in 7 months, and I expect it will take longer because there will be hiccups along the way. I may also be surprised and find the work gets easier over time. We'll see.

Thanks for sticking with me. This is all fantastic.
 
  • Like
Reactions: Jme
Right, I agree and see what you mean. I will probably remove the bottom to have room to reach the tabs for the crown. Thanks for the advice!


Thanks a bunch! I got a few tests done tonight. Here's what I learned:

Hot glue does NOT work well with resin. Some hot glue seams in the foam helmet came apart after the resin coat, so I tried to patch them back with super glue. No luck. I moved on to a small smooth cast 300 test area. I made an very small batch, maybe 4 tablespoons, followed all instructions and safety precautions. Applied it as quickly as possible, but it gelled up really fast, felt faster than the three minutes the instructions stated, though I didn't time it so perhaps it's just my perception. Turned white and hardened in 5 minutes as expected. There was a significant amount of waste left in the mix cup.

Conclusion: Tacky resin is not fun, results in hot glue degradation, but at least a new coat can solve the problem. Smooth cast will be saved for the internal slush casting. I'm very impressed with the results of that stuff.

Thats all for now. Just finishing the paper helmet assembly tonight.

hey Godwolfen, yeah, resin and hot glue don't mix so well. Most resins will heat up a bit before curing.....If you go w/ the high heat hot glue, it will work though. The resin won't get that hot.
 
hey Godwolfen, yeah, resin and hot glue don't mix so well. Most resins will heat up a bit before curing.....If you go w/ the high heat hot glue, it will work though. The resin won't get that hot.

Its a good thing I used super glue for most of it then! Smooth cast gets WAY hotter than even resin does.
 
Ok, I settled on the Halo 4 EOD chest/torso piece by Crimson and Tabris89. I know it's not Reach like the helmet but I've decided I would rather build a suit that looks cool than be accurate to a single game.

On that note, I took a look at the .pdo file and noticed there was a lot of alternating tabs back and forth between two adjoining pieces rather than all tabs on one edge. This is something I find very irritating (personal opinion from experience, nothing against the creators) so I decided I would optimize it a bit for my preferences.

The way I see it, a suit of armor is divided into mirroring parts. That means along the line of reflection, you will have the helmet, torso, cod, and butt plate. Each of these pieces therefore will have centered segments that are symmetrical. The torso then can be divided into central parts that lie along the line of reflection, and peripheral parts that lie on either side. That is how I arrived with this:

ChestOptimize.png

Makes me think of the Didact. >:D

Anyway, the point is to easily see adjoining edges so I can make fast visual decisions on where I want the tabs to be. Once they're all swapped out I will re-organize all the pieces to make it Letter friendly (the original is set to A4) as well as more modular in how the sections are laid out per page.

Never thought I would dive this deep, but this is great experience, especially since I'm researching the Silhouette Cameo craft cutter. (Shout-out to Robot Chicken/Starbase 101 for the awesome tutorial on Youtube.)

Now I just need to solve the problem of where to work with resin. That stuff is nasty, and I can't keep driving an hour to my folks every weekend to borrow their garage or I'll never get this done. Such are the trials of city living.
 
Status
Not open for further replies.
Back
Top