Props 3D Printed HALO Sniper Rifle for my ODST Kit

Status
Not open for further replies.

Elcorio

Active Member
Hello everyone. After quite a hiatus from the forum, thought I would jump back in. About a year ago, I received my Snapmaker 2.0 A350 and it has been chugging along almost non stop. Only problem was, I was making things for everyone else! Laser engraving this, printing that, etc., etc. etc.

While it is fun, I bought it for me to up my skill set in building things. However, these "side projects" did help me learn and fine tune a variety of settings with different filaments for 3D printing and laser engraving.

I started small and gradually kept upping the ante on prints until I got to the Mandalorian helmet. That print failed on several occasions until I finally got a sliced version and printed it in sections.

So that leads me to the current print and it was a "go big or go home" decision.

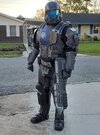
I always loved the pic of the ODST in the rain holding the sniper rifle so I thought "To hell with it, let's do this!" This is the sniper rifle from HALO 5 and I chose it simply because it was already sliced for printing and I liked the way it looked. Don't beat me up to bad :)

I am using ABS filament and have found it absolutely wonderful to print with versus PETG or PLA. Sanding is ridiculously easy and yesterday, I discovered the holy grail of using ABS.........acetone!

One failed structure support rendered the piece a failure, so into an acetone bath it went and and ABS slurry was made. Fellas......best thing ever!!!! Its like making your own glue, seam filler, and smoother (is that even a word?)!!! I think I am in love with ABS now! The versatility!

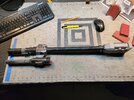
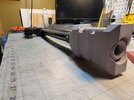
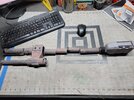
The barrel sections (8 parts) are printed and partially assembled with sanding and clean up being the current stage.

I'll post in blocks as I get several pieces done.

Anyway, enjoy the pics and as always, comments, opinions, tips, & tricks, etc. are always welcome!

FB_IMG_1587003397112.jpghalo_odst_sniper_by_andrewvideos510art_ddvoe3k-pre.jpg20210628_215349.jpg20210628_215154.jpg20210628_215341.jpg20210628_215323.jpg20210628_215233.jpg20210628_215217.jpg
 
Join the ODST Sniper team! We're the bestest at snagging our snipers on everything at cons.
 
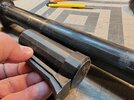
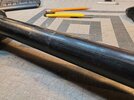
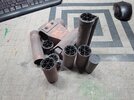
Where are all my 3D printing guru's? Ran into a small issue. I had the 8 pieces of the barrel assembly put together and was cleaning it up when it slipped from my hands. When it hit the ground, it broke in to 3 pieces.

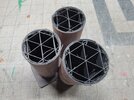
While a bit irritating for the set back, I realized that I had tried to take a short cut by reducing the infill to 7.5% AND by sanding down the hard edges to make the barrel cylindrical, it created multiple weak spots along it's entire length. I also noticed that the layers also displayed a slight layer separation in some parts.

So my question is this in regards to printing with ABS: If I increase the wall thickness from 1.2mm to say, 1.8mm, increase the infill to 25% using a grid pattern versus hexagon, will that give me more rigidity in the barrel? For the layer separation, could it be the speed or fan cooling (moving to fast or cooling to quickly to adhere to the lower layer)?

Using the same parameters (1.2mm wall & 7.5% infill) on the body parts seems to be fine, but I definitely need to make the barrel more rigid. Regardless, I am going to print a single tube section with the updated settings and stress test it, but was hoping for some more experienced printers to cast upon me their knowledge.

20210704_061719.jpg20210704_062348.jpg20210704_062540.jpg
 
Where are all my 3D printing guru's? Ran into a small issue. I had the 8 pieces of the barrel assembly put together and was cleaning it up when it slipped from my hands. When it hit the ground, it broke in to 3 pieces.

While a bit irritating for the set back, I realized that I had tried to take a short cut by reducing the infill to 7.5% AND by sanding down the hard edges to make the barrel cylindrical, it created multiple weak spots along it's entire length. I also noticed that the layers also displayed a slight layer separation in some parts.

So my question is this in regards to printing with ABS: If I increase the wall thickness from 1.2mm to say, 1.8mm, increase the infill to 25% using a grid pattern versus hexagon, will that give me more rigidity in the barrel? For the layer separation, could it be the speed or fan cooling (moving to fast or cooling to quickly to adhere to the lower layer)?

Using the same parameters (1.2mm wall & 7.5% infill) on the body parts seems to be fine, but I definitely need to make the barrel more rigid. Regardless, I am going to print a single tube section with the updated settings and stress test it, but was hoping for some more experienced printers to cast upon me their knowledge.

View attachment 307505View attachment 307506View attachment 307507
I'm not gonna pretend to be a guru but I have been printing and troubleshooting abs for almost a month now.

With regards to the breaking, I'm assuming it broke along the seams between the parts. This can happen not just with abs. How did you "glue" the pieces together? I haven't actually attached any pieces together yet of abs all my prints have been 1 piece things so far. My understanding is an acetone weld works really well with abs but can be difficult to make sure the weld is thoroughly done.

The layer splitting as I understand it is a result of too rapid cooling. Basically the layer cools too fast and doesn't adhere to the one below it. I would turn the cooling fan down (or even off) and make sure your printing in an enclosure so that the ambient environment is temp controlled as well.

Wall thickness in general increases strength more effectively than increasing infill. But if your point of failure is the seams then neither will really help.

I also read that increasing infill can help with the layer splitting problem as there's more surface area to interact with the previous layer.

I hope this helps. And hopefully some actual printing gurus will get on here with other ideas.
 
FalseShepherd Thanks for the insight and it does help. I do have an enclosure with the machine, so that is a plus. As far as gluing the pieces, I made an acetone glue with some of the ABS supports from the pieces. It is a thin milky consistency an seems to work well. The breakages were not at any specific point. I could literally grab a piece and snap it in half with little effort.

On my test piece, I did reduce the fan speed to 75%, but am now thinking of dropping that even further. I have 6 more hours to go on the next two body pieces and will then start printing barrel test pieces for strength testing.

Thanks for the response again, it was defintely helpful to get another opinion!
 
I only print with abs now and completely removed the cooling fan from my print head lol, 250 temp, and 40mm/s for speed. So slow and hot
 
Just wanted to pop in and thank everyone for the tips and advice. I opted with turning the fan off, raised the print temperature, increased the infill to 20% and wall thickness to 1.5mm. After gluing the two test pieces together using acetone, I placed the piece in an old pot with acetone soaked paper towels running up the sides for cold vapor smoothing. Left it in their for 20 minutes then pulled it out and let sit for an additional 20 minutes.

I can't break this thing if I try. Dropping it, twisting it, prying it, it is solid now. So I went ahead and put all 7 barrel pieces on the build plate (the muzzle break was salvageable), set my supports, and the printer a chugging along with an estimated completion time of Wednesday morning.

Thanks again!
 
Status
Not open for further replies.
Back
Top