3D printed Mark VI armor

Status
Not open for further replies.

Risted

New Member
I have decided to try and make a 3D printed Mark VI suit.
I have been trying to find inspiration from other people, but there are no way near enough threads about how to go about it. So I decided to just try doing something, see how it goes, post it here and hopefully get some advice on how to progress further.
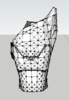
My method is to take the pepakura files export them to an .obj file and opening them in SketchUp (Using an extension) scaling them and then adding 1mm debt to the models.

My first and only print was the bottom halve of the forearm guard, and it actually turned out better than expected
WP_20160314_003.jpgWP_20160314_002.jpgWP_20160314_004.jpg

I need to print the top part next and glue them together and hopefully they will fit (crossing all fingers).
If any of you have any good ideas about a different approach please tell me, I am always on the lookout for new ideas. :)
 
I'm looking to do this very thing pretty soon, so I'm curious, how much filament did you use for this part? I've been practicing methods of printing parts with minimal filament use recently, and am trying to find the best cost saving technique.

Also, nice work thus far. Looking forward to seeing more pictures along the way.

For that part I used around 5.7 meters with a fill density of 10%. I am lucky enough that my university have 3D printers so I don't have to pay for the material.
The part I printed is really solid so I don't think it would hurt making it thinner.
 
I did a Full H4 MC Armor set last year and it took 12 ish Kg of ABS and was re enforced with fiberglass tape and epoxy.

600H print and build time. I used blender and 123D meshmixer to edit and chunk up the parts.

Peter.
 
Man, I so want to 3D print my build instead of pep it. Then I could have the printer chugging away at parts while I spend time with family or work on model development. Even printing the straight Pepakura models would be quicker than pepping and probably be more precise, then sand and fill smooth (something you'd need to do anyway with pepping). But alas, I know not how to sub-divide the model into sections that will fit on the print table and have the necessary support infrastructure. I'm very jealous of what you've got so far with just the forearm part and look forward to seeing more!
 
I did a Full H4 MC Armor set last year and it took 12 ish Kg of ABS and was re enforced with fiberglass tape and epoxy.

600H print and build time. I used blender and 123D meshmixer to edit and chunk up the parts.

Peter.

I really like your Donut armor, I am hoping to make Tucker myself :D
I am definitely gonna use your thread as a go-to if I ever get stuck, your videos are amazing.
 
Time for a little update.

I am almost done with the left forearm
WP_20160322_002.jpgWP_20160322_001.jpg

I need to find a better way to connect the pieces, they are to thin some places for the epoxy to stick...
Anyway I am currently making the helmet in paper, just to make sure it will fit when I print it :)
 
Time for a little update.

I am almost done with the left forearm

[Pics]

I need to find a better way to connect the pieces, they are to thin some places for the epoxy to stick...
Anyway I am currently making the helmet in paper, just to make sure it will fit when I print it :)

Did you just glue the rims together? No wonder that's too thin. Guess it won't be very durable, too. I'd propose glassing the inside of the bond, overlapping quite a bit on both sides. As one of my profs put it, "the lifeblood of glued bonds is surface area". At least I think you could translate it like that, german sayings are sometimes a little hard to translate :D

/edit: another way would (or could, at least) be to implement holes for dowels into the facing sides before printing, or to drill them afterwards. They don't have to be round in shape, flat wooden spatulas (like those coffee stirrer thingies) should work as well I think. Flat dowels would be easier to implement prior to printing than drilling, and they'd need less, how to put it, depth in material!?
 
I highly recommend doing an entire layer of fiberglass in the inside of all your parts..
i print about 2- 3mm on my armor..
 
Did you just glue the rims together? No wonder that's too thin. Guess it won't be very durable, too. I'd propose glassing the inside of the bond, overlapping quite a bit on both sides. As one of my profs put it, "the lifeblood of glued bonds is surface area". At least I think you could translate it like that, german sayings are sometimes a little hard to translate :D

/edit: another way would (or could, at least) be to implement holes for dowels into the facing sides before printing, or to drill them afterwards. They don't have to be round in shape, flat wooden spatulas (like those coffee stirrer thingies) should work as well I think. Flat dowels would be easier to implement prior to printing than drilling, and they'd need less, how to put it, depth in material!?

It actually holds up better than expected, but I am definitely going to stabilize it in some way, I am thinking some 3D printed plates glued to the inside. I'll take it into consideration with the dowels, I am still working on optimizing my models :D

I highly recommend doing an entire layer of fiberglass in the inside of all your parts..
i print about 2- 3mm on my armor..

I don't know a lot about fiberglass so for now I am working on some stabilizer pieces I can glue to the inside of the parts, we'll see how it goes XD

I hope to get some more printing done next week :)
 
So I have printed both forearms and glued them together
12919226_10209412152328705_386880751_n.jpg

And the small plates I use to glue the parts together works better than expected. I have dropped and pulled in the pieces and it holds, so yea \o/
Tomorrow I am going to print the elbow thingies that is missing on the pieces, so the forearms can be all done and I can begin with the upper arms part :D
 
I have gotten a message about how I split the models to fit inside of a 3D printer, so I thought why not make a post in the thread so other people can use it as well.

Disclaimer: The way I am doing it is in no way the easiest or the best way to do it.

I have used the UD pepakura files RobotChicken and SirPalesAlot have made and probably the HD files from Grey for the other parts.

I only know how to use SketchUp when we talk about 3D modeling programs, there are a ton of better ones to use out there, but SketchUp works for me.
I export the pepakura file as an .obj, then you can open it in various 3D modeling programs, I use an extension to SketchUp that lets me import .obj files. First I start scaling the model to fit to me (Kind of like in pepakura the only difference is that you can't write the measurements into SketchUp you have to use the scale tool. It is a bit of a bother but I don't know how else to do it. Exporting the pepakura files in the right side, doesn't seem to work)
Then I just starts looking at the model, seeing where you can split it up in two, but still have a big surface to glue it back together after the print.

1.PNG2.PNG3.PNG4.PNG

As the pictures show the model can be put together again, then I began adding thickness to it. This is done pretty much as I see fit, you are not going to see the inside of the prints and as long as the pieces don't overlap each other when you put them together (the first picture) and it still fits your body it should be fine.
If people want it I can upload my SketchUp files to the archives when they are done, then you can optimize them yourself.
When you have all of the pieces, just export them as an .stl file (An extension in SketchUp)

It is not a great description, but most of what I have done is just trial and error. If you have any questions I will try to answer them as best as I can.

Edit: I have made a video showing how I split a 3D model in smaller pieces, hope it helps. I will make one showing how I add thickness to the pieces soon.
https://youtu.be/LReTliU0yoE

Second video is done, it shows how I add thickness to the pieces:
https://youtu.be/lryjE8SbqMg

So aparently i have managed to attach a thumbnail to this post... I have no idea how I did it or how to remove it
 

Attachments

  • 1.PNG
    1.PNG
    24.1 KB · Views: 240
Status
Not open for further replies.
Back
Top