Foam Adrestia, Halo 3: ODST

Status
Not open for further replies.

OttyrCosplay

Member
Got bored and printed out some pepfoam files for the ODST I want to build. Her name is Adrestia and I plan on doing Navy Blue with yellow accents as the color scheme. No real plans to wear her to a con atm but I wanted to try my hand at following a pepfoam file without a video tutorial holding my hand like I did with the AngelLegend videos.

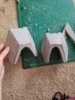
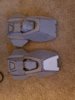
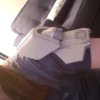
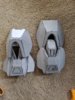
First up is the shoulders. Which seem pretty simple.

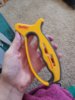
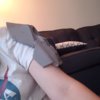
I also complained somewhere (IDK where) about how sharpening box cutters doesn't work for me but I decided to instead use my kitchen knife sharpener and not one of those sharpening sticks that you have to do the correct angle and everything.

MADE A HUGE WORLD OF DIFFERENCE. It's like new after a few passes. Would recommend if you have trouble sharpening your box cutters.
 

Attachments

  • JPEG_20190824_161130.jpg
    JPEG_20190824_161130.jpg
    2.3 MB · Views: 186
  • 20190824_161301.jpg
    20190824_161301.jpg
    1.5 MB · Views: 177
Glad to see you becoming a helljumper! Sorry the scaling didn't go to what you wanted. Have you thought about using armorsmith?
Will be following this, hope to see some great progress
 
Glad to see you becoming a helljumper! Sorry the scaling didn't go to what you wanted. Have you thought about using armorsmith?
Will be following this, hope to see some great progress

FEET FIRST!!

I have! I just haven't pulled the trigger on it yet. I think for my birthday I will treat myself to it.

But the scaling issue is allright I guess. Since I am navigating the pep foam files on my ownish, the first iterations of the shoulders are a lot rougher than I would have liked. I wanna try doing some different "folds" as opposed to full cuts that I used.
 
Last edited:
Shoulders are pretty much done but they seem on the small size. I want this to be bulky. I might make this like 5 percent bigger.
I think if you wanna your shoulder pieces looks bulky you need to increase size by 10% I think. 5 will be not enough if you compare with yours current ones. For sure you can at first made a new peace ot of cardboard, and you will see a result and don't waste EVA)
But with each attempt with each mistake you learn and this the important part)) I once forgot to mirrored a hand peace, soooo I had 2 left ones DX

I tried a 10% test piece and it swallows my arm when I held the paper up to it. I should mention I am 5'4" so proportionally it might work, I think. We will see if maybe I need to do something dumb like 7%. Which would involve math. THE HORROR.

But yes each attempt is a chance to learn! And this is all pretty cheap floormats so I am not too worried about wasting material.

Here is the five percent increased. I definitely like the way I built this shoulder opposed to the previous iteration. I think I will clean the next iteration up before gluing it all together so I can get the dremel into the crevices easier. I also think if I have the chest armor built it will be easier to gauge size.
 

Attachments

  • 20190825_161145.jpg
    20190825_161145.jpg
    1.8 MB · Views: 181
  • 20190825_162738.jpg
    20190825_162738.jpg
    282.5 KB · Views: 169
I tried a 10% test piece and it swallows my arm when I held the paper up to it. I should mention I am 5'4" so proportionally it might work, I think. We will see if maybe I need to do something dumb like 7%. Which would involve math. THE HORROR.

But yes each attempt is a chance to learn! And this is all pretty cheap floormats so I am not too worried about wasting material.

Here is the five percent increased. I definitely like the way I built this shoulder opposed to the previous iteration. I think I will clean the next iteration up before gluing it all together so I can get the dremel into the crevices easier. I also think if I have the chest armor built it will be easier to gauge size.

Hmmmm. From now I think it will be better if you compare with other parts of costume. Like you sad with a chest. Cuz one of the reasons its how it sits all together.
For example. I had a fail(but not with armor) after I made ODST, pistol and SMG, I thought I wanna make a DMR. I made it via pepakura and scaled it wrong, for rifle size it was nice but with chest - I couldn't aim - buttstock was tooooo big.
And again best of luck to you with your build)))
 
No real tangible progress atm BUT I do have digital progress. I was waiting on my birthday because after a bit of back and forth with me also trying on the arm piece compared to my Targaryen build, I decided that DoasterRus was right and it needed to be bigger.

But how much bigger? In comes Armorsmith. I spent the cash as a birthday gift to me and oh boy was it worth. Program is still abit janky and buggy at times but it does what I need when I need it! (Though, I went with the male model because the female one just had her bazongas clipping through the armor).

I have also downloaded Lin0004's ODST helmet from thingiverse because I wanted to try printing and finishing a helmet. I will be printing it in PETG and hand sanding so say a prayer for my inevitable death by sanding.

I have finished a 3d printed prop before with my Mercy halo and staff and did an Amon mask for a friend so no worries! I know what I am doing there! The not so funny but kind of is part is that I have a Lulzbot Mini which is a tiny machine and all the parts LITERALLY ALL OF THEM in the files are just JUST barely big enough to not fit on the build plate. I could rescale but also I need enough room to fit all my electronics inside. So I just cut them all to fit. It will just mean a shorter print time per piece and more gluing.
 
Last edited:
Status
Not open for further replies.
Back
Top