Alienated Phreak
New Member
Hello, this is my first attempt at a whole ODST armor build. I have had experience with pepakura and the rest, but I have never done a whole suit before. So, here we go!
What exactly am I building?
I am building the full ODST armor, including a weapon and a vacuum-formed visor (thanks to a friend). I will use fiberglass and resin for strengthening, not clay, casting, etc. etc.
Why am I doing this?
I almost always have some project to work on, whether it be video game development, other 3D modeling, and so on. Recently I've thought up and started a few small projects, but they never really worked out. Just recently, I remembered the Halo armor project I tried a while back and decided to go back into it.
What time do I have available?
I will get work done every day on this! Marching Band has just finished, so the only thing that is in my schedule until school starts is a Martial Arts class I teach/learn twice a week. Unfortunately there's been an ordeal, so I will be teaching more, and will have to spend a bit more time out of class helping out. But, other than that, I'm good. (School starts here on the 22nd btw)
Any goals on this?
I hope to have a majority of this done by Halloween, I would actually love to have this done by Halloween due to temperature drop, since resin works at +60F. However I WILL NOT rush this, so we will have to see. Another goal is to also build a fully-functional weapon (only a BB gun), just to go with the suit. I'm not sure which weapon I will build, so recommend one for me!
Pepakura Files
405th All-in-one Pep Pack - http://www.405th.com/showthread.php/26285-All-in-One-Halo-Pepakura-Pack
Kirrou's Game Accurate Pep Files - http://www.405th.com/showthread.php/22471-New-Hd-Odst-Game-Accurate-Pep-Files
Reference Pics
For detail - http://images.wikia.com/halo/images/8/8d/Odst2.jpg
For placement - http://www.elangworthy.com/odst_full_armor02_labelled.jpg
http://www.elangworthy.com/odst_final01_labelled.jpg
With HUGE help from - http://www.405th.com/showthread.php/8319-Odst-Weta-Landfall-Ver.-Pep-Armor-By-Skg-amp-Crew
http://www.instructables.com/id/ODST-Halo-Armor-Build-Part-6-Table-Of-Contents-/
Moving Forth
Current Work:

Day 1
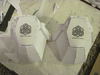
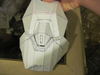
Got the helmet tester started and completed, what better way to start off then with head? This gave me a good idea of scale.


The blonde isn't me btw, he is a friend who wanted to try it out.

Got most of it completed, enough for it to hold itself together well and to give a good idea of size.

Complted and wearing! Again, this wasn't meant to be built well, I focused more on speed rather than accuracy since this was just the tester, my better work is to come.
And yes, I'm 14, I know, but please treat me like I'm an adult.
Day 2
HUGE progress. The helmet showed me that it actually fits great at default scale! Its a bit big, but it needs to fit for a while")
The first part of the day didn't go very well actually, I began the forearm, and I couldn't tell if it was too small or too big, or just right.

It seemed too big and would wobble near the middle, but I could barely fit my hand through, and the reference picture I've been using looks like it should fit WAAY to tight. So I kinda freaked, and left it alone.
Moving on to the productive part, I got both the knee pads done! They're a bit big it seems, but they look great!


I know its only the knee pads but I'm very happy with the progress, especially for my first real day.
More progress coming soon, so stick around guys.
What exactly am I building?
I am building the full ODST armor, including a weapon and a vacuum-formed visor (thanks to a friend). I will use fiberglass and resin for strengthening, not clay, casting, etc. etc.
Why am I doing this?
I almost always have some project to work on, whether it be video game development, other 3D modeling, and so on. Recently I've thought up and started a few small projects, but they never really worked out. Just recently, I remembered the Halo armor project I tried a while back and decided to go back into it.
What time do I have available?
I will get work done every day on this! Marching Band has just finished, so the only thing that is in my schedule until school starts is a Martial Arts class I teach/learn twice a week. Unfortunately there's been an ordeal, so I will be teaching more, and will have to spend a bit more time out of class helping out. But, other than that, I'm good. (School starts here on the 22nd btw)
Any goals on this?
I hope to have a majority of this done by Halloween, I would actually love to have this done by Halloween due to temperature drop, since resin works at +60F. However I WILL NOT rush this, so we will have to see. Another goal is to also build a fully-functional weapon (only a BB gun), just to go with the suit. I'm not sure which weapon I will build, so recommend one for me!
Pepakura Files
405th All-in-one Pep Pack - http://www.405th.com/showthread.php/26285-All-in-One-Halo-Pepakura-Pack
Kirrou's Game Accurate Pep Files - http://www.405th.com/showthread.php/22471-New-Hd-Odst-Game-Accurate-Pep-Files
Reference Pics
For detail - http://images.wikia.com/halo/images/8/8d/Odst2.jpg
For placement - http://www.elangworthy.com/odst_full_armor02_labelled.jpg
http://www.elangworthy.com/odst_final01_labelled.jpg
With HUGE help from - http://www.405th.com/showthread.php/8319-Odst-Weta-Landfall-Ver.-Pep-Armor-By-Skg-amp-Crew
http://www.instructables.com/id/ODST-Halo-Armor-Build-Part-6-Table-Of-Contents-/
Moving Forth
Current Work:
Day 1
Got the helmet tester started and completed, what better way to start off then with head? This gave me a good idea of scale.
The blonde isn't me btw, he is a friend who wanted to try it out.
Got most of it completed, enough for it to hold itself together well and to give a good idea of size.
Complted and wearing! Again, this wasn't meant to be built well, I focused more on speed rather than accuracy since this was just the tester, my better work is to come.
And yes, I'm 14, I know, but please treat me like I'm an adult.
Day 2
HUGE progress. The helmet showed me that it actually fits great at default scale! Its a bit big, but it needs to fit for a while
The first part of the day didn't go very well actually, I began the forearm, and I couldn't tell if it was too small or too big, or just right.
It seemed too big and would wobble near the middle, but I could barely fit my hand through, and the reference picture I've been using looks like it should fit WAAY to tight. So I kinda freaked, and left it alone.
Moving on to the productive part, I got both the knee pads done! They're a bit big it seems, but they look great!
I know its only the knee pads but I'm very happy with the progress, especially for my first real day.
More progress coming soon, so stick around guys.