Willnaut
New Member
Hey all! It's been a minute - or 2.628 million minutes - since I've had the opportunity to work on props and costumes, but the time has finally come! I'm kicking off this adventure by breaking into the world of fantasy with some foam swords and sword accessories.
Sounds simple, right?
That's what I thought too, which is exactly why I decided to make all of the templates for the various sword components completely customizable and interchangeable. After some time, I aim to have a library of templates that will allow me to make swords in all shapes and sizes, kinda like in the rage-inducing game Mordhau. That should add just enough work to drive me the right amount of crazy...
Til next time, I leave you with the work from this evening.

I always (usually... sometimes) start a project off with at least some amount of planning. Here I have my note card sketch and scale "blueprint."

Then it's off to make excessively labelled templates on poster board so I can keep track of the modular pieces later.


I used a 1/4" aluminum dowel as the core of the sword. Cut the dowel down to the right length, then covered the tips in hot glue to prevent the metallic edges from wearing out the foam.


I cut out the foam and hollowed out spaces on the inside to seat the dowel.


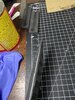
I finished the evening off by sticking the two sides of the blade together with the titular contact adhesive, then test fit the grip and other details. I may or may not have also swung the chunky thing around for ten minutes like a child. The jury's still out on that one.
Time permitting, I'll shape the blade and grips tomorrow and move on to the fancier details that I'm dying to work on.
Until then,
Will
edit: goofed up on image sizing
Sounds simple, right?
That's what I thought too, which is exactly why I decided to make all of the templates for the various sword components completely customizable and interchangeable. After some time, I aim to have a library of templates that will allow me to make swords in all shapes and sizes, kinda like in the rage-inducing game Mordhau. That should add just enough work to drive me the right amount of crazy...
Til next time, I leave you with the work from this evening.
I always (usually... sometimes) start a project off with at least some amount of planning. Here I have my note card sketch and scale "blueprint."
Then it's off to make excessively labelled templates on poster board so I can keep track of the modular pieces later.
I used a 1/4" aluminum dowel as the core of the sword. Cut the dowel down to the right length, then covered the tips in hot glue to prevent the metallic edges from wearing out the foam.
I cut out the foam and hollowed out spaces on the inside to seat the dowel.
I finished the evening off by sticking the two sides of the blade together with the titular contact adhesive, then test fit the grip and other details. I may or may not have also swung the chunky thing around for ten minutes like a child. The jury's still out on that one.
Time permitting, I'll shape the blade and grips tomorrow and move on to the fancier details that I'm dying to work on.
Until then,
Will
edit: goofed up on image sizing