Alright! So looks like I’m going to be doing a Chief suit guys/gals and AIs! Wish me luck!
OH! And as I mentioned there will be 2 other suits (hopefully) in the form of Sarah Palmer (GF) and Jorge (Buddy) when all is said and done.
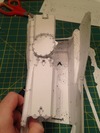
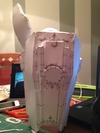
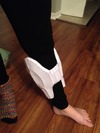
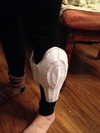
I grabbed the Master Builder file and printed out the first piece I will try, the bracer. I didn’t do any scaling, because I was having difficulty with the measurements in the program. It didn’t have the assembled measurements to the proper locations (elbow to wrist) from what I could tell. Not one of the measurements was significantly longer than the others…and I know it’s not a cube so it seemed to go around it, or on some weird tilt. I seem to be having this issue with a few files. Some are multiple pieces (shin + foot) or ‘blown up’ like the multiple pieces of one part purposely separated (Palmer’s Scout shin is a good example). Is there some way to merge these? Or chose points on the 3D side to measure?
For what its worth, I’m 6’ and 175lbs. anyone know what the Master Builder file is scaled to?
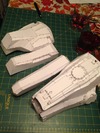
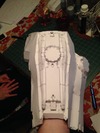
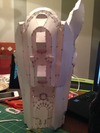
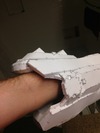
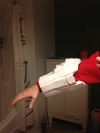
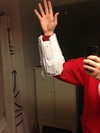
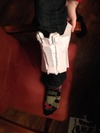
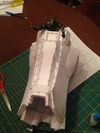
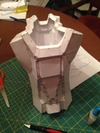
Well, here is where I am at so far!

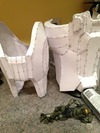
Re-used paper from a bad print.

OH! And as I mentioned there will be 2 other suits (hopefully) in the form of Sarah Palmer (GF) and Jorge (Buddy) when all is said and done.
I grabbed the Master Builder file and printed out the first piece I will try, the bracer. I didn’t do any scaling, because I was having difficulty with the measurements in the program. It didn’t have the assembled measurements to the proper locations (elbow to wrist) from what I could tell. Not one of the measurements was significantly longer than the others…and I know it’s not a cube
so it seemed to go around it, or on some weird tilt. I seem to be having this issue with a few files. Some are multiple pieces (shin + foot) or ‘blown up’ like the multiple pieces of one part purposely separated (Palmer’s Scout shin is a good example). Is there some way to merge these? Or chose points on the 3D side to measure?For what its worth, I’m 6’ and 175lbs. anyone know what the Master Builder file is scaled to?
Well, here is where I am at so far!

Re-used paper from a bad print.