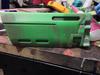
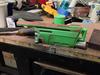
So it's been a while since I posted anything, but I figured I would post up my progress on my newest project, the Duke from destiny. I got the model from Stephen Swanson and had it printed by my friend Tim (timecon here on the 405th, you can message him if you need stuff printed). Once I had it in hand and was able to start, I began by assembling the various small pieces. I used super glue and e-6000 epoxy. I started by assembling the forward shroud, the upper rail, and then the grip section. I left the other parts for later. I used spot filler to clean up the seams and then just sanded the heck out of everything. I have been extremely grateful for a table sander on this project that's for sure. Once the top rail and the shroud were completed I assembled the central detail portion. There were some gaps where it lined up with the shroud so I used epoxy putty and filled them in and cleaned everything up, tightening up and gaps.
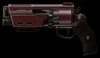
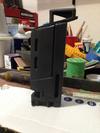
Here is what it should look like when done:

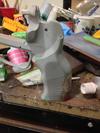
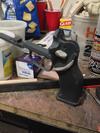
Here's a shot of the shroud and central detail. The grey is a bit of left over filler primer after sanding:

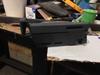
After that I glued the from portion on using the same method. This shot has te top rail sitting on it though it hasne been glued

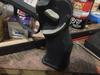
Once I hit that point I decided to work on the grip portion a bit. The model has the rear of the grip a bit different that the in game so I decided to adjust that with some epoxy putty. I am using a SmoothOn product call FreeForm Sculpt. It's a bit tough to mix but once it is mixed it can be formed and shaped nicely. As it continues to set I continue to smooth and shape it.

You can see from that shot I had already done a little sanding, filling with spot filler and priming with filler primer. Now that the bad shape was mostly laid out (or so I thought) , it was time to prime everything. I use duplicolor sandable primer. First I hit it with a dark grey and then with black. This way as I am sanding I can see where I am at by the change in color.


While that was drying I polished up the little bits (trigger, hammer and barrel, base of the grip). This model allows for a moving trigger, hammer, and cylinder. I'm really loving this thing so far. Once they are sanded and cleaned up I made sure they got their touch of primer.

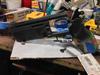
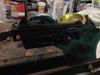
You can see that I have added the top rail to the shroud assembly

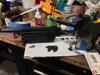
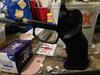
And here is a shot of the first real dry fit of the main body of the Duke:

At this point I'm getting pretty excited. It looks like it is really coming together. Since bungie released some super high def reference material I thought I would have a gander and see if I could pick up some reference for the grip section since a lot of the pistols share architecture. I then discovered I had made more work for myself. Lots of little details and things to change. Time to break out the epoxy putty again.
Here you can see the details I added , they are murrored on the other side.

This shot might look the same, but you can see that I have begun to smooth and even out the epoxy as it cures. You just wet you finger tips and it allows you to really massage the shapes you want out of it. I worked on the upper details as well but forgot to get shots of them.

While waiting for the epoxy to cure I tweaked a detail on the back of the grip. At the base of the grip there is a raised portion with a couple of indents at the back. Sculpted that on with epexh as well. Since it would be a while before I could go back to the grip I switched over to te forward section and hit it with a light coat of clear coat and then sanded that down to 3000 grit. There are still some tiny screw details to add, but I don't know where I am going to find 6 screws that small (smallest I could find at Home Depot was a 4-32)

Once the grip was ready again, I finished cleaning the epoxied details, and then using layered thin plastic card I built the safety switch. It just got glued on with super glue. After that, I tried adding the side details on the grip and then hit it with primer and left it overnight to cure. Not bad for a half days work")

I will continue with the dry fitting, tweaking anything that needs lined up as I go. Once it is all lined up it will all get a good shot of clear coat and a nice wet sand and wax. Makes it shiny and ready for molding. I won't add the texture to the grips until it is cast and ready for paint. I have the small screw/rivet details to add on the centre detail area, and a couple little ones to add on the grip. I have no idea where I'm gonna get the little screws. I might dig around and see if I have some old electronics with some tiny screw I can caniballize: it is a worthy cause after all. After that it is a question of finding pins for the trigger and hammer. You can follow more progress on this and my other Destiny and Halo builds on my Facebook page at Facebook.com/Incyte.117
Oh, and here is a quick preview of some other Destiny stuff we have going on:
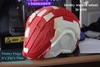
Nightwind helmet (modeled by Jacob and printed by Tim)

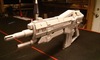
Autorifle (thanks to my buddy Gabe)

Here is what it should look like when done:

Here's a shot of the shroud and central detail. The grey is a bit of left over filler primer after sanding:

After that I glued the from portion on using the same method. This shot has te top rail sitting on it though it hasne been glued

Once I hit that point I decided to work on the grip portion a bit. The model has the rear of the grip a bit different that the in game so I decided to adjust that with some epoxy putty. I am using a SmoothOn product call FreeForm Sculpt. It's a bit tough to mix but once it is mixed it can be formed and shaped nicely. As it continues to set I continue to smooth and shape it.

You can see from that shot I had already done a little sanding, filling with spot filler and priming with filler primer. Now that the bad shape was mostly laid out (or so I thought) , it was time to prime everything. I use duplicolor sandable primer. First I hit it with a dark grey and then with black. This way as I am sanding I can see where I am at by the change in color.


While that was drying I polished up the little bits (trigger, hammer and barrel, base of the grip). This model allows for a moving trigger, hammer, and cylinder. I'm really loving this thing so far. Once they are sanded and cleaned up I made sure they got their touch of primer.

You can see that I have added the top rail to the shroud assembly

And here is a shot of the first real dry fit of the main body of the Duke:

At this point I'm getting pretty excited. It looks like it is really coming together. Since bungie released some super high def reference material I thought I would have a gander and see if I could pick up some reference for the grip section since a lot of the pistols share architecture. I then discovered I had made more work for myself. Lots of little details and things to change. Time to break out the epoxy putty again.
Here you can see the details I added , they are murrored on the other side.

This shot might look the same, but you can see that I have begun to smooth and even out the epoxy as it cures. You just wet you finger tips and it allows you to really massage the shapes you want out of it. I worked on the upper details as well but forgot to get shots of them.

While waiting for the epoxy to cure I tweaked a detail on the back of the grip. At the base of the grip there is a raised portion with a couple of indents at the back. Sculpted that on with epexh as well. Since it would be a while before I could go back to the grip I switched over to te forward section and hit it with a light coat of clear coat and then sanded that down to 3000 grit. There are still some tiny screw details to add, but I don't know where I am going to find 6 screws that small (smallest I could find at Home Depot was a 4-32)

Once the grip was ready again, I finished cleaning the epoxied details, and then using layered thin plastic card I built the safety switch. It just got glued on with super glue. After that, I tried adding the side details on the grip and then hit it with primer and left it overnight to cure. Not bad for a half days work

I will continue with the dry fitting, tweaking anything that needs lined up as I go. Once it is all lined up it will all get a good shot of clear coat and a nice wet sand and wax. Makes it shiny and ready for molding. I won't add the texture to the grips until it is cast and ready for paint. I have the small screw/rivet details to add on the centre detail area, and a couple little ones to add on the grip. I have no idea where I'm gonna get the little screws. I might dig around and see if I have some old electronics with some tiny screw I can caniballize: it is a worthy cause after all. After that it is a question of finding pins for the trigger and hammer. You can follow more progress on this and my other Destiny and Halo builds on my Facebook page at Facebook.com/Incyte.117
Oh, and here is a quick preview of some other Destiny stuff we have going on:
Nightwind helmet (modeled by Jacob and printed by Tim)

Autorifle (thanks to my buddy Gabe)

Attachments
-
 885E121C-7F3F-474E-AFF4-B3889A4F3F60.png435.3 KB · Views: 174
 -
 50C0D338-DB63-4640-8B8E-0A907B417905.jpg88.9 KB · Views: 161
 -
 70B99B6D-8DB9-4FE8-A730-5EEC72B38958.jpg98.2 KB · Views: 183
 -
 24948E59-48C5-4F10-9201-4FC9DF440CD8.jpg80.8 KB · Views: 160
 -
 8FD1C833-C81D-4E8E-B96D-E29040F27657.jpg76.4 KB · Views: 167
 -
 ABD5D867-28FE-462F-972A-02598BC58437.jpg64.6 KB · Views: 169
 -
 03DDAE58-8C0C-4319-9CA6-4DFC52F30E23.jpg97.1 KB · Views: 153
 -
 2B135147-CC17-4C7F-B474-6BA28AA66D4F.jpg87.7 KB · Views: 171
 -
 9DDF17A0-1203-4A10-A801-4E8FDE69BB79.jpg84.1 KB · Views: 157
 -
 3AE75294-CB81-4CDC-82C2-4353620D6C57.jpg93.4 KB · Views: 173
 -
 690A63C3-F314-4C42-94CD-6604CD77950C.jpg90.4 KB · Views: 161
 -
 D426680C-4B82-4588-B564-4D4D94715434.jpg72.6 KB · Views: 156
 -
 0004DCF1-F183-475C-AF30-0F69905A9302.jpg80.4 KB · Views: 164
 -
 0518A51D-8D72-4699-ABD7-691608DA6474.jpg118 KB · Views: 169
 -
 1812E4EB-7657-4867-86F3-53F1E2CED95D.jpg113.8 KB · Views: 152