nml3sscosplay New Member Feb 2, 2026 #21 Dang, the rats are evolving and are making armor now lol jokes aside, it's looking great so far!
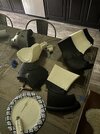
halo three rat Member Pacific Regiment Feb 9, 2026 #22 Got the back glued up, the front printed and half glued, and I got a second shoulder printed. Attachments IMG_3723.jpeg 1.6 MB · Views: 30
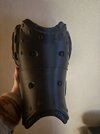
halo three rat Member Pacific Regiment Feb 15, 2026 #23 After a busy week, I’ve made a lot of progress. I printed a whole thigh and glued together the front half of the armor. I also put together a list of parts I want to re-print. I’m going to re-print the : Thighs Shins Helmet (maybe) jetpack
After a busy week, I’ve made a lot of progress. I printed a whole thigh and glued together the front half of the armor. I also put together a list of parts I want to re-print. I’m going to re-print the : Thighs Shins Helmet (maybe) jetpack
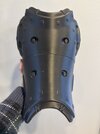
halo three rat Member Pacific Regiment Feb 19, 2026 #24 I’ve reprinted one of the thighs and both of the shins. All that’s left now is to mirror the thighs to the other leg and print a helmet Attachments IMG_3807.jpeg 1.3 MB · Views: 17 IMG_3803.jpeg 2 MB · Views: 21
I’ve reprinted one of the thighs and both of the shins. All that’s left now is to mirror the thighs to the other leg and print a helmet
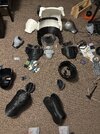
halo three rat Member Pacific Regiment Mar 1, 2026 #25 Got everything printed except for the helmet Attachments IMG_3864.jpeg 5.3 MB · Views: 23
MNKr DMO Division Staff Midwest Regiment Harvest Stream Team Member DIN S060 Mar 1, 2026 #26 You know what this needs? a banana helmet
halo three rat Member Pacific Regiment Mar 1, 2026 #27 MNKr said: You know what this needs? a banana helmet Click to expand... That would be awesome, but I don’t know anybody that has a banana helmet or banana themed suit
MNKr said: You know what this needs? a banana helmet Click to expand... That would be awesome, but I don’t know anybody that has a banana helmet or banana themed suit
MNKr DMO Division Staff Midwest Regiment Harvest Stream Team Member DIN S060 Mar 1, 2026 #28 halo three rat said: That would be awesome, but I don’t know anybody that has a banana helmet or banana themed suit Click to expand... Wing get this man the Kawari helmet please.
halo three rat said: That would be awesome, but I don’t know anybody that has a banana helmet or banana themed suit Click to expand... Wing get this man the Kawari helmet please.
Wing Member Midwest Regiment Harvest Mar 1, 2026 #29 MNKr said: Wing get this man the Kawari helmet please. Click to expand... Done
halo three rat Member Pacific Regiment Mar 2, 2026 #30 I will paint this like a cherry so that I can be a cherry limeade spartan and maybe get sponsored by sonic
I will paint this like a cherry so that I can be a cherry limeade spartan and maybe get sponsored by sonic
halo three rat Member Pacific Regiment Mar 3, 2026 #32 Wing thank you very much for this model. It turned out amazingly I sized it a bit too small so I need to re print it
Wing thank you very much for this model. It turned out amazingly I sized it a bit too small so I need to re print it
Wing Member Midwest Regiment Harvest Mar 3, 2026 #33 halo three rat said: Wing thank you very much for this model. It turned out amazinglyView attachment 373973 I sized it a bit too small so I need to re print it Click to expand... Love it! Youre the first person to print it so thanks for being the guinea pig!
halo three rat said: Wing thank you very much for this model. It turned out amazinglyView attachment 373973 I sized it a bit too small so I need to re print it Click to expand... Love it! Youre the first person to print it so thanks for being the guinea pig!