7H3LaughingMan
New Member
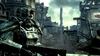
I have been a long time lurker watching everyone else and learning from videos and such not, but recently I decided to go all out and make my own set of Fallout T-45D Power Armor. My personal choice of doing this for my first suit instead of Halo is because of the fact that making your own modifications to something like this actually makes it stand out more and is also feasible in your own Fallout related stuff.
Well to start off with I am currently only in the process of making my own models by editing I believe a model taken out of Fallout 3. Most of these models contain to much detail for things you shouldn't have pepped.
Reference Picture:

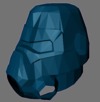
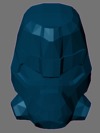
T-45D Helmet Model:


The helmet actually has all the fine details removed along with some of the other parts that are going to be attached onto the helmet itself using other materials. I also had to simplify the mouth part since it originally was overly complex to be pepped at all, mostly containing a lot of 1mm strips and such.
A few ideas I had for adding onto the armor.
Anyways, the helmet part took roughly 3-4 hours to fine down. Tomorrow I plan on separating the other parts of the model and start removing the details I don't need.
Well to start off with I am currently only in the process of making my own models by editing I believe a model taken out of Fallout 3. Most of these models contain to much detail for things you shouldn't have pepped.
Reference Picture:
T-45D Helmet Model:
The helmet actually has all the fine details removed along with some of the other parts that are going to be attached onto the helmet itself using other materials. I also had to simplify the mouth part since it originally was overly complex to be pepped at all, mostly containing a lot of 1mm strips and such.
A few ideas I had for adding onto the armor.
- Using real hoses for the side parts of the helmet to run a water line hooked to a Camel Bak Bladder to help conceal it.
- There is a little box that is on the back of the helmet near the base of the skull that I can conceal batteries to help power electronics in the helmet such as fans.
- Butchering a Jabber Bluetooth Headset and having it integrated into the helmet.
- There is a section on the left forearm that is perfect for creating a little box to hold my touchscreen phone, to have a miniature Pip-Boy that doesn't suck.
Anyways, the helmet part took roughly 3-4 hours to fine down. Tomorrow I plan on separating the other parts of the model and start removing the details I don't need.

")