Hello all! So I am about to embark on my first ever foam build, i've dabbled here and there with foam and pep but im ready to give a full foam build a shot. Firstly i've been looking around trying to find some advice on scaling the pep files so I can transfer them onto foam. I cannot find any tips though :/ can anyone give me a hand with some advice on how much I should add on to the files? Thanks! hopefully Ill start tackling this tomorrow afternoon.
You are using an out of date browser. It may not display this or other websites correctly.
You should upgrade or use an alternative browser.
You should upgrade or use an alternative browser.
First Foam build H5 MC
- Thread starter Spartan22
- Start date
- Status
- Not open for further replies.
- Member DIN
- S2424
First thing you need is to know how to scale. Here is a tutorial from Halo goddess. Tutorial. Here you will learn how to scale to your size. There are more....much more but this is the first one I came across. There is even a quick and easy formula for peping off a picture....but for the life of me I can't find it.....It's out there.....Once you have your size.....test pieces first.....don't waste foam when you aren't sure you have the correct sizing. Foam has more give to it and uses a lot less templates then when peping for glass. There is a lot of YouTube vids on creating foam armor.....find them and watch them .....again if you did already. Go through all the stickys you find in the forum. Do a quick search on Foam...Tutorials....Scale..... and just read....read....read.... There are also plenty of Foam files in the archives. You would just need to scale them to your size. There are a ton of tips and tricks....just got to read and test. read and test, re-read and just build..... It will come. be patient and don't get frustrated.
Found it!!! This is the formula on how to scale off a picture.
Found it!!! This is the formula on how to scale off a picture.
Alright! So I've taken a little time tonight to check out just a bit of foam work. I gave a few shots on the shoulders and tomorrow I'll tackle the scaling for the chest and shins. Here's a few pictures of what I worked on for the shoulders. I experimented with a hot knife and then regular knives. In all honestly I didn't like the hot knife or maybe I just need more practice at it...haha.

Was my first full attempt. Was messy due to the hot knife, didn't really like how it turned out so obviously...remade it.

Started with this cleaner lines so it would be easier. However doing the raised outline was irksome to me. Wasn't really sure how to cut it out properly without making it jagged. Even in the ones I liked it was a bit jagged decided to just smooth out with a dremal later.

Loved how this one was coming out. I curled it a bit more so it would "cup" my shoulder better. Even though in the reference image it wasn't as curved I personally liked it this way. So before doing the edges I made a copy fast.

I just used little foamies for the details all except the inverted details I used a exacto slowly to cut them inward. Then I bit the bullet and tackled the outline.

Right side was smoothed a little. Need a rubber attachment to smooth more. However I like it. It's not pristine but what battle armor is! Also the gaps on right sided one are where I didn't fully hot glue yet due to me decided on placement that's all. Will glue after this 12 hour shift! If you have any tips let me know! I plan on tackling the shins tomorrow ^_^!
Was my first full attempt. Was messy due to the hot knife, didn't really like how it turned out so obviously...remade it.
Started with this cleaner lines so it would be easier. However doing the raised outline was irksome to me. Wasn't really sure how to cut it out properly without making it jagged. Even in the ones I liked it was a bit jagged decided to just smooth out with a dremal later.
Loved how this one was coming out. I curled it a bit more so it would "cup" my shoulder better. Even though in the reference image it wasn't as curved I personally liked it this way. So before doing the edges I made a copy fast.
I just used little foamies for the details all except the inverted details I used a exacto slowly to cut them inward. Then I bit the bullet and tackled the outline.
Right side was smoothed a little. Need a rubber attachment to smooth more. However I like it. It's not pristine but what battle armor is! Also the gaps on right sided one are where I didn't fully hot glue yet due to me decided on placement that's all. Will glue after this 12 hour shift! If you have any tips let me know! I plan on tackling the shins tomorrow ^_^!
Have today off so plan to chip away at a lot more of the suit. Started off with the shoulders again.

Finished putting the raised edge on it. Took Evakuras advice and cut out the outer edge and raised it about 4mm maybe a bit more didn't want to sit and measure it all! Mostly uniform.


This section frustrated me. I cut relief marks and edged it to 45 degrees but it still wouldn't fit properly on the top of the shoulder...realized that the piece was suppose to be more craft foam and not 1/2 thick Eva foam...DOH! Spent about an hour playing with it till I realized that. Sooooo continuing on.

Didt have any craft foam of the right size so painstakingly cut the EVA foam In half. One. Slice. At. A. Time. However! Finally got it sorted out!


Both shoulders with the top parts attached. And to clarify the details are not carved in with a knife. They are melted in using a hot knife with a pointed/rounded tip. It gave me cleaner/faster lines plus I liked the way it turned out almost "fire damage" on some of the details. Started with the bicep attachment but started making the bicep and ruined it twice..so taking a breath then coming back and pounding it out. Bicep and forearm tonight! Have any questions or tips let me know, thank you!
Finished putting the raised edge on it. Took Evakuras advice and cut out the outer edge and raised it about 4mm maybe a bit more didn't want to sit and measure it all! Mostly uniform.
This section frustrated me. I cut relief marks and edged it to 45 degrees but it still wouldn't fit properly on the top of the shoulder...realized that the piece was suppose to be more craft foam and not 1/2 thick Eva foam...DOH! Spent about an hour playing with it till I realized that. Sooooo continuing on.
Didt have any craft foam of the right size so painstakingly cut the EVA foam In half. One. Slice. At. A. Time. However! Finally got it sorted out!
Both shoulders with the top parts attached. And to clarify the details are not carved in with a knife. They are melted in using a hot knife with a pointed/rounded tip. It gave me cleaner/faster lines plus I liked the way it turned out almost "fire damage" on some of the details. Started with the bicep attachment but started making the bicep and ruined it twice..so taking a breath then coming back and pounding it out. Bicep and forearm tonight! Have any questions or tips let me know, thank you!
Sorry for double post ahead of time but made a good chunk of progress! Started tackling the forearms and had tons of issues. I tried using the no detail template from Rhinoc, but I hated the idea of having so many pieces. So I ended up virtually half scratch building it. With three total attempts the last one worked out great and I was able to build both at the same time! Also picked up a new heat gun today so that helped massively with forming. Nevertheless to the pictures. Not many work heavy as I zone while working forgetting to take pictures.


This was the first and second attempt many individual parts. And weird cuts I didn't really like it. It wasn't clean or neat by any means so it would have just looked sloppy. Was getting frustrated. So took a tour of many others projects to see where I went wrong. Found the answer or have less means more!


This was my third attempt which turned out great minus a little sanding to the top, failed to take pictures as I worked so apologies will do for next parts!
Ignore the unfinished bathroom...obviously we can see priorities here xD! I tried focusing on detail using a reference picture. I know it's not as detailed in some aspects but I think it came out perfect for what I wanted. Next trip is biceps and then chest or legs. Not sure dreading chest a little!
This was the first and second attempt many individual parts. And weird cuts I didn't really like it. It wasn't clean or neat by any means so it would have just looked sloppy. Was getting frustrated. So took a tour of many others projects to see where I went wrong. Found the answer or have less means more!
This was my third attempt which turned out great minus a little sanding to the top, failed to take pictures as I worked so apologies will do for next parts!
Ignore the unfinished bathroom...obviously we can see priorities here xD! I tried focusing on detail using a reference picture. I know it's not as detailed in some aspects but I think it came out perfect for what I wanted. Next trip is biceps and then chest or legs. Not sure dreading chest a little!
- Member DIN
- S2424
Not bad for a half scratch half temp build.....to bad at all.....Fantastic even. The chest was a pain for me as well since I was build for my son and when I'm trying to assemble......he's asleep........You'll do great......Just keep at it.
Not bad for a half scratch half temp build.....to bad at all.....Fantastic even. The chest was a pain for me as well since I was build for my son and when I'm trying to assemble......he's asleep........You'll do great......Just keep at it.
Thanks man I appreciate it! Was worried my thread was dying haha, I started the chest about 3 hours ago and im making pretty good progress! So hopefully tonight ill be able to update again. I was worried but ive taken some templates and some customization to it. Hopefully I can finish the chest by midnight. Its the hardest piece in my opinion. The suit you made for your kid is great! My brother is 11 and wants one but so does my girlfriend...so going to be tackling two next haha!
- Member DIN
- S2424
Some one is taking on 3!!!! 2 for his kids and one for himself....Matching ODSTs!!!!!
ive been looking around for pep files and found and site that does them....heres the web address...http://halocostuming.wikia.com/wiki/Pepakura_File_Index
thats crazy! Where the thread?? I want to see! Haha let me know how it turns out! I'm almost done with the chest no details yet maybe an all nighter!Some one is taking on 3!!!! 2 for his kids and one for himself....Matching ODSTs!!!!!
thanks Dave! I'm using the pep files from 405th file database. But I'm also using the ones from rainbowdash he has pre made foam ones that require a little modding for my liking!ive been looking around for pep files and found and site that does them....heres the web address...http://halocostuming.wikia.com/wiki/Pepakura_File_Index
Parts left:
Chest (progress)
Shins(not started)
Thighs( not started)
Boots(Not started)
Shoulders(Done)
Forearms(done)
mikejusten
New Member

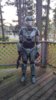
your armor is looking great I just finished one for my daughter we are going to go to the CCCC at the end of the month as old Blue team
View attachment 25774
- - - Updated - - -
your armor is looking great I just finished one for my daughter we are going to go to the CCCC at the end of the month as old Blue team
View attachment 25775
that looks sweet! Very well done! Good ole blue team all the way! I'm still deciding what one for my girlfriend...she wants a very...feminine one...haha
mikejusten
New Member
how were you thinking of doing the boots?
mikejusten
New Member
Be careful at 4share you and download some bad stuff there are foam ODST files on this sight at http://www.405th.com/file-archive.p...ams[author]=on&do=search&action=searchresults
they should be much safer
they should be much safer
Be careful at 4share you and download some bad stuff there are foam ODST files on this sight at http://www.405th.com/file-archive.p...ams[author]=on&do=search&action=searchresults
they should be much safer
Thats where I downloaded most my stuff from. I think only two things ever from 4 share rest is from here. Have me paranoid now ;b computer scan time!
Aright guys so in struggling a little bit on the chest scrapped the first one I made because it wasn't clean enough. I'm going to post a few pictures of the 3rd one I'm working on. Need a bit of advice, I'm tossing it up in the air if I think it's clean enough or not. If you can give me your opinion is appreciate it! Thanks!


So so all in all deciding if I should scrap and start again. Or keep. Just need opinions on if it's clean or not! Thank you guys!
So so all in all deciding if I should scrap and start again. Or keep. Just need opinions on if it's clean or not! Thank you guys!
- Member DIN
- S501
Looking really really good, keep it up!
mikejusten
New Member
it looks good. you might want to play with putting pieces together with 45 deg angles like this. It helps give you cleaner lines with less work. it will work on most angels too

Looking really really good, keep it up!
Thanks! I've decided on keeping it. I decided to put a little elbow grease into it and it came out to my liking.
hey mike! Alright, I have been using 45 degree angles on all pieces that are not straight I just think the way I heated it and put it made it a bit wobbly since both sides were 45 cuts. Should have only done one. Secondly I decided it was good enough, I went to the store and got some 150,220,400,1000 grit sandpaper. The 400,1000 were dry/wet for automotive.it looks good. you might want to play with putting pieces together with 45 deg angles like this. It helps give you cleaner lines with less work. it will work on most angels too
View attachment 25821
 Pre sanding picture. All the seams for the breastplate section
 I ended up sanding the seams with 150/220 first depending on area with a 1x3 block I bought. And sanded down so the seams were smooth. Then to remove the hairs I switched to wet sanding with 400 heating to remove any other hairs then 1000 wet as well and that fully removed all hairs and made it as smooth as the other areas! This also smoothed it out making it more fluid there's still gaps but I have filler for the holes which I also researched. I'll be using kitchen "caulk" to be specific Kwik seal. Due to its ability to seal and be flexible.


These are the post sanding images of the seams. I am much happier with how it turned out! Seams smoothed out, they are a little darker due to water asorbance as well as a little heat marks but once filled and plasti dipped no one will know!
- Status
- Not open for further replies.
Similar threads
- Replies
- 63
- Views
- 2,200