You are using an out of date browser. It may not display this or other websites correctly.
You should upgrade or use an alternative browser.
You should upgrade or use an alternative browser.
First Foam Build
- Thread starter Sierra 3105
- Start date
- Status
- Not open for further replies.
Sierra 3105
Member
Rapped up the build ?. I will post a pic for you with mesurments of the back of the chest if you wish. I was lucky enough to have already started a resin and pepakura version of the chest and I based my measurements off of that. I found that it works if you make it just slightly bigger then you would think it needs to be. Keep in mind of what you under suit is going to be made of too and leave room for that, if your going to make one.
Rapped up the build ?. I will post a pic for you with mesurments of the back of the chest if you wish. I was lucky enough to have already started a resin and peanuts version of the chest and I based my measurements off of that. I found that it works if you make it just slightly bigger then you would think it needs to be. Keep in mind of what you under suit is going to be made of too and leave room for that, if your going to make one.
That was meant to be "ramped up". I increased the size by 15% which seems to be looking right.
Sierra 3105
Member
You really rapped up the build. Mine is a much simpler in detail. Maybe ill add it in later if i get time. Im doing the chest plate but i think i may have made it a little small. Have you got a good picture of the rear of the chest.
Here are the mesurments for the back of my chest piece. I am pretty tall and stocky build.

- - - Updated - - -
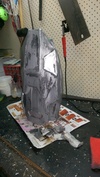
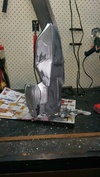
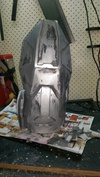
Ok guys, I've completed the first coat of glue wash, which is a simple process, 1st give the surface of your build a light wipe down with a damp cloth or sponge, and then take a small bucket or even a large cup, just something to hold enough glue was for your task. What you want to do next is mix approximately 50/50 tap water and PVA Wood Glue together, until you get the consistency of thick milk. Brush this over you build making sure to take care of any drips that start to dry, they are annoying to have to get rid of later so its best to do it at this stage. Make sure you get it in all the gaps and grooves even try to fill the gaps a little with it or as much as you can, it won't get rid of them completely but it helps. Then what I do is get my wall filler or spack fill as it's called here and I clean up all the holes and gaps I dont want, smoothing out any seams and bevels I need. Once this is dry sand it back to a smooth finish and I also like to go over again with a damp sponge and wipe any excess off the flatter surfaces as well, almost like a sanding action but with the sponge and water. After this I gave it another coat of glue wash to help seal it all in and left to dry, the next step is to inspect for any more imperfections and then prime and paint.
first coat of glue wash, should appear shiny and vinyl looking after drying.

Then the gap fill or drywall filler is added.


Then the second coat of glue wash.

I think I might continue down the arm and make the forearm and hand plates next then move to the opposite side.
Last edited by a moderator:
Wow!!! The shoulders look great! This is very similar to my method of painting
Good job and keep up the AMAZING work!
Good job and keep up the AMAZING work!
- Member DIN
- S713
Damn, your build is amazing! O_O
Dang, incredibly cool looking build you got yourself there! Also, your tutorial-like posts might prove helpful for me, as I have absolutely no idea about how to do all the filling and painting stuff  until now, I was totally convinced I'd go for paper and glass, but due to your build, I'm re-thinking about starting off with foam. How sturdy is it in the end? I mean, I know it won't ever be REAL battle armor, but I prefer it to be somewhat rigid and feel armor-like, not all wibbedy-wobbly like a camping mat
until now, I was totally convinced I'd go for paper and glass, but due to your build, I'm re-thinking about starting off with foam. How sturdy is it in the end? I mean, I know it won't ever be REAL battle armor, but I prefer it to be somewhat rigid and feel armor-like, not all wibbedy-wobbly like a camping mat Sierra 3105
Member
I'm glad someone asked this question actually, Looking at it and even picking it up it looks and feels like its a solid material as if it was some kind of metal, but purely by the weight you know its not. But with out a lot of reinforcing it is pretty rigid, just with that perfect amount of give, so when putting it on and off its a little easier. The glue wash process I use helps with the rigidity as well as the flexibility without damaging any of your hard work. I used to be a Pepakura and Fiberglass advocate, but since moving to foam, I would never turn back. I believe whole heatedly in using foam as a base and for most details but if you wanted to add 3D printed parts (if I had a 3d printer I would) or smaller fiberglass details, it would all mesh really well. Some of my smaller details are rigid items like nuts and bolts, plastics and other things like that. The thing I find a lot of people don't remember is that just because your using foam, the entire project doesn't need to consist of it. Some people would disagree but with a little pre planning and thought, you can achieve twice the detail in half the time and if you make a mistake, its as simple as cutting another bit of foam out and doing that one piece again, with pep and resins you would have to figure out a way to cover a hole or damage depending on how big the mistake was and what it was that went wrong, then if more resin was required you would have to mix it, apply it wait for it to dry or stop being tacky, fill, sand it and so on. I find with foam that less movement is restricted when your wearing it too. But having said all this, its each to there own, both methods have there pros and cons ( I just think foam has less cons haha ) and what ever you decide to use I'm sure it will turn out awesome !!. I'm glad to hear that my project is inspiring others and that my posts are helpful, more then anyone could want. I don't mind answering specifics ether so don't hesitate to ask any questions, I may not be able to answer them straight away due to my work scheduled, but I will answer them.
Did you try to cover foam in resin/glass? I've seen crinkled foam in other threads, where it apparently has been bent before. That kinda ruins the whole sturdy-armor-look.
And as you said I may ask: what tools do I need to get foam crafting going? Especially the cutting tools - is it just a sharp crafting knife, or do you use a hot knife? I know I can piece together that information browsing all those threads eventually, but I thought I could ask as well and read the threads without hunting for some keywords
Oh, and what kind of glue do you use? Just a simple hot glue? Cause I know some types of glue don't mix up well with some kinds of plastic, resulting in melting the plastic down...
Sierra 3105
Member
I've not tried to use resin on this build, however it could be an option for another build maybe, but I find I don't need too. It has the sturdy armor look and if you take your time with the paint process especially, the plastidip coats it shouldn't crinkle. Unless the foam is being bent too far after paint, if you plan well in placement of seams and/or clips and fasteners that should minimize the that risk also. As far as tools and glue, there would be a fair bit to type, but I think it's only like 1 page back or so, that has pictures of the exact product and tools I use. Apart from the PVA/wood glue process.
Nightfire166
New Member
That looks awesome man! I love how you have the armor secure together! I've been looking for a way to secure the hinges on mine and this technique seems perfect for what i'm doing! Thanks!
Sierra 3105
Member
Hey guys I was going to wait until I had done a little more of the paint process before I posted anything, however I realized Ive not posted in a while due to being busy and having a short period in hospital due to a foot injury, I have also ran out of Plasti dip so waiting on an order to be delivered. So not much to post but will post pics of progress anyway. Have done first few coats of undercoat and sanded some imperfections out, all the gaps are sealed and cleaned, ready for Plasti dip and paint.


Im thinking as I have some time off now due to my foot, I might make a start on the Forearm piece and wrist plate of the same arm, so that by the time my order arrives Ill have a few more pieces to paint and I can continue posting.


Im thinking as I have some time off now due to my foot, I might make a start on the Forearm piece and wrist plate of the same arm, so that by the time my order arrives Ill have a few more pieces to paint and I can continue posting.
Attachments
This looks amazing! Now I really can't wait to start my own build XD Still not sure I can pull off Master Chief though. I'm a really tiny person.
Sierra 3105
Member
Spartans come in all shapes and sizes , you can be whom ever you wish, chief included. Just have a crack at something.
Thanks, Sierra 3105, I'll let you know when I get started on mine for sure then! I might just start with some practice pepping on basic box board. Think I can pull something simple off with cereal boxes?Sierra 3105
Member
Cool I look forward to seeing your build. If there are any tips or help that your after, don't hesitate to ask, and if I can help I will.
Thanks, I'll be sure to call on you if I need any help! I look forward to seeing your build completed too.
Thanks, I'll be sure to call on you if I need any help! I look forward to seeing your build completed too.
- Status
- Not open for further replies.