FIRST-TIMER G1 mask - Hard to reach places...oops.

Status
Not open for further replies.

Love2prop

New Member
Hi all!
First of all I wanted to say this place is awesome!
With quarantine and all this craziness going on in the world, I wanted to try doing something I'd never done before and came along this website.
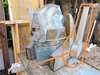
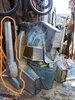
I decided to make an Optimus Prime G1 mask (I probably could've gone for something easier, but I'm a sucker for a challenge) and found the file through here.
I had loads of fun putting it together and even went ahead and coated with some resin. I am just about to go ahead with the rondo on the inside (resin is far too flimsy as my son is gonna want to play around with it for sure) and just realised that there are places that are totally sealed off now since putting the pieces together, DOH!!

I have attached 2 pictures so you can see the areas I am referring to.

Any advice on how to do it without having to start those pieces over?

Thanks all!
 

Attachments

  • G1 a.jpg
    G1 a.jpg
    2.4 MB · Views: 222
  • G1 b.jpg
    G1 b.jpg
    2.3 MB · Views: 239
Hi Love,

My advise would be to drill a 1/4" hole somewhere in those antennae pieces that are not super obvious (in the back or bottom). Pick up some ketchup squirters at the dollar store. Mix up the rondo and pour it into the ketchup squirter. Now you can squirt the rondo into the antennae. Turn the prop up and around over and over again to try to slosh the rondo around. If you set it down it will pool and harden all at the bottom. So keep turning for a full 10-15 minutes for the rondo to harden.

Keep in mind the rondo will also want to come out the hole you made, maybe put masking tape over the hole until it dries. Here is the post I did for my brute shot..


Tips on Rondo-ing a weapon:

1. After you resin the outside of a fully enclosed pep, like a weapon, you will not be able to get inside to fiberglass. Some people have posed using expanding foam, but that is risky. Expanding foam can keep expanding for months after you apply it, which means it could pop your pep like a kernel. So get out your Bondo, or other body filler, and your resin from earlier.
2. Mix the bondo and resin together to make rondo, roughly a 50-50 mix. I like it a little runnier so I did a 5:3 or 5:4 ratio. Meaning 5oz of resin for every 3-4oz of bondo.
3. Be sure to use the same amount of catalysts for both products.
4. Here is the whole process: 5oz resin > 3-4oz bondo > 50 drops of resin catalyst > few dime circles of cream hardener > stir until no lumps
5. From here simply get it inside the piece and then shake. It should stop running after about 10-15 minutes.
6. Remember to support your piece and check for warping/caving before walking away.

For my big guy here, I drilled about ten 7/32" holes evenly throughout the piece. I picked up some condiment squeezers from the dollar store and from here I was able to get the rondo in without too much getting out. I ended up filling one of the squeezers twice, then let it dry. Then I added another squeezer full, I feel like I should have done two though, its a big gun.


20160730_194757_002_zpswvokavyn-jpg-jpg.jpg


It was a nice sunny day, so while I was squeezing the rondo into the piece I was able to hold it up and see the silhouette of the rondo and attempt to move it around accordingly.
 
I forgot to mention... Nice work on your pep so far! :D

Clean lines, looks even, looks fully resined. If you're going to bondo on the outside I'd recommend very very thin layers. That's a lot of tough angles to sand. The thinner the layers the easier to sand in between. If it were me I'd get a flat paint stir stick and some sticky back sandpaper and stick em together. That will give you a nice thin flat surface to sand all those angles.
 
Status
Not open for further replies.
Back
Top