Last Resort
Jr Member
Hey guys,
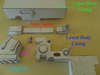
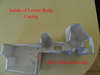
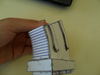
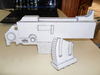
After being pumped by watching everyone else's awesome armour, I decided to man up, spend some cash and get started. My choice of first armour ever was Space Marine Power Armour from Warhammer 40K. Most of it is big and bulky, so I thought it would be a good starting point. First point of attack: the massive Power Armour pauldrons. Any constructive criticism will be GREATLY appreciated. Even though I think it looks somewhat average compared to a couple others, I'm really happy with it as my first attempt. I used 210gsm card (yeah, I'm Australian), with hot glue.
Cheers, hope you guys like my start,
- Adam
(Hope the links work)
http://img4.imageshack.us/i/img0000r.jpg/
http://img573.imageshack.us/i/img0001rg.jpg/
http://img64.imageshack.us/i/img0002qsx.jpg/
(I have no idea how to add pictures to a post. Can someone enlighten me? I tried the 'Insert Image' button, but when I did 'Preview Post', nothing came up. Help?)