Alright guys, after a couple months of research and consultation by none other than SBG.....here goes yet again, another MK VI ; ). I'd like to preface this WIP by stating that although I am new to the Halo universe, I do have a modicum of experience w/ prop/ costuming. I would like to thank Carpathia, justbarnett, and Robotchicken for lending a hand w/ some of my questions....a special thanks to SBG for a TON of wonderful incite and his willingness to cheer me on in the wee hours of the night....and another special shout-out to ROBOGEN for his wonderful files. That being said, allow me to bring you guys up to speed.
After several practice runs, testing various techniques and staving off the expected frustration which is Pepakura ; ), I am pretty satisfied w/ where I'm at.


Essentially I began w/ RC's "size test" lid in order to establish a starting point. I wasn't disappointed as this provided me w/ a great deal of information as to the scaling. Below are some measuring techniques I used along w/ what seemed to be a reasonable hypothesis for the scaling in question.... This turned out to be largely INCORRECT in accordance w/ ROBOGENS file however, provided the information which I am able to share with all of you.
Head
Length- 12"w/ tape and 9.5" w ruler (going off tape for initial test build of H3 MK6)
Width- 9" w/tape and 7" w/ Chek caliper (if needed will use tape on initial testbuild)
Hypothesis
According to VickoMF's youtube channel, the individual is suggesting that "300 mm is thegold standard for someone 6' in height... 330 mm was way too large." basedupon this idea we can conjecture as follows:
5' 10"-6'= 300mm ---> Height= 18"
5'7"-5'9"=280-285 mm ---> Height= 16"
Result: The above scaling was highly inconsistent as 285mm would seem to be more suitable for the 5'10"-6' height scale.


After V.1 was complete I decided, w/ the help of SBG, to take a shot at a 267mm V.2 which proved to be a great fit for my height/ build. As a result of this, it is my thought that anyone using ROBOGENs file to take the following into consideration when scaling:
Head
5' 10"-6'= 275-285 mm
5'7"-5'9"= 260-270 mm
Note: Please understand this is not set in stone but may provide a newcomer w/ a head start.
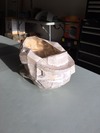
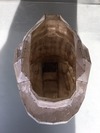
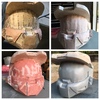
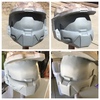
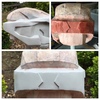
Below are some images of the 267mm along side the 285mm as well as how this turned out as far as fit...


As of present, I have laid down 2 coats of resin on the 285mm as well as the initial coat on the 267mm. Once this cures over the next couple of days I will begin glassing the interior of both, followed by ofcourse, the bondo process. As always, your keen eye and expertise is welcome and I look forward to sharing the process w/ all of you.


After several practice runs, testing various techniques and staving off the expected frustration which is Pepakura ; ), I am pretty satisfied w/ where I'm at.


Essentially I began w/ RC's "size test" lid in order to establish a starting point. I wasn't disappointed as this provided me w/ a great deal of information as to the scaling. Below are some measuring techniques I used along w/ what seemed to be a reasonable hypothesis for the scaling in question.... This turned out to be largely INCORRECT in accordance w/ ROBOGENS file however, provided the information which I am able to share with all of you.
Head
Length- 12"w/ tape and 9.5" w ruler (going off tape for initial test build of H3 MK6)
Width- 9" w/tape and 7" w/ Chek caliper (if needed will use tape on initial testbuild)
Hypothesis
According to VickoMF's youtube channel, the individual is suggesting that "300 mm is thegold standard for someone 6' in height... 330 mm was way too large." basedupon this idea we can conjecture as follows:
5' 10"-6'= 300mm ---> Height= 18"
5'7"-5'9"=280-285 mm ---> Height= 16"
Result: The above scaling was highly inconsistent as 285mm would seem to be more suitable for the 5'10"-6' height scale.


After V.1 was complete I decided, w/ the help of SBG, to take a shot at a 267mm V.2 which proved to be a great fit for my height/ build. As a result of this, it is my thought that anyone using ROBOGENs file to take the following into consideration when scaling:
Head
5' 10"-6'= 275-285 mm
5'7"-5'9"= 260-270 mm
Note: Please understand this is not set in stone but may provide a newcomer w/ a head start.
Below are some images of the 267mm along side the 285mm as well as how this turned out as far as fit...


As of present, I have laid down 2 coats of resin on the 285mm as well as the initial coat on the 267mm. Once this cures over the next couple of days I will begin glassing the interior of both, followed by ofcourse, the bondo process. As always, your keen eye and expertise is welcome and I look forward to sharing the process w/ all of you.
Last edited by a moderator: