Halo 3 Marine Build (CH252 Helmet and M52B armor)

Status
Not open for further replies.

Rookie425

New Member
I only recently picked up the pepakura habit about a month or so ago, but as any Halo fan I've always wanted to have my own set of armor synonymous with my most favorite entity. In this case, personally, I'd rather have gone for a set of ODST, but since this is my first time pepping, I've decided it's best to start off with something simpler until I have more experience.

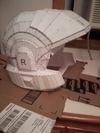
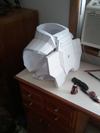
Here's what I got so far. Marine CH252 and M52B. Special thanks to Vrogy.

Completed Pep.

Image09092013030447_zps6d3c4c98.jpg


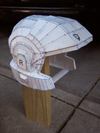
First layer of Resin.

Image09092013165638_zpsa765f274.jpg


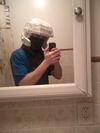
Tinkering with the sense of scale so far. I hadn't get accounted for padding, but I can tell once it gets a spray of OD Green, it'll look good with the shemagh and some ACUs.

Image09102013230608_zps6a7a7ef8.jpg


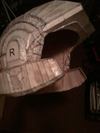
Bad lighting on this shot, but I gave it some Rondo on the inside, fiberglass came into play the following weekend after I gave the rondo time to untack itself.

Image09172013000622_zps7416b718.jpg


Meanwhile, I pepped the M52B assault vest. (I know I'm particular on the naming. Writing is my stronger point, so details are everything to me.)

Image09262013104904_zpsa2e07ae6.jpg


Did some Bondo and sanding finally, also added fiberglass to the inside of the helmet...plus another layer of Rondo to smooth it out. The sun visor was concerning me because I finally noticed that there's a very slight warp on the back left corner, though mainly that was an issue that occurred during the pep stage. I think the shape that it's getting now is pretty good thus far, so I'm not too worried.

1374996_656345824383990_1600525635_n.jpg


More bondo...more sanding...probably not enough, but I'm gonna bondo the rest of the spots before hitting it with a coat of primer...then bondoing from there...
...and more sanding...

1380089_657185837633322_68282631_n.jpg


So far, I'm kinda pleased with what I've got.
 

Attachments

  • Image09092013030447_zps6d3c4c98.jpg
    Image09092013030447_zps6d3c4c98.jpg
    61.7 KB · Views: 242
  • Image09092013165638_zpsa765f274.jpg
    Image09092013165638_zpsa765f274.jpg
    78.8 KB · Views: 290
  • Image09102013230608_zps6a7a7ef8.jpg
    Image09102013230608_zps6a7a7ef8.jpg
    53.4 KB · Views: 184
  • Image09172013000622_zps7416b718.jpg
    Image09172013000622_zps7416b718.jpg
    46.2 KB · Views: 203
  • Image09262013104904_zpsa2e07ae6.jpg
    Image09262013104904_zpsa2e07ae6.jpg
    62 KB · Views: 231
It's coming along nicely so far! I know that, eventually, I'd like to tackle this project as well (I've got so much planned that it makes my head spin sometimes).

Your pepping is clean and your bondo skills are decent from what I've seen so far. I can't wait to see more.
 
EDIT: Okay, working pictures this time.

Update time. More bondo, more sanding, and finally I was able to give it a hit of primer.

1385313_661114400573799_1375322351_n.jpg


Lots of little craters and bevels, but I expected massive imperfection on my first go with auto body filler. I'm guessing some light bondoing will fix most of this, or otherwise epoxy putty. Any suggestions are welcome.

1393635_661114943907078_2001336967_n.jpg


Otherwise, I feel it's coming together.

995532_661115653907007_2006191195_n.jpg


I also resin'd the chestplate, but so far it's just the one side. I'll get pictures once it's finished.
 
Lookin' slick, Rook! This is really coming along nicely! Have you done anything else with the chest or other pieces?
 
So far, the chestplate has been given a layer of resin to one side but due to weather conditions it's curing time has been prolonged and I probably won't be able to hit the other side until tomorrow. I've also toyed with a shoulder guard, but mostly for experimental value. It looks like it's going to be a botched piece, but I'll salvage what I can from it.

Right now, my only real concern is the little bits and dips in the helmet. I'm assuming additional layers of bondo will do the trick, or spot putty.
 
Wow, nice work so far.

The craters in bondo usually happen when you lay it on thick. If you want, you can find bondo brand spreaders for like 2-4$ at hardware stores, though a credit card will work "okay" as well. They let you smooth the bondo on more evenly, and cut down on the large pock marks, though you will still get the eraser sized craters.

The little craters can be filled with bondo spot putty, which is just smeared onto the area. Some people will spot putty the entire thing, but I usually leave that for the "final sanding" step. It's hard to fill the small craters with more bondo, and can take more time than it's worth since you need to mix batches and then get it just over the hole (if you smear it over the whole area, you risk it not filling the hole).

Also... a cheap powered mouse sander can help grind down "too much bondo" spots, or even out areas that are just uneven. Though they can be problematic if you use too high of a grit or press to hard and it eats through your work.
 
Went right back to it the next day. Touched up some spots using Water Weld epoxy putty.

1395857_661608373857735_2097633387_n.jpg


This gunk ain't that fun to use. If anyone has a better option for spot putty I'm all ears, but I think it's gonna look better once its sanded.

1381238_661608420524397_927428728_n.jpg


Also got to resining the main components for the assault vest.

1380367_661608537191052_1499804843_n.jpg
 
7100876_bnd_907_pri_larg.jpg


That's the good stuff I use.
 

Attachments

  • 7100876_bnd_907_pri_larg.jpg
    7100876_bnd_907_pri_larg.jpg
    25.6 KB · Views: 175
Touched up some spots using Water Weld epoxy putty.

The problem with using an epoxy putty to fill gaps in polyester filler is that the putty will dry harder than the filler and, while sanding, it is possible to sand the surrounding filler lower than the putty, leading to lumps.

Spot putty or some form of paint based putty is going to be a better bet. I use Tamiya basic putty, which is basically a putty form of grey primer.
 
Thanks for the heads up. I'll be careful when I sand it and hope to God I'll never have to use this stuff again. If it really comes down to precision, I can always use my steady-handedness with a metal file to shave down the bits of epoxy.
 
I've never had a problem with good ol' joint compound and some reliable sanding blocks. May not be very refined but it's hard to beat the cost effectiveness.
 
I'll probably experiment with a few things, but a lot of people praise Bondo brand spot putty, so that'll likely be my fallback. As for this epoxy putty, it's really nice that it's tough, but I have to put extra care into sanding it now that I've learned it's denser than auto body filler, though thankfully not by a whole lot in the case of this Water Weld brand.

I was able to nick it with a cheap MTech knife just to test its consistency (I do a lot of planning when it comes to correcting mistakes) and it left a nice chip and gash, and later after work I tried out a smaller, metal file against it and it scuffed right up. It shouldn't be too much of an issue for the spots I have globbed with it. The sun visor is going to take most of the care.

I'm extremely glad to say I'm almost done with the helmet. I've been waiting months to get this thing painted, padded and usable. The assault vest is going to be a nice change of pace as I can be a little more careless now. (The vest only took three or four hours to pep...so if I screw up I can just reprint.)
 
I take it back. Sanding that stuff off took me the better part of an hour. By the time I was finished, my respirator was venting pure water every time I exhaled. But after some mad filing precision, conservative sanding, and every curse I can think of, I got it down just to the first layer. After that came another layer of Bondo. Sadly, I didn't have the patience to get progress pics of it, but I probably will after I sand it and hit it with more Primer.

I finally went out and got some proper Bondo glaze and spot putty. Never using WaterWeld for this kind of mending again (Dorvack, you weren't kidding), in fact I used up the rest of it reinforcing the helmet on the inside, over those places I couldn't fit fiber glass or Rondo, which is typically the sun visor.

Also fiberglassed the chestplate. Didn't bother with the Rondo smoothing this time, as I wanted to experiment with my very finite remnants of resin I had left.

The pieces are coming together. All will be revealed next time. All will be made whole.
 
Before this next update, I thought I'd share a bit of my motivation behind the build. Since youth, I've always had a fascination with stories. I picked up roleplaying in highschool, and later I went on to college and picked up an Associate's in Liberal Arts, writing multiple stories, original and fanfiction. No matter how frustrating the formation of a story can be, there's one thing that never gets old for me and that's creating a character and planning their involvement in a story.

Meet Private Aaron Lockett, UNSC Marine Corps, designated Machine Gunner: http://z13.invisionfree.com/Halopolis/index.php?showtopic=167

But if don't give a damn and just wanna see the build's progression, here we go. I don't have the proper, pic-heavy advance due to my general laziness to retrieve my phone at the time, so I only managed to snap it after the first layer of paint. Long story short, I sanded the next layer of bondo, filed, sanded, spot puttied, sanded, stabbed myself, primed, and finally gave the helmet its first coating of paint. It ain't perfect, it was never meant to be, but I'm pretty damn happy with it so far.

1375936_665860050099234_1291486018_n.jpg


Obvious flaws are still there. I could always mend them later. The paint does a good job of giving it depth, however.

1374377_665859926765913_749529265_n.jpg


1395957_665744813444091_891504789_n.jpg


I'll try to give it its second coat tomorrow, and if it dries properly I'll give it the black highlighting in the appropriate nooks and crannies.
 
So I found an imperfection in my helmet and decided that it could use a little more spot putty, which would be a good percentage of the damn thing. Like I said, it was never meant to be perfect, but some mistakes you can't just look at and go "eh, it's fine." Ergo, FML, time to repaint...

...which I did.

603121_666141990071040_844899377_n.jpg


Speaking thus, that chestplate is without bondo. I thought about bondoing it for a while, but frankly, I can't see much need for it. It's the simplest part of the outfit, probably moreso than the shoulder guard.

1375717_666141806737725_616675463_n.jpg


That's a little more like it.
 
Just about done. I need to touch a few spots where I screwed up with the paint, along with some minor details that I may add in down the line (rivets and such), but otherwise I'm done.

1382006_667101556641750_582693292_n.jpg


1374122_667101596641746_798675372_n.jpg


1391693_667101813308391_1292675777_n.jpg
 
Bad news incoming.

I was just about to move on to fiberglassing the backplate, but I never got around to it for two reasons; time restraints, and weather. It's just too damn cold to do anything more for the time being. Winter's been known to have some warm days, so maybe I'll luck in now and then and fix something up, but until then I'm not gonna be able to continue this build for a while unless I have access to a well ventilated, well heated workshop.

This is good however, since this project has taken up a lot of my time and effort, and now I have more reason to get back into writing more extensively. Also, in the meantime, I've found a few other pepakura files I wanted to toy with, including a Dead Space Marker figure and an Army of Two Mask. Should be fun.

Also, I've decided that I'm going to redo this helmet after the rest of the build is complete. I liked how it turned out for a first pep, but I know now that I can do better. I screwed up on the pep stage due to inexperience and other obvious reasons (screw you, Gorilla Glue) and when the bondo stage finally came around I wasn't patient enough. So a few things I'd like to do to change this are 1) get a power sander to save my wrists some trouble, 2) learn how to properly apply bondo in light coats, and 3) never use epoxy putty against for anything other than internal reinforcement.

Stay tuned.
 
Status
Not open for further replies.
Back
Top