Halo 4 Locus Helmet (Short WIP)

Status
Not open for further replies.

ABYISZ

New Member
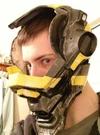
Hi yall, I've been around the forums for a while and have not posted anything at all. I only recently have gotten into this side of the creative spectrum and am pretty entranced. Now, this is going to be a pretty short thread and I'll explain why. I bought this Locus Helmet from Armory Props, more specifically from Jose Valdez. Its a great helmet and was very well made. It was a raw cast and I have done all the extra work on it like the sanding and such.

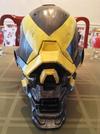
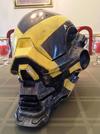
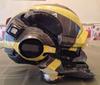
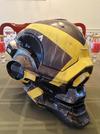
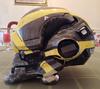
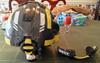
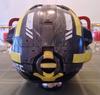
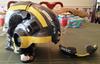
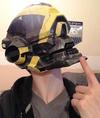
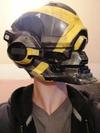
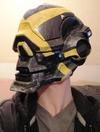
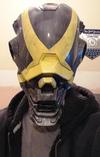
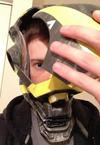
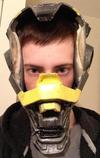
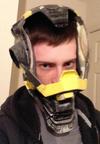
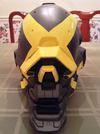
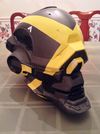
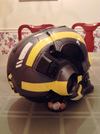
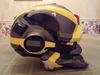
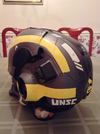
Now to the good part. With all that extra stuff outta the way, I began the painting process; first a layer of black, and then a taping off of all the necessary black parts. This was followed by a coat of (I used "Soft Iron Metallic) "steel" paint. Then taped off the other areas for the "X" and such and then lastly the little white details that are on the helmet. The helmet is not done being painted, I do have some touch ups to do, and may or may not "damage" it some. All in all it has turned out pretty well. When the paint process is complete I am going to trim a section of the helmet off and have it come on and off with magnets ("Back-off" mod by Impact Props). And then trim the visor off and do the same trick. In the mean-time, I will be playing with a clear visor I also bought from them.

Alakazam!!
1234448_637577886281962_191639219_n_zps2581d853.jpg
1234310_637577876281963_739155304_n_zpscc2d753f.jpg
1185852_637577869615297_1614748287_n_zps98cfb917.jpg
1174968_637577872948630_239358395_n_zps3cc5605e.jpg
1098131_637578112948606_766398873_n_zps6fa5551c.jpg

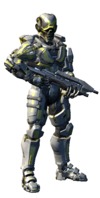
I do have some reference shots I took in-game, they're a bit big so I'll re-size them and post'em later for anyone to use.
 

Attachments

  • 1234448_637577886281962_191639219_n_zps2581d853.jpg
    1234448_637577886281962_191639219_n_zps2581d853.jpg
    71.4 KB · Views: 1,654
  • 1234310_637577876281963_739155304_n_zpscc2d753f.jpg
    1234310_637577876281963_739155304_n_zpscc2d753f.jpg
    77.6 KB · Views: 371
  • 1185852_637577869615297_1614748287_n_zps98cfb917.jpg
    1185852_637577869615297_1614748287_n_zps98cfb917.jpg
    67 KB · Views: 275
  • 1174968_637577872948630_239358395_n_zps3cc5605e.jpg
    1174968_637577872948630_239358395_n_zps3cc5605e.jpg
    67.8 KB · Views: 623
  • 1098131_637578112948606_766398873_n_zps6fa5551c.jpg
    1098131_637578112948606_766398873_n_zps6fa5551c.jpg
    68.6 KB · Views: 322
I'm sorry, Am i the only one that noticed the Change on the helmet,

Also nice build man
 
Thanks Hyper and Lordhood, more pictures to come soon, probably not till friday? though.

-And as for the "change" I got this huge Boot Beer Mug thing once, and use it to store change, and it is sized just right that I can use it instead of a foam head for now.
 
Lookin good!! with a little bit of weathering that thing will look pretty beast! One thing I'm kind of curious about is how people set up the visor on a locus helm, where are you going to see out of?
 
Thanks. For the hard visor, currently still attached, I will dremel it off and then have it come on and off with some small rare earth magnets. I bought a clear vacuum form visor from them as well though, so for that I have bought nightshade headlight tint for cars, and I am ordering some yellow headlight tint as well. I'm testing those two paints on some other random clear plastic pieces to see if I can get it to "sync up" at least fairly well. If I can get the clear visor how I want it, then it will be installed permanently, while keeping the hard visor as a back-up. Should the clear visor plan fall through, it shouldn't, but if it does, I might consider having the visor go up and down like how the face plates of the ironman helmets do. I have backup plans for my back up plans.

As for weathering, I have decided not to do to much, really just on the edges and such. I want it to look "worn" but still mostly just off the assembly line. For that I'm going to use some silver paint to give the illusion of metal under all the paint.
 
Sounds interesting. And yeah, I think that little wearing will go a long way, will make it seem more metallic less plastic. Cant wait to see how this turns out!
 
Alright y'all, spent friday fixing paint, weathering up and implimenting the "Back-off" mod I talked about. Not much to say other than that its now complete and ready for your views.
BD_RS_zpsebf5fcf7.jpg
BD_RSS_zps0efe95cb.jpg
BD_LSS_zpsb0b31c8d.jpg
BD_LS_zpsece8ade7.jpg
BD_F_zps43e95310.jpg
BD_BO_2_zps967f83f8.jpg
BD_B_zps3152c519.jpg
BD_BO_1_zpsc58f37ec.jpg

Again wanna thank Armory Props and Jose Valdez for their cast, Impact Props for the "Back-off" mod idea and you all for taking the time to look at this.
 

Attachments

  • BD_F_zps43e95310.jpg
    BD_F_zps43e95310.jpg
    87.3 KB · Views: 318
  • BD_LS_zpsece8ade7.jpg
    BD_LS_zpsece8ade7.jpg
    83.9 KB · Views: 256
  • BD_RSS_zps0efe95cb.jpg
    BD_RSS_zps0efe95cb.jpg
    62.6 KB · Views: 277
  • BD_RS_zpsebf5fcf7.jpg
    BD_RS_zpsebf5fcf7.jpg
    90.9 KB · Views: 327
  • BD_LSS_zpsb0b31c8d.jpg
    BD_LSS_zpsb0b31c8d.jpg
    76.2 KB · Views: 379
  • BD_BO_1_zpsc58f37ec.jpg
    BD_BO_1_zpsc58f37ec.jpg
    91.5 KB · Views: 254
  • BD_B_zps3152c519.jpg
    BD_B_zps3152c519.jpg
    66 KB · Views: 294
  • BD_BO_2_zps967f83f8.jpg
    BD_BO_2_zps967f83f8.jpg
    87.3 KB · Views: 268
thanks, the boot stein glass is what I use to hold extra coin, and just happened to be tall enough to hold the helmet until I get a styrofoam head.
 
I definitely agree, at first the initial idea was pretty much just some of the edging and then maybe a couple streaks on the visor and all, but well, to quote some memes, "That escalated quickly." lol. Yeah, it fits the helmet I think and works well. I've had tons of compliments on it on facebook and work and such. I'm going to add a couple magnets for the visor and then maybe post a short video for how the "Back-off" works and all. But I am very happy with this helmet. Now, all I have to do is wait for more of the armors to come out for foaming and pep, and perhaps I'll make my full suit from H4.
fullbody?target=large.png

Helmet: Locus
Chest: Tracker
Shoulders: (R) offhand think its pathfinder? (L) Mk V
Forearms: Outerplated
Legs: ODST
 

Attachments

  • fullbody?target=large.png
    fullbody?target=large.png
    177 KB · Views: 1,940
I like the weathering, but some of the scratches look a bit too regular.

It you take a bit of sponge, dip it lightly in silver paint, wipe most of it off and dab the sponge on some of the heavy use areas, it might add some visual interest. You could also do this with dark gray / black paint on the stripes. Test it on scraps first though.

You could also go over the armor plate edges with the flat edge of a silver pencil to create wear marks. The good thing about this method is that if you go too heavy, you can take off the excess with an eraser. Again, test this on something that you don't mind ruining, just in case.

Nice work overall though.
 
thanks Dorvack, I'll look into that, though since I think I'm done with this one, maybe on the next.

Well, a little premature but I do have a small video ready for ya'll. Mostly showing how the magnets are working. I will be fixing some small details on the helmet like adding a few more magnets to the visor.


Thanks for all the comments.
 
Last edited by a moderator:
Heres a couple quick "Selfies," lol.
image_zps133dd415-Copy_zps88c7c20f.jpg
image_zps8c441148.jpg
image_zps37c7ab6d-Copy_zpsb63c5dfd.jpg
image_zps6b902d08-Copy_zps21d36edc.jpg
image_zps6dd3a716-Copy_zpsa8708d58.jpg
image_zps5bdb1213-Copy_zps07146188.jpg
 

Attachments

  • image_zps133dd415-Copy_zps88c7c20f.jpg
    image_zps133dd415-Copy_zps88c7c20f.jpg
    71.5 KB · Views: 386
  • image_zps6dd3a716-Copy_zpsa8708d58.jpg
    image_zps6dd3a716-Copy_zpsa8708d58.jpg
    57.8 KB · Views: 309
  • image_zps6b902d08-Copy_zps21d36edc.jpg
    image_zps6b902d08-Copy_zps21d36edc.jpg
    59.9 KB · Views: 318
  • image_zps8c441148.jpg
    image_zps8c441148.jpg
    55.9 KB · Views: 1,250
  • image_zps5bdb1213-Copy_zps07146188.jpg
    image_zps5bdb1213-Copy_zps07146188.jpg
    54.2 KB · Views: 305
  • image_zps37c7ab6d-Copy_zpsb63c5dfd.jpg
    image_zps37c7ab6d-Copy_zpsb63c5dfd.jpg
    68.3 KB · Views: 283
so... how do you see out of it?

Great helmet tho. I'd go as far as to say probably one of the best I've seen yet.

Gotta admit some of those MC helmets are really good but this one is waaaaaay up there.


Hope you make the rest of your suit... I'd love to see it.
 
You can do a vacuum-formed visor, I did buy one from Armory Props too, haven't done it yet. That visor would be clear and can be tinted with headlight paint from an auto store or such.
The way I have it set up right now is the same way Jose has his, we dremeled the visor itself straight off, and have it coming on and off with magnets. Like I said in the video as you're walking around at places like Pax or such you can have it off and then when you pose for pictures and things you put it on.
image_zpsb5fe0ce0.jpg
image_zpsa5c7408c.jpg
image_zpsaa4d5092.jpg
image_zpsca1e3081.jpg

I'm still trying to figure out exactly how to do the paint on the clear visor I bought. I have Black headlight tint (VHT Nightshades), but it wouldn't look like the "steel" paint. And then as for the yellow "X" on the visor I was looking at some yellow headlight tint on amazon and eBay, but that can is around 3oz and $32-35. I'm going to keep looking and see what I can find to get it as close as possible to the original paint and if I have to I'll succumb to the pressure and buy the yellow tint. Still $35 is a lot for a little ~3oz can of spray tint, Nightshades was $17-19 and was the equivalent to an actual spray paint can. I have seen some "Smoke" tint so I guess I could always buy a can of that too and kinda mix both the Nightshades and smoke together and see how it looks. It has to be mildly dark so people can't see in, but still capable of being seen out of by the wearer.

This project is done but not done at the same time for the above reasons. When I figure things out I'll post my results and I guess a lil how-to on how I did it. So yeah, still a little bit of progress to go and then completely finished with this helmet. Again thanks for all the comments and feedback.
 

Attachments

  • image_zpsaa4d5092.jpg
    image_zpsaa4d5092.jpg
    30 KB · Views: 502
  • image_zpsb5fe0ce0.jpg
    image_zpsb5fe0ce0.jpg
    30 KB · Views: 238
  • image_zpsa5c7408c.jpg
    image_zpsa5c7408c.jpg
    28.2 KB · Views: 215
  • image_zpsca1e3081.jpg
    image_zpsca1e3081.jpg
    27.6 KB · Views: 242
If the visor is vac-formed from policarbonate, Tamiya makes a rather good 'smoke' paint for RC car bodies. The product number is PS-31 and it should cost less than $8 for a small spray can. Tamiya also makes a translucent yellow policarbonate paint (PS-42) and a translucent silver policarbonate paint (PS-36) which might work for you in some combination.

You apply it in light coats and stop when you have the desired darkness of tint. A little goes a long way...

Policarbonate paint only really bonds to policarbonate / lexan, but there's also a version of the 'smoke' paint for plastic. TS-71 is the product number.

Good luck.
 
Status
Not open for further replies.
Back
Top