caaAAveJohnson
New Member
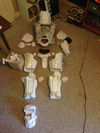
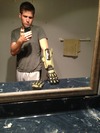
I'm a new member to the forum, but this is my second Spartan build. I used EVA foam the last time around and was never totally satisfied with how it turned out, so my business partner and I put our heads together and started working on a new one. I'm fortunate enough to work in a small composites/fabrication shop and have a lot of materials on hand for this sort of project.
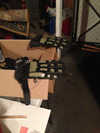
I've seen about a million and a half pep wip threads, and there's nothing wrong with that, I just don't want to dwell on this step too long. This was actually my second time pepping the H4 armor, I lost a lot of the first one to a layer of Polyester Laminating Resin (big mistake, for a number of reasons, avoid that poisonous crap like the plague)
I did notice that the chest piece came out a bit small, but I'm not very big so I'll try bulking it out with expanding foam in the front after the resin stage rather than re-pepping it.

We use a lot of different epoxy resins up at the shop, but I'd recommend ones used for hand layups and such rather than infusion resins. (Fast or semi-fast hardener)
They have a honey consistency and don't really need much work after they're cured, just a quick wipe-off between layers. Plus, some are odorless. (still, wear a vapor rated respirator if you do this a lot, nerve damage is no joke) Laminating resins usually have a wax or amine mixed in that rises to the surface of the part, because it cannot cure in the presence of oxygen. This has to be scrubbed off between layers and will destroy your peps for fun. Plus it smells like napalm and takes a few days to cure and out-gas.
I like using heavier resins because the strength is unbelievable, but I had an issue with sagging when I did my stormtrooper helmet, even with internal supports and working from the bottom up. To combat this, all of my peps were coated with high build filler primer (wet-sandable auto body primer works too) in light, incremental layers about 10 minutes apart. This helped seal up pin holes and gave the parts much more rigidity for the resin stage. An added plus, high build filler primers are very porous, and will absorb resin when it's applied.

I'll update with more sometime next week.
I've seen about a million and a half pep wip threads, and there's nothing wrong with that, I just don't want to dwell on this step too long. This was actually my second time pepping the H4 armor, I lost a lot of the first one to a layer of Polyester Laminating Resin (big mistake, for a number of reasons, avoid that poisonous crap like the plague)
I did notice that the chest piece came out a bit small, but I'm not very big so I'll try bulking it out with expanding foam in the front after the resin stage rather than re-pepping it.
We use a lot of different epoxy resins up at the shop, but I'd recommend ones used for hand layups and such rather than infusion resins. (Fast or semi-fast hardener)
They have a honey consistency and don't really need much work after they're cured, just a quick wipe-off between layers. Plus, some are odorless. (still, wear a vapor rated respirator if you do this a lot, nerve damage is no joke) Laminating resins usually have a wax or amine mixed in that rises to the surface of the part, because it cannot cure in the presence of oxygen. This has to be scrubbed off between layers and will destroy your peps for fun. Plus it smells like napalm and takes a few days to cure and out-gas.
I like using heavier resins because the strength is unbelievable, but I had an issue with sagging when I did my stormtrooper helmet, even with internal supports and working from the bottom up. To combat this, all of my peps were coated with high build filler primer (wet-sandable auto body primer works too) in light, incremental layers about 10 minutes apart. This helped seal up pin holes and gave the parts much more rigidity for the resin stage. An added plus, high build filler primers are very porous, and will absorb resin when it's applied.
I'll update with more sometime next week.