So, long story short. It's my buddy's birthday and I couldn't think of what to get him for a gift, so I figured I'd build something simple, and the activation index from halo ce(a) came to mind. It was quite straightforward to make, involving 3 layers of ~1/4"? Foam, and small details added using thin foam sheets. I'm not sure the exact dimensions on the stuff, but I buy it from michael'ls craft stores.
So for starters, I needed a basic template. So I referenced a few screenshots online to get an idea for scale ad then went to town on a piece of cereal box.

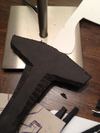
Next, I traced the main shape onto the thicker craft foam, cut out three pieces, and hot glued them together.

Then I needed to bevel a number of the edges, using a ballpoint pen to lightly mark the bevels before I cut them using a sawing motion with my utility knife. Unfortunately this leaves the edges rather rough, but I'll get to that next.

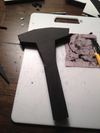
Now I used sandpaper (I believe 100 grit) to smooth out the rough cuts. Surprisingly, it worked extremely well. Now it still isn't as crisp or smooth as if I had pep'd and bondo'd it, but it also took a fraction of the time.

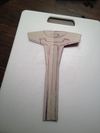
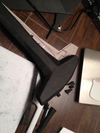
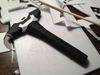
The last step to assembling it was to cut details out of the thin foam, glue them on, then score the final details by pressing moderately into the foam with a ballpoint pen.

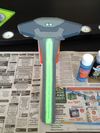
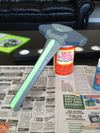
Now I have sealed it with mod podge and it is currently drying and awaiting paint. I will be finishing it off tonight, and will add more pictures then. Enjoy!
So for starters, I needed a basic template. So I referenced a few screenshots online to get an idea for scale ad then went to town on a piece of cereal box.
Next, I traced the main shape onto the thicker craft foam, cut out three pieces, and hot glued them together.
Then I needed to bevel a number of the edges, using a ballpoint pen to lightly mark the bevels before I cut them using a sawing motion with my utility knife. Unfortunately this leaves the edges rather rough, but I'll get to that next.
Now I used sandpaper (I believe 100 grit) to smooth out the rough cuts. Surprisingly, it worked extremely well. Now it still isn't as crisp or smooth as if I had pep'd and bondo'd it, but it also took a fraction of the time.
The last step to assembling it was to cut details out of the thin foam, glue them on, then score the final details by pressing moderately into the foam with a ballpoint pen.
Now I have sealed it with mod podge and it is currently drying and awaiting paint. I will be finishing it off tonight, and will add more pictures then. Enjoy!
Attachments
-
 2380E228-6000-413C-B4F3-18359E7829EE-4563-00000330CB07E377_zps285109aa.jpg83.1 KB · Views: 217
 -
 2949D690-E65A-411F-95E4-2AA063192B66-4563-00000330D8789BC8_zpsea035075.jpg97.5 KB · Views: 171
 -
 06752A24-D13E-4D2C-BDC9-5566633BF775-4563-00000330E75A30A3_zps06517e79.jpg76 KB · Views: 153
 -
 21C0543E-4FEC-485C-B6C3-ECA6699B8EA7-4563-00000330F1E64018_zpsda7e87ba.jpg76.5 KB · Views: 146
 -
 388DD1CB-EE62-42F4-81C8-34CF3BF2F843-4563-00000331016E8857_zps4f74ad43.jpg88 KB · Views: 158
") Will be good to see it painted
Will be good to see it painted