NOTE: This is a tutorial on two different methods of hardening foam that I use. It will be separated by two posts due to character limits per post. I will attach photos to the first process once I have them in order.
I have been working with EVA and craft foam for a while now, and have a pretty good hang of it. One thing I had a real hard time with in the past was getting the characteristics of plastic and/or metal like surface that foam seems to avoid with every fiber (or perhaps cell) of it's existence. I have experimented with many different approaches to getting that surface while at the same time, "hardening" my foam. But, sometimes that plastic/metal surface is what you want, but hardening is not.
For these two separate applications, I have found two methods that give the high amount of performance required without causing damage to the foam. I will give my knowledge of both.
Hardened, Non-Flexible surface:
The first was by doing some research and finding that a lot of people use PVA glue followed by Plasti-dip or straight to paint (either epoxy or acrylic based). The downside to this style is that the item is not flexible after this process has been done. Basically, the PVA will crack and separate from the foam. For items like weapons or helmets (things that are not meant to articulate or come under stress of bending), this is a perfect solution.
But how do you get that beautifully smooth surface? Up until today, this was my biggest hurdle. Sanding PVA (even the "sand-able" professional grade carpenter's wood glue) is not an easy task and always gave me less than desirable results, as well as the possibility of penetrating the glue and scuffing the surface of the EVA. This, as we all know, is a total pain to rectify. I had previously tried 220 wet/dry sandpaper with little success. Most of what happened was either my sandpaper got all gummed up, the wood glue would "ball" up, or it just straight up took FOREVER to tediously and meticulously take off the slightest amount of glue. I had even gone so far as try to wet sand it. All that happened was the wood glue would reconstitute and become a massively gooey mess. Also, getting into corners, edges, recesses, etc. was next to impossible. Then, it hit me. The answer was right in front of me the whole stinkin' time!
EVA FOAM is the ANSWER! It can be cut to any size or shape you require, and will conform to the shape of just about anything you need it to. Here are the steps I take.
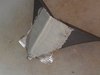
* "Paint" on your EVA glue (nice and heavy, no need to scrimp). DO NOT USE WATERPROOF GLUE if you are going to use these steps! Personally, I go back and forth on diluting it with water depending on the thickness I need or if I know I will need multiple coats. If I do need several coats, I usually start with non-diluted first, then build it up with diluted ones after that. Don't worry about the areas that seem to repel the glue, as we will address that next. (Side note: As soon as I get down to my hobby shop, I am going to pick up a can of spray on Tacky glue to see if "dusting" the item with that first will alleviate that from happening... I will post results after I have done that). To minimalize work down the road, try to only work with level surfaces. This is not mandatory, but it really does help.
* For the areas that repelled the glue, you should have glue surrounding that area. A second or possibly third coat of glue can be pooled into that area.
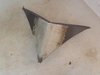
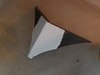
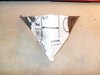
* Once the glue has dried, you will notice that there will be many imperfections in the surface. This is where spare pieces of EVA come into play. Cut pieces in shapes on an as needed basis. I usually start off with a 2"x3" rectangle for larger flat surfaces, but you may need another size. There is no standard to this part. Grab a shallow container with a bit of water in it. Using the EVA foam as a sort of sanding block, dip it in the water and get a few drops to stick to it, then "sand" the glued surface you wish to level/shape. It should, almost instantly, start to reconstitute the glue. Hint: Less is more. Use very little amounts of water and do small parts at a time. Keep any run-off contained with a no-nap cloth immediately. It will be very slimy to start and should start thickening up fairly quickly. In between this time is your working time. The best part is, if it gets too gummy before you have completed your task, just add a couple of drops of water again! This process has allowed me to level a surface in a couple of minutes that normally would have taken me hours with sanding... and the results were FAR better.
* After you have leveled and shaped your glued surface, and let it completely dry, you are ready for either Plasti-dip or directly to paint. If you do go to a brush-on acrylic based paint, be aware that you mustn't work the paint too much on the surface or you run the risk of reconstituting the glue again!
I have been working with EVA and craft foam for a while now, and have a pretty good hang of it. One thing I had a real hard time with in the past was getting the characteristics of plastic and/or metal like surface that foam seems to avoid with every fiber (or perhaps cell) of it's existence. I have experimented with many different approaches to getting that surface while at the same time, "hardening" my foam. But, sometimes that plastic/metal surface is what you want, but hardening is not.
For these two separate applications, I have found two methods that give the high amount of performance required without causing damage to the foam. I will give my knowledge of both.
Hardened, Non-Flexible surface:
The first was by doing some research and finding that a lot of people use PVA glue followed by Plasti-dip or straight to paint (either epoxy or acrylic based). The downside to this style is that the item is not flexible after this process has been done. Basically, the PVA will crack and separate from the foam. For items like weapons or helmets (things that are not meant to articulate or come under stress of bending), this is a perfect solution.
But how do you get that beautifully smooth surface? Up until today, this was my biggest hurdle. Sanding PVA (even the "sand-able" professional grade carpenter's wood glue) is not an easy task and always gave me less than desirable results, as well as the possibility of penetrating the glue and scuffing the surface of the EVA. This, as we all know, is a total pain to rectify. I had previously tried 220 wet/dry sandpaper with little success. Most of what happened was either my sandpaper got all gummed up, the wood glue would "ball" up, or it just straight up took FOREVER to tediously and meticulously take off the slightest amount of glue. I had even gone so far as try to wet sand it. All that happened was the wood glue would reconstitute and become a massively gooey mess. Also, getting into corners, edges, recesses, etc. was next to impossible. Then, it hit me. The answer was right in front of me the whole stinkin' time!
EVA FOAM is the ANSWER! It can be cut to any size or shape you require, and will conform to the shape of just about anything you need it to. Here are the steps I take.
* "Paint" on your EVA glue (nice and heavy, no need to scrimp). DO NOT USE WATERPROOF GLUE if you are going to use these steps! Personally, I go back and forth on diluting it with water depending on the thickness I need or if I know I will need multiple coats. If I do need several coats, I usually start with non-diluted first, then build it up with diluted ones after that. Don't worry about the areas that seem to repel the glue, as we will address that next. (Side note: As soon as I get down to my hobby shop, I am going to pick up a can of spray on Tacky glue to see if "dusting" the item with that first will alleviate that from happening... I will post results after I have done that). To minimalize work down the road, try to only work with level surfaces. This is not mandatory, but it really does help.
* For the areas that repelled the glue, you should have glue surrounding that area. A second or possibly third coat of glue can be pooled into that area.
* Once the glue has dried, you will notice that there will be many imperfections in the surface. This is where spare pieces of EVA come into play. Cut pieces in shapes on an as needed basis. I usually start off with a 2"x3" rectangle for larger flat surfaces, but you may need another size. There is no standard to this part. Grab a shallow container with a bit of water in it. Using the EVA foam as a sort of sanding block, dip it in the water and get a few drops to stick to it, then "sand" the glued surface you wish to level/shape. It should, almost instantly, start to reconstitute the glue. Hint: Less is more. Use very little amounts of water and do small parts at a time. Keep any run-off contained with a no-nap cloth immediately. It will be very slimy to start and should start thickening up fairly quickly. In between this time is your working time. The best part is, if it gets too gummy before you have completed your task, just add a couple of drops of water again! This process has allowed me to level a surface in a couple of minutes that normally would have taken me hours with sanding... and the results were FAR better.
* After you have leveled and shaped your glued surface, and let it completely dry, you are ready for either Plasti-dip or directly to paint. If you do go to a brush-on acrylic based paint, be aware that you mustn't work the paint too much on the surface or you run the risk of reconstituting the glue again!
")