[HELP] - Creating a Cosplay Tonfa/Sword: Strider Hiryu Cypher

Status
Not open for further replies.

KoKuTanLuFi

New Member
Good Morning 405th,

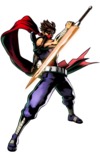
I come to you with a question on prop design. I actually am hoping to get some advice as to how I can go about creating a weapon belonging to Strider Hiryu (Capcom Fame: Ultimate Marvel vs Capcom 3, Strider etc...) I was hoping to get some direction as to which method maybe some of you would use to create this weapon. I have worked with Pepakura before to create a Halo Recon helm out of cardstock but the helm got damaged before I could move on to the next steps so I have not worked with pepakura since.

For this, I was thinking I could use either card stock, EVA foam, or cardboard and layer it... use PVC pipe for the handles and then add bondo? Then sand and paint... I think that would work if I have the right idea.

I was hoping someone could refrence some videos or give me some tips as to how I can do this, I don't feel that the design is complicated enough to warrent asking someone to do a pepakura model or something... It's basiclly a triangle on two handles right?

I have included some images below.


Strider.png


http://photo.cosplay.com/163172/3309603.jpg

http://photo.cosplay.com/163172/3309601.jpg
 

Attachments

  • Strider.png
    Strider.png
    163.5 KB · Views: 2,719
The overall shape of the weapon looks pretty simple. You could go the route you mentioned, but I think you will have to consider the strength of the finished product vs. how long you plan to keep it/how often you plan to take it out.

I think you might be able to use sheet styrene to create the base shape, and then fill in the gaps with body filler/epoxy putty. This would give you a more rigid prop. You wouldn't need really thick styrene to give the part strength if you had the PVC pipe running through the length of the prop with some expanding foam in the interior to fill in the empty space (space between the PVC pipe and the outer styrene sheets). That should give you a strong prop that will last a good while. I can't comment on how much it will weigh, but the less body filler you use the better. That stuff can easily weigh down your prop.
 
You shouldn't bump posts, this isn't that kind of forum. We're not ignoring you, it's just a slow traffic place especially during work hours.

For weapons... It depends on cost and strength really. A good build could be mold cast but it would be very expensive. Going with dowels/pipe and foam would be cheap but not look great and be prone to breaking/cracking.

A common method would be to cut out wood or cardboard in the appropriate shape and glue them together stacked up to make the weapon, then bondo to smooth it. It looks great and is fairly strong, but is heavy as heck. They have free software out there to break a 3d model (you'd design it) into slices so they can be cut out of cardboard/wood.. there are a lot of "sliced" builds on this forum for that.
 
Before I type any advise, I want to state that I have no experience with this type of prop.

Being that you're going to be carrying this around, the material that you need to make it out of needs to be fairly light and still be able to hold up. The only material that I know of that can do that and is also fairly cheap is insulation Styrofoam. You can get it from places like Home Dept if you live in the U.S.. For the hilt you can just use some PVC pipe.
 
Personally, I would shape it using polystyrene foam (like mentioned above), and then coat it with a 50/50 mix of carpenters wood glue and water. Four coats of that should seal it nicely for the next stage. Then I would epoxy and fiberglass cloth (woven) for the final layer. Sand and wet sand to perfection then paint. This would be extremely strong, super light, and would look awesome if you took your time with it.
 
Hello all, I was hoping for some more feedback. I have started and I have used EVA foam and have hot glued everything together. Using PVC pipe for a skeleton, but there are some gaps here and there... Would those gaps be enough to cause me problems later? I was thinking of trying to cover the blade in something then sand with a dremel to get the details I want, because right now many of the EVA foam layers look uneven.

I didn't have a good hot knife to use, so I just used an exacto blade.

1525476_10202228167200180_572770977_n.jpg

1557606_10202228166880172_821829626_n.jpg
 
Hello all, I was hoping for some more feedback. I have started and I have used EVA foam and have hot glued everything together. Using PVC pipe for a skeleton, but there are some gaps here and there... Would those gaps be enough to cause me problems later? I was thinking of trying to cover the blade in something then sand with a dremel to get the details I want, because right now many of the EVA foam layers look uneven.

I didn't have a good hot knife to use, so I just used an exacto blade.

You could always do some more trimming and then lay thin craft foam over the layers to make them more even. If you want to create a hard outer shell for this part I would suggest using a method like this.


Actually I think this would be better for what you're doing.... Instead of using EVA foam try using XPS Foam (Insulation Foam Board). You could easily cut and shape it. To create a hard outer shell you would only need to seal it with this (min. 3 coats), and then you could prime it (to make sure it is sealed properly). Next you would coat it with a polyester resin to give it a hard outer shell. Then you could sand it smooth.

You could also just paint it after it's primed if aren't looking for a lot of durability. Since you will be able to spray primer over the Kilz2 you can do a little bit of sanding, and you wont be limited to the types of paints you could use.

You could also skip the sealing stage and skip straight to using something like this if you didn't mind spending more money.

I hope this information is some help.


This is awesome! How long do you think this whole process should take? Using your method? Do you or anyone else have any sugguestions for my current build? If the insulating foam is easier to shape ill pick that up after work and work on an additonal build. I have a week to complete this but this is my first time working with these things.

Also is there any other tips for cutting eva foam better? Or is it all about the layering (smaller and larger layers) then sanding later? Also is hot glue good for combining pieces?

If you use the XPS you could easily cut the two halves out and seal them with the Kilz2 in one day. Then you could primer it the next day, and coat it with the polyester resin (if temperatures are good enough).

The only two tips I could give would be make sure your Xacto blade is sharp, and take your time. That's if you don't plan to use a hot knife to cut things out in the future. I haven't done much work with EVA foam (because I'm not that good with it) so my advice is limited.


Back, so I swapped the eva foam for the XPS foam... Its much easier to shape/cut/sand. But now I have a few new issues..... I got some contact cement to glue the pieces together, and it totally eats away at the foam and it melts... I have to use it in such small amounts it hardly sticks together... I got some spray glue that kind of holds everything, but again I still have gaps between some of the connecting pieces.

What can I use to fill those gaps?

See I had envisioned everything going like... creating the actual shape of the sword using eva or xps foam... then covering it in something (which also fills gaps) then shaping... priming and painting. Im getting a little worried cause I'm not sure where to go from here.

So ATM my main question is, what can I use to fill the gaps between connecting pieces?


Here are some images.... these gaps are larger now since Im using less xps then I did eva, and the PVC pipe is kinda large...

11703711206_05f9398df0_c.jpg

11702964895_2d67906325_b.jpg

11702957065_ed774988f0_c.jpg


Does the KILZ2 fill gaps? Should I just coat the thing in Epoxy Resin?
 

Attachments

  • 11703711206_05f9398df0_c.jpg
    11703711206_05f9398df0_c.jpg
    2.6 KB · Views: 177
  • 11702964895_2d67906325_b.jpg
    11702964895_2d67906325_b.jpg
    3.3 KB · Views: 219
  • 11702957065_ed774988f0_c.jpg
    11702957065_ed774988f0_c.jpg
    2.6 KB · Views: 194
About to get started today with coating and priming...

About to get started today with a few other steps, I am still unclear as to what I could use to fill gaps like in the photos above, but I have decided to try and coat and fill gaps with PVA Glue (wood glue) then ill try to coat and seal with the KILZ2. Then coat in epoxy or fiberglass resin.

Any last tips or suggestions would be great, I feel that I might have done better by stacking the eva or xps together and gluing them, then cutting it all together becuase many of the pieces don't line up together...

Thanks for the already posted suggestions and any future ones.
 
I could be wrong here, and someone please correct me if that is the case, but I think you have the wrong kind of insulation foam. I think the kind the others were referring to was the stuff that is usually pink or blue. The reason why is because as you notice with yours, it comes off in balls of white foamy chunks, whereas the other foam is much more dense, so the cells are tightly bound, and when cut with a brand new razor, slices beautifully. It will retain it's shape better, and will leave you with far less gaps to fill (if any). I believe it is also sand-able if you use a finer sandpaper and take your time. I honestly don't know too much about it for building crafts, as I primarily use EVA foam, craft foam, and also pepakura with cardstock.

If I am correct, I apologize for being the bearer of bad news, but if so, I like to look at it as a helpful learning experience. Trust me when I say I have circle filed (trashed) many projects that just didn't go the way I had envisioned.
 
I have never been in this department, but I know and have seen people use Extruded Polystyrene. Not expanded, Extruded. Like EVAkura said, it's dense and easier to cut and is cleaner. Hope this helps!
 
The pink insulation foam is what you're looking for here. I DO NOT have a lot of experience in armor construction and whatnot yet (just recently became interested, hence why I joined!), but I have quite a bit of experience working in theatre. We use a number of different types of foam for props, set pieces, you name it. The pink stuff (forgive, I really don't know the proper name) is pretty easy to cut and work with. A sheet of it by itself is incredibly fragile, but stacked it can hold up against a lot (a billion actors backstage, for example).

Keep us posted on how it works with the white foam- I've used that for things in the past too (in working in theatre we've used anything and EVERYTHING to construct props). If you haven't already filled in the gaps- I almost want to recommend bathroom mastic. That's a really big stretch- and it's not flexible or anything enough for armour or costumes, but since this is a sword it might give you more "fill" than glue would.
 
Ok, I have a few builds, but the more I work on these the more I feel like the way I went about it was wrong...

I felt okay doing this step,

11780369076_fef830bf17_b.jpg


But now I feel that i have a bunch of stacks that will be difficult to sand without breaking the overall piece...
11780026794_9fd19008c4_b.jpg


Would it be better to try and harden these with some kind of epoxy or something, then sand them into shape? Or try to work with them first then strengthen and prime and paint?

I was trying to find a hot wire cutting tool to help do the edges but I didn't find one. I have till friday now to finish lmao.
 

Attachments

  • 11780369076_fef830bf17_b.jpg
    11780369076_fef830bf17_b.jpg
    3.3 KB · Views: 191
  • 11780026794_9fd19008c4_b.jpg
    11780026794_9fd19008c4_b.jpg
    3.3 KB · Views: 207
At this point, I would suggest a few of those disposable snap-blades (remember, razor sharp blade will make a world of difference, and they seem to dull quick). Cut your angles, and finish perfecting with sandpaper. Do not use a rotary or vibration power tool, but a belt sander used very carefully with finer grit belt may help speed things up and give you that level finish you need. If you go this route, be sure the sword is secured to a table or something as you will need to control one item (either the sander or the sword) and not both. I have in the past, felt I had a lot more control when I took the belt sander and secured it upside down and worked the piece I was sanding with my hands. Either way, BE SAFE! After you have it in the shape you desire, then you can go to work with hardening it with PVA Glue. Be sure whatever you use is WATER based. Chemical based hardening mediums have an extremely high probability of eating into the material. Then you can sand the glue after it dries, to a nice and hard outside, then either paint directly onto that, use epoxy and fiberglass if you want to go the extra mile, or just plasti-dip. Past that point, paint.
 
Awesome, well I have been sanding for a while, by hand... I have an orbital sander but it won't sand this thing at all... but I wanted to ask what could be good for filling areas where foam has deteriorated or fallen off due to oversanding?

I have one good piece (the XPS foam, the purple one without the marker lines on it) but a piece near the handle has fallen off... ALSO can I use WoodGlue for the PVA coating? I used some wood glue on that yellow piece in the middle. I need to get some more glue to coat everything cause I'm all out...

11791761686_11d49041fe_b.jpg
 

Attachments

  • 11791761686_11d49041fe_b.jpg
    11791761686_11d49041fe_b.jpg
    3.3 KB · Views: 192
Status
Not open for further replies.
Back
Top