Nice! I'm kind of mad I've made the gauntlets your using for your wife's armor and they just come out odd when I'm done :/
You are using an out of date browser. It may not display this or other websites correctly.
You should upgrade or use an alternative browser.
You should upgrade or use an alternative browser.
His & Hers ODST WIP (pic heavy)
- Thread starter Jason 078
- Start date
- Status
- Not open for further replies.
PolyEngineer
New Member
Solid pep work! I see Forward Unto Dawn playing in the back as well. Think my fiancé is about ready to shoot me for netflixing that about ten times too many. Can't wait for the Halo 5 live action film to come out! Keep up the great work!
Same here, on both counts. Well, all three counts since there will be two series coming.Solid pep work! I see Forward Unto Dawn playing in the back as well. Think my fiancé is about ready to shoot me for netflixing that about ten times too many. Can't wait for the Halo 5 live action film to come out! Keep up the great work!
However, I would like to do something strange and actually post an update!!!
It’s been a while since I’ve picked up any costuming part, so I decided to start with something simple: The buckle. That turned out worse than a news crew filming an intersection during a crash between a bus of nuns and a clown car. It was horrific, but kinda makes you chuckle.
With that mental image in your head, I’m taking a different path. I have a lovely cutting printer, a wonderful 12×24 inch cutting pad, and a ream of 11×17 paper. So, I’ll make the buckles sliced!
Tomorrow, I’ll cut them all out, glue them together, and sand them a little smooth. When it comes time for me to start resining, I’ll soak them through, primer, paint, weather, and boom. Wonderful buckles. I’m thinking of using the same idea for an ultra-high detail magnum that I’ll give to a friend to cast.
I’m using two different types of buckles. The one on top is what the prototype action figure has. The bottom is the version seen in the high-detail graphics from the video game. I took a slight liberty with some of the details, but they are as accurate as I could see.
The top, mine, is made to fit a 1¼” strap. Hers is designed for a 1” strap. The reason is that she is very, very small. Well, at least when compared to me. Just wait, you’ll see.
Each page will ultimately become one full buckle. Four print jobs for each and I’m set. Also, because I drafted this out, I can adjust the sizes of either to accommodate future builds (or even orders), but that will come later.
The action figure buckle will end up being about 7mm thick, with the smaller being about 6mm. Each layer from the first picture will be 2mm thick (with the largest of the action figure being 3mm). Each page is roughly 0.21mm, but I rounded to .25 to accommodate glue between, resin soaked/covered, and paint.
I’ll start by doing one of each and post some pictures tomorrow morning when they’re done.
Attachments


King of Gondor12
Member
Looks great mate, can't wait to see it completed. Love ODST builds, they leave so much to the imagination.
That has been one heck of a year. It really drives the phrase “sometimes you’re the hammer, sometimes you’re the nail” home. However, now things are calming down in my life and business. Through the other projects that I am being paid to do, I am also finally putting together my Armor. I’ll be focusing primarily on mine first rather than both mine and my wife’s together.
I’m still using the same Spartan-II pre-MJOLNIR heavy ODST armor. I’ll be using the Hugh Holder files and will be making it similar to the action figure (which I finally own). It will still have the orange-gold visor, white detail stripes, my Spartan Tag, and other identifying marks on the armor as before. The colors will also be accurate to the action figure.
After doing some builds for my business, I’ve changed my process slightly. The pep is built like normal with gel control superglue sticking the tabs together (I have a thing about the heat, and glue guns are heat). However, things will be changed a little when it comes to the hardening.
The first hardener will be a layer of EpoxAmite® 100 Laminating Epoxy on the outside with the URE-FIL® 11 Filler so I can brush it on. After it cures, I’ll add a second layer to the outside and call that good. From there, I’ll be using the Smooth-Cast® 321 Series Liquid Plastic in three layers on the inside rather than Rondo. I’ll be using the EpoxAmite 101 to harden the fiberglass, which will be carbon fiber/Kevlar cloth rather than fiberglass for the increased strength and lower weight. Instead of Bondo on the outside, I plan to use Plasti-Paste® II Trowelable Plastic for the smoothing and details.
I’ll be tackling this build from the bottom up and inside out. So, that is why I now own a pair of military black jungle boots with a panama sole. Why is this important? Well, take a look at the below picture and you tell me that they aren’t the most accurate style.
Pics of the boot armor will be arriving soon!
Captain Anders
New Member
That looks awesome. I got a question. I am gonna buy an Evike M5r when it comes out, and I would like to have a set of ODST armor to go with it. Could I by chance commission your talents to assemble a full set?
Responded in PM.That looks awesome. I got a question. I am gonna buy an Evike M5r when it comes out, and I would like to have a set of ODST armor to go with it. Could I by chance commission your talents to assemble a full set?
The boots are in and they smell like a CIIF. For those of you who don't know what that is, it's the first part of the Army that every recruit sees. It stands for Clothing Initial Issue Facility. That's where you get all of your uniforms. Anyways, I opened the package and had a flashback to my first day of Basic. Oh, the memories. My only problem is that the top of the boot isn't padded. But, they look great otherwise!
Next post will include WIP Pictures!
Next post will include WIP Pictures!
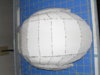
Well, here we are so far. I've been a productive little bunny this Easter. Between Deadpool the Game and this helmet, my weekend has been relaxing. Unfortunately, I was only able to finish Deadpool the Game, but I got a chunk of the helmet done; 39% to be specific (13/33 pages).
This is Hugh Holder's ODST helmet file so it is some assembly required after pep. As you can see, I'm assembling the pieces when I'm finished building them. Oh, and it only looks lopsided because I have the right temple on it and not the left. What do you think?


This is Hugh Holder's ODST helmet file so it is some assembly required after pep. As you can see, I'm assembling the pieces when I'm finished building them. Oh, and it only looks lopsided because I have the right temple on it and not the left. What do you think?
Helmet Day 2. Total Time: ~12 hours
The lid is only clamped on because there needs to be more on the base before I can actually glue it down. It's a little off because of the way I unfolded it, but I already have a re-unfold for v2.0 where I am changing things that are problematic. So far, though, it is nothing that can't be handled with a little love (i.e. bondo and sandpaper). Among other things, I am planning my second build to be from the top of the dome down rather than from the chin up.


The lid is only clamped on because there needs to be more on the base before I can actually glue it down. It's a little off because of the way I unfolded it, but I already have a re-unfold for v2.0 where I am changing things that are problematic. So far, though, it is nothing that can't be handled with a little love (i.e. bondo and sandpaper). Among other things, I am planning my second build to be from the top of the dome down rather than from the chin up.
Attachments
nice pep work man, keep it up!
-Ian
-Ian
The ODST helmet is coming along nicely. Are we going to be seeing the boots soon? They would be interesting to see.
Thank you. It comes from my OCD...nice pep work man, keep it up!-Ian
Boots will be coming soon. I just wanted to get the bucket out of the way since it's the first thing anyone really sees. Which reminds me...The ODST helmet is coming along nicely. Are we going to be seeing the boots soon? They would be interesting to see.
The shot with my grape in the bucket will come later this evening when my regular camera person is present. I tried five selfies in the mirror, but the closest I came to it was a naval shot... I can't selfie.
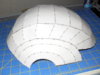
Yes, there's a hole in the base. It will be covered when I slush the inside of the helmet (after hardening). It needs a little work with bondo to even it out, but otherwise it's not too bad. What do you think?


----------
URGH!!!
So, I just tried it on now that it is complete. It fits completely perfectly, almost as if it were made for me. But, that's the problem. If I harden it and slush it, I won't have any room. It's currently 300×251×330 mm (aka 11.8×9.8×12.9 in), I'm thinking it would look better if it was 325×272×357 mm (aka 12.7×10.7×14.0 in). Though, because I also plan to add in fans and padding, I should probably go up to 350×294×386 mm (aka 13.7×11.6×15.1 in). What do you think?


I don't understand pepakura sometimes. My pepakura models are a little bit disfigured or don't turn out right. It's difficult to do props because you need to close off the empty space on the inside. And then there's people like you that do it amazingly. Why? Is it the cardstock? Is it the Glue? What's your secret?
Re: His & Hers ODST WIP (pic heavy)
It's a cross between obsessive-compulsive disorder and being extremely detail oriented, both things taught to me in the military. I'll be writing up a series of .pdf files detailing how I do things, but for the unfolding and assembly, I'll give you the cliff notes.
I unfold my models at 175, making sure the minor folds are separates. I assemble it at 160, so it doesn’t have all the ridges from over-folding along areas that should be smooth to begin with. I also remove some of the smallest tabs to make sure things aren’t overly complicated. I also stagger the tabs so they interlock as I’m putting things together (unless the piece is too thin, then I make it one-sided).
I score the lines with the wrong side of an exacto knife and pre-bend the pieces. I use gel control super glue and only put a small dot of glue on each tab, sometimes two or three on wider tabs. I only glue down one or two at a time before moving on. I don’t work as fast as some people because I have huge sausage-like fingers.
Also, if at first you don’t succeed, try again. I’m going through my next helmet and separating some pieces, connecting others, and hopefully doing it a little better. Oh, which reminds me, start on the hard and move to the easy (i.e. go from the fact back) on solid models.
I don't understand pepakura sometimes. My pepakura models are a little bit disfigured or don't turn out right. It's difficult to do props because you need to close off the empty space on the inside. And then there's people like you that do it amazingly. Why? Is it the cardstock? Is it the Glue? What's your secret?
It's a cross between obsessive-compulsive disorder and being extremely detail oriented, both things taught to me in the military. I'll be writing up a series of .pdf files detailing how I do things, but for the unfolding and assembly, I'll give you the cliff notes.
I unfold my models at 175, making sure the minor folds are separates. I assemble it at 160, so it doesn’t have all the ridges from over-folding along areas that should be smooth to begin with. I also remove some of the smallest tabs to make sure things aren’t overly complicated. I also stagger the tabs so they interlock as I’m putting things together (unless the piece is too thin, then I make it one-sided).
I score the lines with the wrong side of an exacto knife and pre-bend the pieces. I use gel control super glue and only put a small dot of glue on each tab, sometimes two or three on wider tabs. I only glue down one or two at a time before moving on. I don’t work as fast as some people because I have huge sausage-like fingers.
Also, if at first you don’t succeed, try again. I’m going through my next helmet and separating some pieces, connecting others, and hopefully doing it a little better. Oh, which reminds me, start on the hard and move to the easy (i.e. go from the fact back) on solid models.
I watched the other two commentaries on FUD and a couple of episodes of M*A*S*H. In that, I finished one boot. Well, almost. There is a small issue. First, as is typical for my normal build, it's too small. Second, I unfolded it the wrong way.
Looking back over my measurements, I made it the exact width of my boots sole. I saw width, because the Hugh Holder files use width rather than length for the primary measurement. I didn’t add the typical 1” to the measurement before converting it to metric. I wanted to show a shot of it over the boot, but it kept popping off and threatened to tear if I tried to push it all the way down. I’ll redo it, for this reason and…
I made it long-way in the toe which causes it to scrunch. Scrunching, in this case, means it wants to be thinner than normal, which isn’t very good for something that’s already too small. I’ll just re-unfold the toe into wide pieces rather than long pieces.
However, here’s what I’ve got…

- Status
- Not open for further replies.