OJ102
Member
Hi there
I'm working my way through the pitfalls of pepakura and have come to a situation that has stalled my creativity, detailing in the foam!
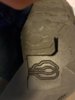
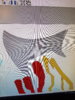
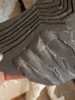
I'm trying to love my work but it's just so untidy and I cant see how its mean to be done! The first image is the template and it shows the indentation in white. I decided that the best approach was to cut it out as a whole and then cut the indents out of it and offset them into the foam 50% thickness. I dont like the result as the second image shows...
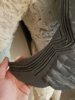
The details are fine and the look scruffy. How would some of you who actually know what your doing deal with this?
I cant see how to get around this.. on test foam I even tried a soldering iron to melt the details in, which did look better but the foam finish was really bad and I've seen some amazing finishes with foam that can be done!
It would be nice of pepakura had an exploration function that let you rotate and zoom in on Parts from different perspectives, half the time I cant even get up close to what I'm building..
Any help would be great as I cant continue with this version as I'm just not happy with its quality... scale is about right tho
I'm working my way through the pitfalls of pepakura and have come to a situation that has stalled my creativity, detailing in the foam!
I'm trying to love my work but it's just so untidy and I cant see how its mean to be done! The first image is the template and it shows the indentation in white. I decided that the best approach was to cut it out as a whole and then cut the indents out of it and offset them into the foam 50% thickness. I dont like the result as the second image shows...
The details are fine and the look scruffy. How would some of you who actually know what your doing deal with this?
I cant see how to get around this.. on test foam I even tried a soldering iron to melt the details in, which did look better but the foam finish was really bad and I've seen some amazing finishes with foam that can be done!
It would be nice of pepakura had an exploration function that let you rotate and zoom in on Parts from different perspectives, half the time I cant even get up close to what I'm building..
Any help would be great as I cant continue with this version as I'm just not happy with its quality... scale is about right tho
")